Making hard boiled eggs seems simple, right? But achieving truly perfect hard boiled eggs, the kind that peel effortlessly and boast creamy, vibrant yellow yolks, can be trickier than you think. Many of us have faced the frustration of shells stubbornly clinging to the whites, or yolks that are dry and chalky with a greenish tinge. But don’t worry, those days are over!
This guide will show you the foolproof method for making hard boiled eggs that are perfect every single time. Whether you’re preparing for Easter egg dyeing, making deviled eggs for a party, or simply want a healthy and convenient snack, mastering this technique will become your go-to kitchen skill. Say goodbye to disappointing eggs and hello to hard boiled perfection!
The Secret to Easy Peel Hard Boiled Eggs
The key to achieving easy-to-peel eggs and avoiding that dreaded green yolk lies in a few simple but crucial steps. It’s not just about boiling; it’s about the entire process, from start to finish. This method focuses on gentle cooking and a rapid cool down to prevent overcooking and ensure the egg white and shell separate cleanly.
Step-by-Step Guide to Perfect Hard Boiled Eggs
Follow these easy steps for consistently perfect hard boiled eggs:
Step 1: Gently Place Eggs in Pot and Cover with Cold Water
Start by placing your eggs in a saucepan. Arrange them in a single layer to ensure even cooking. Then, cover the eggs completely with cold water, making sure the water level is about one inch above the eggs. Starting with cold water is important as it allows the eggs to heat up gradually, preventing them from cracking due to sudden temperature changes.
Step 2: Bring to a Boil, Then Turn Off Heat and Let Sit
Place the pot over high heat and bring the water to a rolling boil. Once the water is boiling vigorously, immediately turn off the heat and cover the pot with a lid. This is where the magic happens! Let the eggs sit in the hot water for a specific amount of time, depending on your desired yolk consistency.
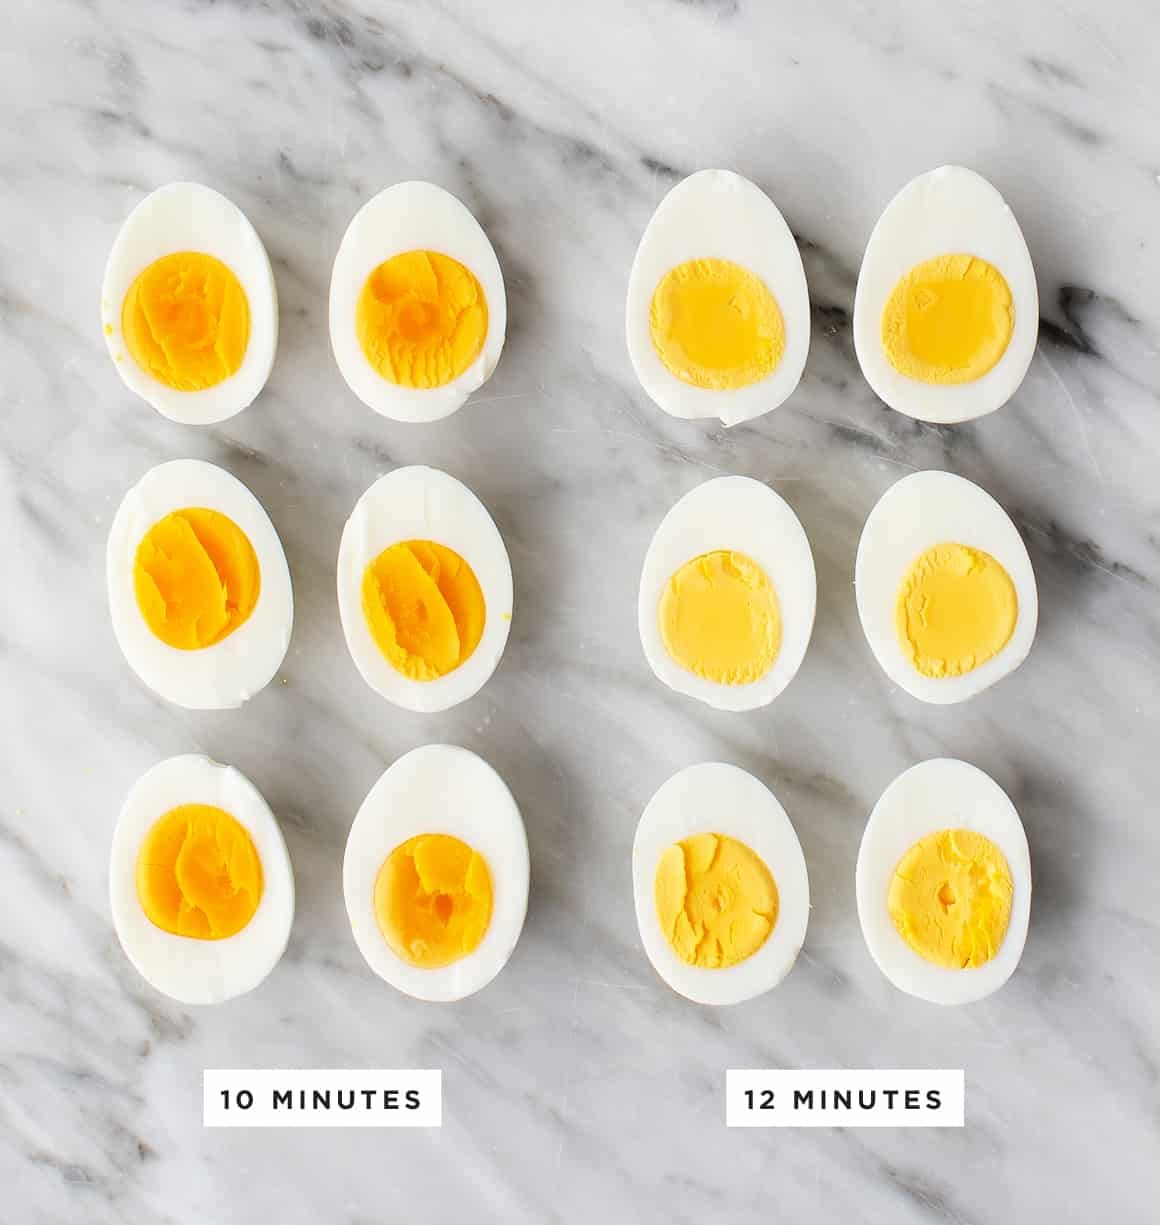
- For creamy, vibrant yellow yolks: Set a timer for 10 minutes.
- For firmer, opaque yolks: Set a timer for 12 minutes.
This “hot water bath” method gently cooks the eggs without overcooking them, which is crucial for preventing rubbery whites and green yolks.
Step 3: Shock in an Ice Bath
When the timer goes off, carefully drain the hot water from the pot and immediately transfer the eggs to a large bowl filled with ice water. This ice bath is essential for two reasons:
- Stops the Cooking Process: The cold water quickly halts the cooking, preventing the yolks from overcooking and developing that undesirable green ring.
- Eases Peeling: The rapid temperature change helps to shrink the egg white slightly, causing it to separate from the shell membrane. This makes peeling significantly easier.
Let the eggs sit in the ice bath for at least 14 minutes before attempting to peel them. Even if you plan to store the eggs in their shells for later, don’t skip the ice bath!
Pro Tips for the Best Hard Boiled Eggs
To take your hard boiled egg game to the next level, consider these expert tips:
- Use Slightly Older Eggs: While fresh eggs are fantastic for frying and scrambling, slightly older eggs (about a week old) are actually easier to peel when hard boiled. The pH of the egg white changes over time, making the membrane less likely to stick to the shell. If you have farm-fresh eggs, let them sit in the refrigerator for a few days before boiling.
- Store Eggs Upside Down (Raw): For yolks that are centered in your hard boiled eggs (especially helpful for deviled eggs!), store your raw eggs upside down in their carton in the refrigerator before cooking.
- Don’t Skimp on the Ice Bath: We can’t stress this enough – the ice bath is not optional! It’s the secret weapon against green yolks and stubborn shells. Make sure the water is genuinely icy cold for maximum effectiveness.
- Peel Gently: Even with the ice bath, peeling still requires a gentle touch. Lightly tap the egg all over on a hard surface to create cracks across the entire shell. Then, start peeling under cool running water, using your fingers to carefully separate the shell from the egg white.
Serving and Storing Hard Boiled Eggs
Hard boiled eggs are a versatile and nutritious food. Here are some ideas for serving and storing them:
- Snack Attack: Enjoy them simply with a sprinkle of salt and pepper, or a dash of Everything Bagel Seasoning for extra flavor.
- Salad Booster: Slice or chop them into salads like Cobb salad, Niçoise salad, or a classic egg salad.
- Grain Bowl Addition: Add protein and creaminess to grain bowls by including hard boiled egg wedges.
- Avocado Toast Topper: Elevate your avocado toast with a perfectly sliced hard boiled egg.
- Deviled Egg Delight: Transform them into delicious deviled eggs for appetizers or potlucks.
- Pickled Egg Adventure: Try making pickled eggs for a tangy and unique snack.
- Egg Salad Sandwich Filling: Create a healthy and satisfying egg salad for sandwiches or wraps.
Store peeled or unpeeled hard boiled eggs in an airtight container in the refrigerator for up to 5 days.
How to Make Hard Boiled Eggs Recipe
(Yields: Varies, Prep time: 5 minutes, Cook time: 15 minutes, Chill time: 15 minutes, Total time: 35 minutes)
Ingredients:
- Eggs
- Water
- Ice
Equipment:
- Saucepan
- Large bowl
Instructions:
- Place Eggs in Pot: Gently place eggs in a saucepan in a single layer.
- Cover with Cold Water: Cover the eggs with cold water, ensuring the water is about 1 inch above the eggs.
- Bring to Boil: Bring the water to a rolling boil over high heat.
- Turn Off Heat and Let Sit: Once boiling, turn off the heat, cover the pot, and let sit for 10-12 minutes depending on desired yolk firmness.
- Prepare Ice Bath: While eggs are sitting, prepare a large bowl of ice water.
- Ice Bath Shock: Drain hot water and immediately transfer eggs to the ice bath for at least 14 minutes.
- Peel and Enjoy: Gently peel eggs and enjoy!
Recipe Notes:
- Cooking time may slightly vary based on egg size, type, and freshness.
- Slightly older eggs are generally easier to peel than very fresh eggs.
- Adjust sitting time (10-12 minutes) for desired yolk consistency.