Mochi ice cream, with its delightful combination of a soft, chewy rice dough exterior and a cool, creamy ice cream center, has captured dessert lovers’ hearts worldwide. This Japanese confection, traditionally enjoyed during special occasions, is surprisingly simple to create in your own kitchen. If you’re wondering How To Make Mochi that rivals store-bought versions, you’ve come to the right place. This guide will walk you through each step of crafting homemade mochi ice cream, ensuring a fun and rewarding culinary experience.
What Exactly is Mochi?
Mochi is fundamentally a Japanese rice cake made from glutinous rice. In Japan, mochi holds cultural significance, especially during the New Year, where the traditional Mochitsuki ceremony involves steaming and pounding glutinous rice to form these delicate cakes. For a fascinating glimpse into this time-honored tradition, numerous videos online showcase the Mochitsuki process, highlighting the labor and skill involved.
However, this recipe focuses on a more approachable method for home cooks. We’ll utilize glutinous rice flour, often called sweet rice flour, and employ a microwave or steaming technique to create the mochi dough. This simplified approach allows anyone to enjoy the unique texture and taste of mochi without extensive equipment or traditional processes.
Why Make Homemade Mochi Ice Cream?
While pre-made mochi ice cream is readily available in many grocery stores, crafting it at home offers several compelling advantages:
- Unbelievably Easy: Despite its sophisticated appeal, making mochi ice cream is surprisingly straightforward. With just a handful of ingredients and minimal cooking time, you can achieve impressive results.
- Complete Customization: Homemade mochi ice cream puts you in control. Choose your favorite ice cream flavors, experiment with different fillings, and even infuse the mochi dough itself with unique tastes. The possibilities are endless, allowing you to tailor each bite to your exact preferences.
- Fun and Engaging: The process of making mochi ice cream can be a fun activity, perfect for involving family members or enjoying as a solo culinary adventure. From scooping ice cream balls to wrapping them in soft mochi dough, each step is tactile and satisfying.
Essential Tips Before You Start Making Mochi
Before diving into the recipe, keep these helpful tips in mind for a smoother mochi-making experience:
- Mochi is Sticky – Embrace the Starch: Glutinous rice flour lives up to its name – it’s incredibly sticky when cooked. Cornstarch, potato starch, or tapioca flour are your best friends here. Have a generous amount ready for dusting your work surface, rolling pin, and hands.
- Dough Cutter Considerations: Selecting the right size cutter for your mochi dough is crucial. Aim for a cookie or biscuit cutter that is slightly larger than your ice cream scoops. This ensures ample dough to encase the ice cream without excess bulk or air pockets. Don’t hesitate to get creative – even a lid from a container can work in a pinch!
- Microwave or Steam the Dough: This recipe offers the convenience of microwave cooking for the mochi dough, which is quick and effective. However, if you prefer a more traditional approach, steaming is also an option. Steaming typically takes longer, requiring about 20 minutes in total, with a stir halfway through, until the dough develops a slightly shiny appearance.
Ingredients You’ll Need for Mochi
Here’s a simple list of ingredients to gather before you begin your mochi ice cream adventure:
- Glutinous Rice Flour: This is the star ingredient! Look for “sweet rice flour” or brands like Mochiko or Shiratamako. Crucially, regular rice flour or all-purpose flour will not work.
- Water: Plain water is all you need to hydrate the glutinous rice flour and create the dough.
- Sugar: Granulated sugar adds sweetness to the mochi dough.
- Powdered Sugar: A touch of powdered sugar enhances the sweetness and texture of the dough.
- Cornstarch (or Potato Starch/Tapioca Starch): For dusting and preventing the sticky mochi dough from adhering to surfaces and itself.
- Ice Cream: Your favorite ice cream flavors! Get creative and choose a variety to make your mochi ice cream assortment exciting.
- Optional Food Coloring: If you want to add a visual flair, a few drops of food coloring can tint the mochi dough.
Step-by-Step Guide: How to Make Mochi Ice Cream
Let’s break down the process of making mochi ice cream into easy-to-follow steps:
Step 1: Freeze the Ice Cream Balls
Start by preparing the ice cream filling. Line a baking sheet with parchment paper. Using a small ice cream scoop, quickly scoop balls of ice cream and place them on the parchment-lined sheet. Pack the ice cream firmly in the scoop to create a flat base, which will help them sit steadily on the tray. Freeze the ice cream balls for at least 1 hour to ensure they are solid and easy to handle.
Step 2: Prepare the Mochi Dough
In a microwave-safe bowl, combine the glutinous rice flour, sugar, and powdered sugar. Gradually add water, stirring continuously until the mixture is smooth and lump-free. Cover the bowl tightly with plastic wrap. Microwave on high for 1 minute.
Remove from the microwave and wet your spatula or spoon to prevent sticking. Use the wet utensil to vigorously fold and stir the mochi mixture. This helps to cook it evenly and develop its characteristic chewy texture. Re-cover and microwave for another minute. Fold again, and then microwave for a final 30 seconds. The mochi dough is ready when it appears slightly shiny. If it still looks opaque, microwave for an additional 30 seconds.
Step 3: Roll Out and Cut the Mochi Dough
Dust a sheet of parchment paper generously with cornstarch and place it on your countertop. Scrape the hot mochi dough onto the cornstarch-dusted parchment paper using a rubber spatula (be cautious, it will be hot!). Dust the top of the dough ball with more cornstarch.
Using a rolling pin, roll the mochi dough into a thin rectangle, approximately ¼ inch thick. If the dough sticks to the rolling pin or parchment, add more cornstarch as needed. Once rolled, place the parchment paper with the dough on a baking sheet and refrigerate for 30 minutes to make it easier to handle.
Step 4: Wrap the Ice Cream with Mochi
Remove the chilled dough from the refrigerator. Use a round biscuit cutter (about 3 inches in diameter) to cut circles from the dough. Gently brush off any excess cornstarch from the top of each circle using a dry pastry brush or your fingers.
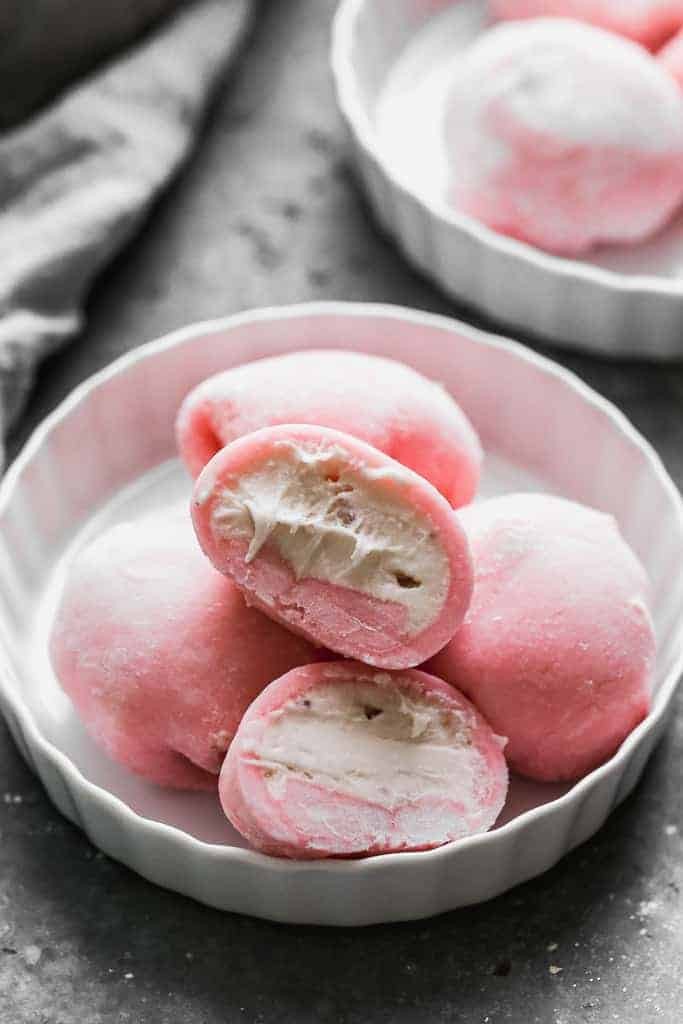
Working quickly with one ice cream ball at a time (keep the rest in the freezer to prevent melting), place an ice cream ball in the center of a mochi circle. Gently bring the edges of the mochi dough up and around the ice cream, pinching to seal it completely. If there’s any excess dough, trim it away to avoid a tough, chewy frozen edge. Place the assembled mochi on a square of plastic wrap. Gather the corners of the plastic wrap and twist tightly to seal, forming a neat ball.
Step 5: Freeze and Enjoy
Place the wrapped mochi ice cream balls back in the freezer, with the twisted plastic wrap side down. Repeat the wrapping process with the remaining dough and ice cream. Freeze for at least 1 hour before serving to allow the mochi to firm up completely.
Store the frozen mochi ice cream wrapped in plastic wrap in a freezer-safe bag or container for up to 3 months. Before enjoying, let the mochi thaw slightly at room temperature for a few minutes to soften the dough for the best texture.
Mochi Ice Cream Flavor Variations
Unleash your creativity and explore these exciting variations to elevate your homemade mochi ice cream:
- Ice Cream Flavor Fiesta: The sky’s the limit when it comes to ice cream flavors. Experiment with classic vanilla, rich chocolate, refreshing mint chocolate chip, or even fruity sorbets for a dairy-free option.
- Surprise Fillings: Go beyond ice cream! Consider stuffing your mochi with Nutella, chocolate ganache, fresh strawberry slices, peanut butter, or traditional red bean paste (anko) for a unique twist.
- Dough Flavor Infusions: Incorporate flavors directly into the mochi dough itself:
- Peanut Butter Mochi: Mix 2 tablespoons of peanut butter into the dough immediately after microwaving.
- Chocolate Mochi: Stir in 1 teaspoon of cocoa powder into the dry ingredients before cooking.
- Matcha Mochi: Add 1 teaspoon of matcha powder (green tea powder) to the dry ingredients.
- Vanilla Mochi: Stir in 1 teaspoon of vanilla extract to the dough before microwaving.
- Coconut Mochi: Substitute 1 tablespoon of water with coconut milk for a subtle coconut flavor.
With this comprehensive guide, you’re now equipped to confidently create your own batch of delightful mochi ice cream. Enjoy the process and the delicious results!