Losing your iPhone can be a stressful experience. Whether it’s misplaced at home, left in a taxi, or potentially stolen, the first thought that comes to mind is often, “How To Find My Iphone?”. Fortunately, Apple has developed a robust and user-friendly system called “Find My” that significantly increases your chances ofDevice recovery. This comprehensive guide will walk you through every step you need to take to locate your missing iPhone, ensuring your valuable device and personal information are protected.
Getting Started with Find My: Ensuring You’re Prepared
Before you find yourself in the unfortunate situation of losing your iPhone, it’s crucial to understand and set up the Find My feature. By default, Find My is usually enabled when you set up your iPhone, but verifying its activation and understanding its functionalities is a proactive step every iPhone user should take.
To check if Find My is enabled on your iPhone:
- Open the Settings app.
- Tap on your Apple ID name at the top.
- Select Find My.
- Ensure that Find My iPhone is toggled on.
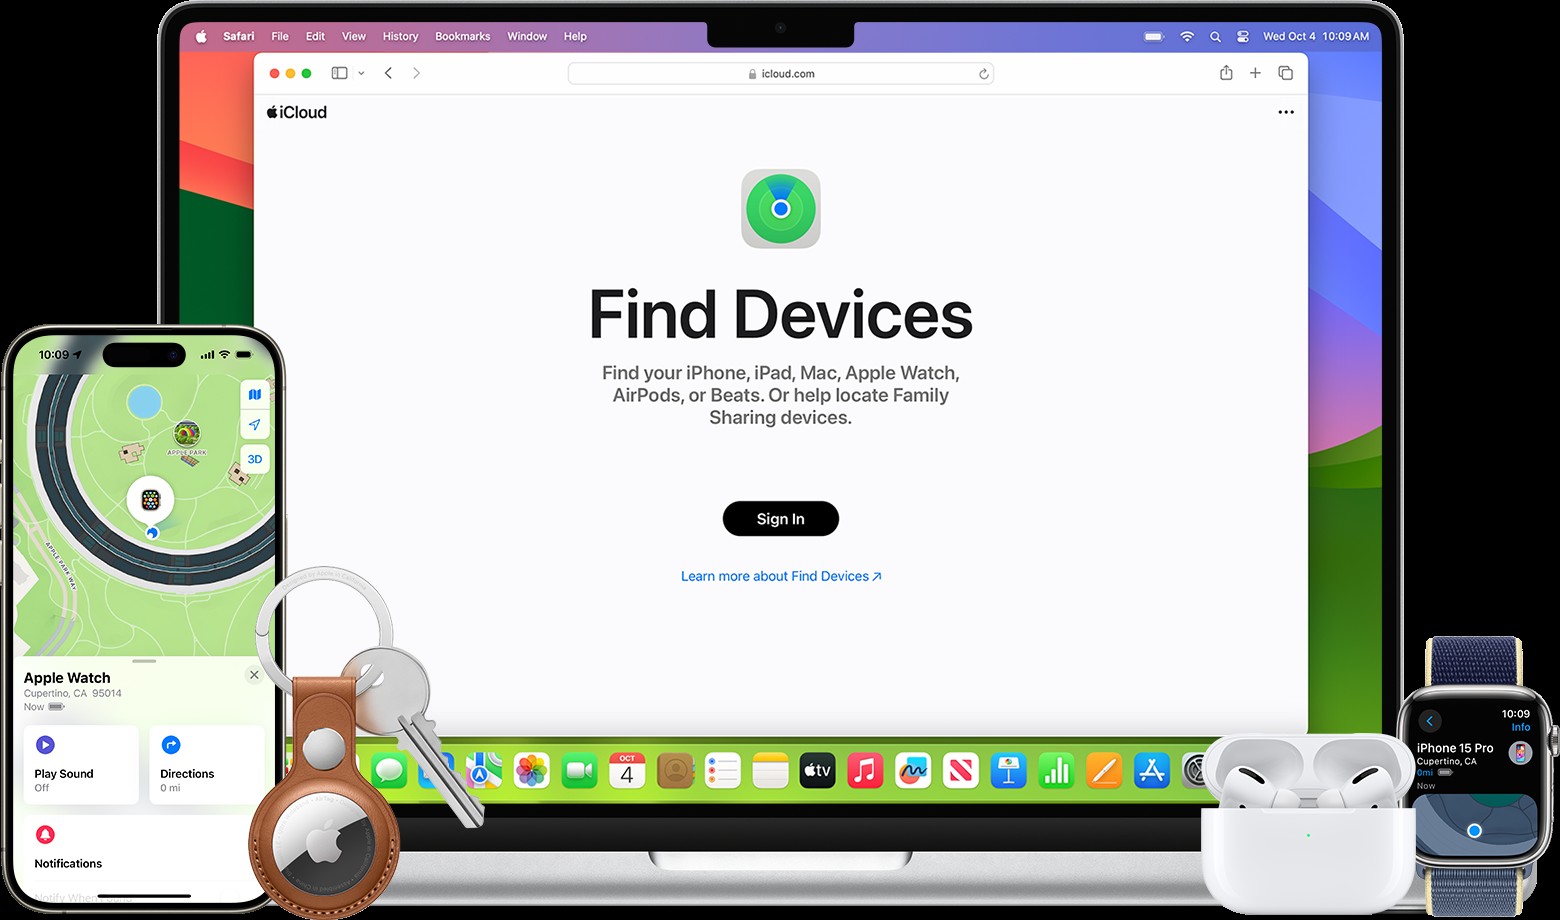 Find an AirTag, an iPhone, or other Apple devices in Find My or on the web.
Within the Find My settings, you’ll also notice options like “Find My network” and “Send Last Location.” The “Find My network” leverages a network of millions of Apple devices to help locate your iPhone even when it’s offline. “Send Last Location” automatically sends Apple the last known location of your device when the battery is critically low, providing a crucial last point of reference. Ensure both of these are also enabled for maximum findability.
Step-by-Step Guide: How to Find My iPhone
Once you realize your iPhone is missing, time is of the essence. Here’s how to initiate the search using Find My:
Method 1: Using the Find My App on Another Apple Device
If you have another Apple device like an iPad, Mac, or even an Apple Watch, the Find My app is your most direct tool.
- Open the Find My app on your other Apple device.
- Tap on Devices at the bottom of the screen.
- You will see a list of your Apple devices. Select your missing iPhone from the list.
- Your iPhone’s location will be displayed on a map.
From here, you have several options:
- Directions: Tap Directions to open Apple Maps and get turn-by-turn navigation to your iPhone’s last known location.
- Play Sound: If you believe your iPhone is nearby, but out of sight (like under a couch cushion), tap Play Sound. Your iPhone will emit a loud ping, even if it’s set to silent.
- Find Nearby: For newer iPhones with Ultra Wideband technology (like iPhone 11 and later), you may see a Find Nearby option. This feature provides more precise directional guidance to your iPhone, especially useful for locating AirTags or AirPods Pro 2nd generation as well.
Method 2: Using iCloud Find My on the Web
Don’t have another Apple device readily available? No problem. You can access Find My through iCloud on any web browser.
- Go to iCloud.com/find on any computer or smartphone browser.
- Log in with your Apple ID and password.
- If prompted for two-factor authentication and you don’t have access to your trusted device, look for and select the Find Devices option instead of entering a verification code.
- Once logged in, click on All Devices at the top center of the screen.
- Select your missing iPhone from the dropdown list.
- Your iPhone’s location will be shown on a map, and you will have similar options as the Find My app: Play Sound, Lost Mode, and Erase iPhone.
Method 3: Using a Family Member’s Device
If you are part of a Family Sharing group, you can use a family member’s Apple device to find your iPhone. As long as you have shared your location with your family, your devices will appear in their Find My app under the Devices list. They can follow the same steps as in Method 1 to help you locate your iPhone.
Understanding Location Information and “Lost Mode”
Once you’ve located your iPhone on the map, it’s important to understand the location information Find My provides and how to use Lost Mode effectively.
Interpreting Location Accuracy
Find My is remarkably accurate, but there are scenarios where the location might not be pinpoint precise:
- “No location found” or “Offline”: This typically means your iPhone is powered off, not connected to a network (Wi-Fi or cellular), or it has been more than 7 days since it last sent its location. In these cases, Find My will show the last known location, if available. If no location data is available, it will display “No location found.”
- “Not sharing location • Online”: This indicates that your iPhone is online and connected to a network, but is currently unable to transmit its location, possibly due to issues with Location Services settings.
Activating Lost Mode: Securing Your iPhone
Lost Mode is a critical feature to activate as soon as you realize your iPhone is missing. It helps protect your personal information while you attempt to recover your device.
To enable Lost Mode:
- In the Find My app or on iCloud Find My, select your missing iPhone.
- Scroll down to the Mark As Lost section and tap Activate (in the Find My app) or Lost Mode (on iCloud).
- Follow the onscreen instructions. You can set a phone number where you can be reached and display a custom message on your iPhone’s lock screen.
- Tap Activate or Done to enable Lost Mode.
When Lost Mode is active:
- Your iPhone is locked with your passcode. If you didn’t have a passcode set, you’ll be prompted to create one.
- Payment cards and passes in Apple Pay are suspended. This prevents unauthorized transactions.
- A custom message with your contact information is displayed on the lock screen, making it easier for someone who finds your iPhone to return it to you.
- Find My continuously tracks your iPhone’s location and sends you updates when its location changes.
When Erasing Your iPhone Becomes Necessary
In the unfortunate event that you believe your iPhone is permanently lost or stolen, and you want to prevent unauthorized access to your data, you have the option to remotely erase it. However, exercise extreme caution, as erasing your iPhone is irreversible. Once erased, you cannot track it using Find My if it’s running iOS 15 or earlier. For devices running iOS 15 or later, you may still be able to locate it even after erasure.
To erase your iPhone remotely:
- In the Find My app or on iCloud Find My, select your missing iPhone.
- Scroll down to Erase This Device and select Erase.
- Confirm that you want to erase your iPhone.
Important Considerations Before Erasing:
- Try all other recovery methods first. Erasing should be a last resort.
- If you have two-factor authentication enabled, you can erase your device remotely via Find My. If not, you’ll need to use iCloud.com.
- Back up your iPhone regularly. If you have a recent backup, you can restore your data to a new device after erasing.
Find My Features Across Devices: A Quick Overview
The core Find My functionalities are consistent across Apple devices, but some features vary:
| Feature | iPhone/iPad | Mac | Apple Watch | AirPods (3rd Gen, Pro, Max) | AirTag |
|---|---|---|---|---|---|
| View Location | Yes | Yes | Yes | Yes | Yes |
| Play Sound | Yes | Yes | Yes | Yes | Yes |
| Lost Mode | Yes | Yes | Yes | Yes | Yes |
| Erase | Yes | Yes | Yes | No | No |
| Find Nearby | Select Models | No | No | Select Models | Select Models |
| Notify When Found | Yes | Yes | Yes | Yes | Yes |
| Notify When Left Behind | Yes | Select Macs | Yes | Yes | Yes |
This table provides a quick reference to the availability of key Find My features across different Apple products, highlighting the comprehensive nature of Apple’s device-finding ecosystem.
Conclusion: Taking Control When Your iPhone Goes Missing
Losing your iPhone is undoubtedly a frustrating experience, but Apple’s Find My feature offers a powerful toolkit to aid in its recovery and protect your valuable data. By understanding how to use Find My effectively, from initial setup to utilizing Lost Mode and even remote erasure, you significantly increase your chances of “finding my iPhone” and mitigating the stress associated with a lost device. Remember to be proactive, enable Find My, and familiarize yourself with these steps – it’s the best preparation for the unexpected.