Pop-up windows, once a ubiquitous part of the internet experience, can be both a blessing and a curse. While they can be intrusive and often associated with unwanted ads or even malware, many websites rely on them for legitimate functions. Modern browsers like Google Chrome, in an effort to enhance user experience and security, block pop-ups by default. However, there are times when you need to allow pop ups on Chrome to access essential content, like online payment portals, customer support chats, or critical notifications.
If you’re encountering blocked pop-ups that are disrupting your browsing, or if you simply prefer to manage them manually, this guide is for you. We’ll provide straightforward instructions on how to enable pop-ups in Chrome on both desktop and mobile devices. Whether you want to allow all pop-ups or just for specific, trusted websites, Chrome offers flexible settings to customize your browsing experience. Let’s dive into how you can take control of pop-ups in your Chrome browser.
Allowing Pop-ups on Chrome Desktop
Managing pop-ups on the desktop version of Google Chrome is simple and gives you granular control. You can choose to allow pop-ups for only the websites you trust, or, if needed, permit all pop-ups. Here’s how to adjust these settings:
Allow Pop-ups for Specific Sites on Desktop
If you only want to see pop-ups from certain websites you frequently use and trust, follow these steps to whitelist them:
-
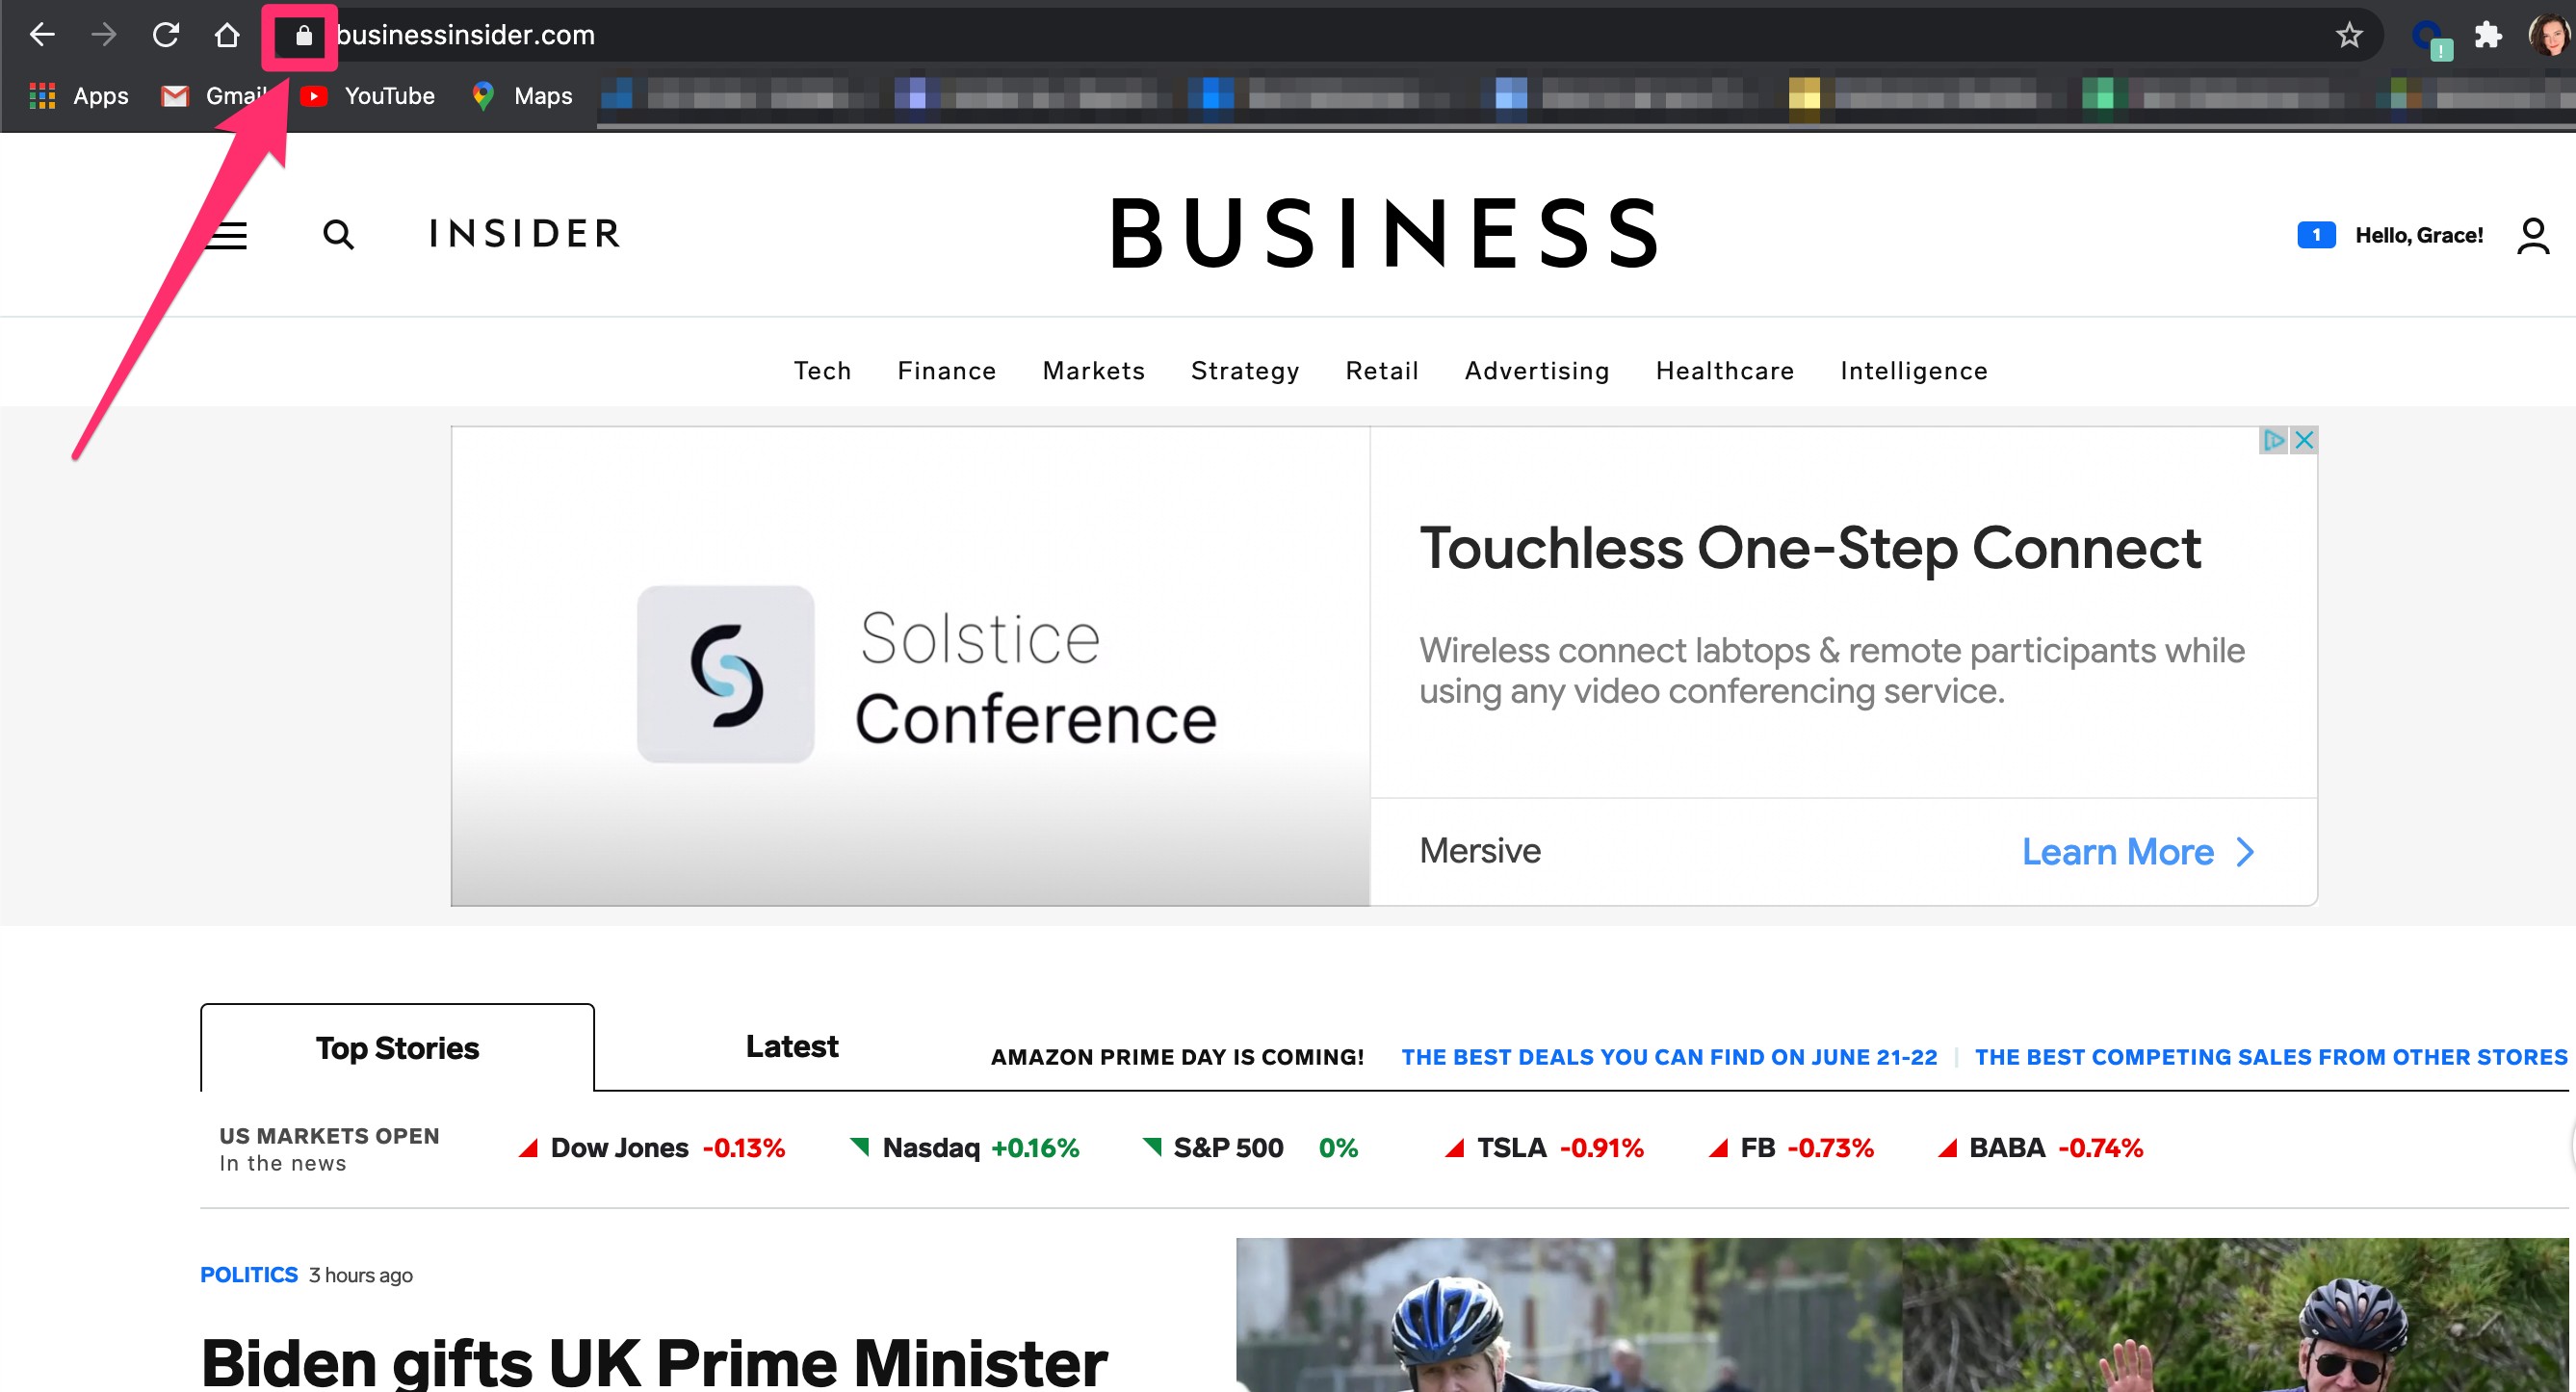
Navigate to the Website: Open your Google Chrome browser and go to the specific website where you want to allow pop-ups.
-
Locate the Lock Icon: Look at the left side of your address bar. You’ll see a lock icon (or sometimes an “i” for “information”). Click on this icon.
-
Adjust Pop-up Permissions: In the pop-up menu that appears, find the dropdown menu next to Pop-ups and redirects. Change the setting from Block to Allow. Alternatively, you can click on Site Settings at the bottom of the menu and scroll down to Pop-ups and redirects to make the change there.
By making this adjustment, you’ve now allowed pop-ups specifically for this website. Chrome will remember this setting for future visits.
Allow All Pop-ups on Desktop
If you need to allow all pop-ups on every website you visit (though generally not recommended for security reasons), here’s how to enable this setting in Chrome desktop:
-
Open Chrome Settings: Click on the three vertical dots (More icon) located at the top-right corner of your Chrome browser window. In the dropdown menu, select Settings.
-
Go to Privacy and Security: In the left-hand menu of the Settings page, click on Privacy and security.
- Access Site Settings: Within the Privacy and security section, find and click on Site Settings.
An image showing the “Privacy and security” settings page in Chrome, specifically pointing out the “Site Settings” option to proceed to content permissions.
- Find Pop-ups and redirects: Scroll down the Site Settings page until you find the Content section. Click on Pop-ups and redirects.
A close-up view of the “Site Settings” page, clearly indicating the “Pop-ups and redirects” option under the Content section, which is the target for pop-up management.
- Allow Pop-ups: At the top of the Pop-ups and redirects page, you’ll see a toggle switch labeled Blocked (recommended). Click this switch to change it to Allowed. The switch will turn blue when pop-ups are allowed.
Image focusing on the “Pop-ups and redirects” settings page in Chrome, with the toggle switch clearly highlighted in the “Allowed” position, demonstrating how to globally enable pop-ups.
On this page, you also have the option to manage specific sites by clicking Add next to either the Allow or Block lists. This is another way to customize pop-up behavior for particular websites.
Enabling Pop-ups on Chrome Mobile (Android & iOS)
Managing pop-ups on the Chrome mobile app is slightly different for Android and iOS devices, but both offer similar control. Here’s how to enable pop-ups on your mobile device:
Allow All Pop-ups on Chrome Mobile
Here are the steps to allow all pop-ups on the Chrome mobile app for both iPhone/iPad (iOS) and Android devices:
On iPhone and iPad:
-
Open Chrome App: Launch the Google Chrome app on your iPhone or iPad.
-
Access More Menu: Tap the More icon, which looks like three horizontal dots, located at the bottom-right corner of the screen.
Screenshot of the Chrome mobile app on iOS, pointing to the “More” menu icon (three horizontal dots) at the bottom right, the starting point for accessing settings.
- Go to Settings: In the menu that pops up, scroll down and tap Settings.
Image of the Chrome mobile menu on iOS, with the “Settings” option clearly highlighted, showing users where to tap to proceed to the settings panel.
- Enter Content Settings: Scroll down the Settings page and tap on Content Settings.
Display of the Chrome mobile settings page on iOS, specifically indicating the “Content Settings” option which leads to pop-up controls.
- Find Block Pop-ups: On the Content Settings page, tap Block Pop-ups.
A focused view of the “Content Settings” in Chrome mobile on iOS, highlighting the “Block Pop-ups” setting that users need to tap to manage pop-up blocking.
- Disable Pop-up Blocking: Tap the toggle switch next to Block Pop-ups to turn it off. The switch will turn grey when pop-up blocking is disabled.
Close-up of the “Block Pop-ups” settings in Chrome mobile on iOS, showing the toggle switch in the off (grey) position, which allows all pop-ups.
On Android:
-
Open Chrome App: Open the Chrome app on your Android device.
-
Access Settings Menu: Tap the three vertical dots (More icon) in the top-right corner and select Settings from the dropdown menu.
Image showing the Chrome mobile app interface on Android, with an arrow pointing to the three vertical dots “More” menu icon in the top right corner, used to access settings.
- Go to Site Settings: Scroll down and tap on Site Settings.
Screenshot of the Chrome settings page on Android, clearly indicating the “Site Settings” option that users should select to configure site-specific permissions.
- Select Pop-ups and redirects: On the Site Settings page, tap Pop-ups and redirects.
Focused view of the “Site Settings” page in Chrome mobile on Android, highlighting the “Pop-ups and redirects” option, which is crucial for managing pop-up behavior.
- Disable Pop-up Blocking: Slide the switch at the top to the left to turn off pop-up blocking.
Close-up on the “Pop-ups and redirects” settings in Chrome mobile on Android, with the toggle switch shown in the disabled position, indicating that pop-ups are now allowed.
Allow Pop-ups for Specific Sites on Chrome Mobile
To allow pop-ups for specific sites only on mobile, the process is slightly different. Unfortunately, as of the current Chrome mobile versions, directly whitelisting specific sites for pop-ups like on desktop is not available through settings for iOS. However, on both iOS and Android, Chrome provides a prompt at the bottom of the screen when pop-ups are blocked on a site, offering a quick way to allow them for that specific instance or always.
On iPhone and iPad:
-
Visit the Site: Open the Chrome app and navigate to the website where pop-ups are being blocked.
-
Tap “Always show”: When you see the Pop-ups blocked message at the bottom of the page, tap Always show underneath it. This will allow pop-ups for this specific site going forward.
On Android:
-
Visit the Site: Open Chrome and go to the website where pop-ups are blocked.
-
Tap “Always show”: Similar to iOS, at the bottom of the page, when you see Pop-ups blocked, tap Always show. This action whitelists the site for pop-ups.
Conclusion
Managing pop-ups in Google Chrome is a straightforward process, whether you’re using a desktop or mobile device. By following these steps, you can customize your browsing experience to allow pop-ups where they are necessary while continuing to block intrusive or potentially harmful ones on other sites. Remember to exercise caution when allowing all pop-ups, and consider only enabling them for trusted websites to maintain a secure and pleasant browsing experience.