Ever watched someone produce a piercingly loud whistle using just their fingers and wondered how they do it? That sharp, commanding sound is not just for hailing cabs in old movies or getting attention at a baseball game; it’s a cool skill that many aspire to learn. If you’ve spent years trying to unlock this secret, you’re not alone. Many people remember a family member, like a grandparent or parent, effortlessly whistling with their fingers, wishing they could do the same. The good news is, mastering this impressive trick is achievable with the right guidance and a bit of practice.
This guide will break down the process of how to whistle with your fingers into simple, easy-to-follow steps. Whether you’re a complete beginner or have been struggling for years, you’ll find the techniques and tips here to help you create that loud, clear whistle you’ve always wanted. Let’s dive in and learn how to create this attention-grabbing sound.
Understanding the Mechanics of Finger Whistling
Before we get into the specific techniques, it’s helpful to understand the basic mechanics of finger whistling. Your fingers play a crucial role in shaping your mouth to produce a whistle. Essentially, your fingers work in tandem with your tongue and lips to create a focused stream of air.
Firstly, your fingers are positioned inside your mouth to push your tongue back. This creates the necessary space and shape within your mouth. Secondly, your lips are tucked back over your teeth, forming a tight opening. This combination of tongue position and lip shape creates a bevel, much like the edge of a flute or whistle, which generates a tone when you blow air across it. The focused airflow across this bevel is what produces the loud, piercing sound we recognize as a finger whistle.
There are various finger combinations you can use to achieve this effect. We’ll explore two popular and effective methods to get you started.
Method 1: Two-Handed Middle and Index Finger Technique
This method uses both hands and is often favored for its power and the loud whistle it can produce.
Step 1: Position Your Fingers
Extend the middle and index fingers on both of your hands. Keep these fingers close together, side by side. Simultaneously, use your thumbs to fold down your ring and pinky fingers into your palms, keeping them out of the way.
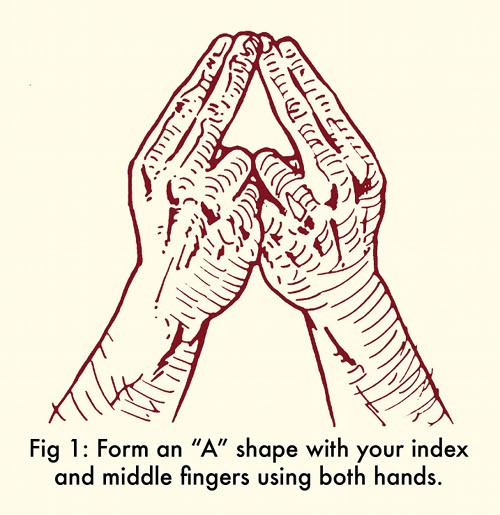
Step 2: Form the “A” Shape
Bring your two hands together and place your middle fingers next to each other, aligning them closely. The index fingers will naturally angle outwards slightly, creating a shape that resembles an “A”. This formation is key to directing the airflow correctly.
This image illustrates the two-handed finger position for whistling, creating an “A” shape with the index and middle fingers.
Step 3: Wet and Tuck Your Lips
Lip placement is critical for successful whistling. Start by lightly wetting your lips – a quick lick will do. Then, tuck your lips back over your teeth. Imagine you are mimicking the look of someone toothless, drawing your lips inwards to cover your teeth. Your lips need to fully cover your teeth to create the right air pressure and sound. Experiment with how much you tuck your lips, as this can vary slightly from person to person.
Step 4: Position Your Tongue with Your Fingers
This is often considered the trickiest part but is essential for producing a clear whistle. With your fingers in the “A” shape, place the tips of your fingers just under the tip of your tongue. Now, gently push the tip of your tongue back into your mouth using your fingers. The goal is to fold the front portion of your tongue back on itself. Push your tongue back far enough that your first knuckle reaches your bottom lip. This action creates a channel for the air to flow over your tongue and lips, generating the whistle sound.
Step 5: Blow Air
With your fingers positioned inside your mouth, holding your tongue folded back and your lips tucked over your teeth, close your mouth firmly around your fingers to create a tight seal. You need to ensure no air escapes from the sides of your mouth; all the air should be directed through the opening between your fingers.
Now, take a breath and blow out gently. You should feel the air directed outwards, primarily over your bottom lip. If you feel air escaping from the sides of your mouth, tighten your seal around your fingers. Ensure that your tongue is not protruding into the opening between your fingers, as this will block the airflow and prevent a whistle.
Initially, you may not produce a sound, or you might hear a weak, breathy sound. This is perfectly normal. Adjust the placement of your fingers under your tongue, experiment with slightly different finger angles, and vary how much you tuck your lips. Small adjustments are key to finding the “sweet spot.” You’ll know you’re getting closer when you start to hear a noise that resembles blowing across the top of a bottle. Once you reach this point, try blowing more forcefully until you achieve a loud, clear, high-pitched whistle.
Method 2: One-Handed “OK” Sign Technique
For those who prefer a more subtle approach or want to whistle with just one hand free, the “OK” sign method is an excellent alternative.
Step 1: Form the “OK” Sign
Using either hand, form the “OK” sign. This is done by touching the tip of your thumb to the tip of your index finger or, alternatively, to the tip of your middle finger. Both variations can work effectively.
Step 2: Wet and Tuck Your Lips
Just as with the two-handed method, lip placement is crucial. Moisten your lips and tuck them back over your teeth as if you were portraying a toothless grin. Ensure your teeth are fully covered by your lips to create the necessary air pressure.
This image demonstrates how to tuck your lips back over your teeth, a key step in finger whistling.
Step 3: Position Your Tongue with Fingers
Insert the hand forming the “OK” sign into your mouth. Place the tip of your thumb (or the joined thumb and finger tips) under the tip of your tongue. Push your tongue back into your mouth, folding the tip of your tongue backwards, similar to the two-handed method. Adjust the depth until your first knuckle is near your bottom lip.
Step 4: Blow Air
Close your mouth around your fingers, ensuring a tight seal so air doesn’t escape from the sides. Blow air through the opening of the “OK” sign. Start with a gentle blow and gradually increase the force as you experiment to find the right sound. Again, adjustments to finger and lip position will be necessary to find the optimal configuration for a clear whistle.
Key Steps to Perfect Your Finger Whistle
Mastering the finger whistle takes practice and patience. Here’s a breakdown of the essential steps and some tips to help you along the way:
Step 1: Master Finger and Lip Positioning
Experiment with both the two-handed and one-handed finger techniques to see which feels more natural and comfortable for you. Pay close attention to how you tuck your lips over your teeth. The right lip position creates the necessary aperture for the air to be channeled effectively. Practice getting the feel of tucking your lips consistently.
Step 2: Tongue Placement – The Crucial Element
Tongue placement is often the key to unlocking the whistle. Focus on folding the tip of your tongue back and using your fingers to hold it in that position. Experiment with how far back you push your tongue. Slight variations in tongue position can dramatically affect the sound. Remember, the goal is to create a bevel or edge with your tongue and lips for the air to vibrate against.
This image highlights the correct tongue placement when finger whistling, showing the tongue being pushed back by the fingers.
Step 3: Blowing Technique and Achieving the Seal
Ensure you have a complete seal around your fingers with your mouth. Air leakage is a common reason for a weak or non-existent whistle. Start with soft blows and gradually increase the force. Pay attention to how the air feels as it exits your mouth. It should be directed straight out over your bottom lip.
This image shows the mouth position while blowing, emphasizing the seal around the fingers and the air exiting through the finger opening.
Step 4: Practice, Patience, and Troubleshooting
Practice is paramount. Set aside dedicated practice sessions, even if they are just for 10-15 minutes at a time. Consistency is more effective than long, infrequent sessions. If you’re not getting a whistle right away, don’t get discouraged. It took time for many, even those who seemed to pick it up quickly.
Troubleshooting Tips:
- No Sound: Double-check your lip tuck and tongue position. Ensure you have a tight seal around your fingers.
- Weak or Breathy Sound: You may not be blowing forcefully enough, or your lip and tongue bevel might not be optimally shaped. Experiment with slight adjustments to both.
- Sore Lips: If your lips become sore from tucking, take a break. You can also try using lip balm to keep them moisturized.
- Dizziness: Avoid hyperventilating. Take breaks between blowing attempts, especially when you are first starting out.
Where and When to Practice:
Practice anywhere you feel comfortable making a bit of noise. Outdoors, in your car (while parked!), or in a room where you won’t disturb others are good options. Turning practice into a fun challenge can also help keep you motivated.
Conclusion
Learning how to whistle with your fingers is a rewarding skill that, with a bit of persistence, anyone can master. By understanding the mechanics, practicing the finger and mouth positions, and experimenting with airflow, you’ll be producing loud, clear whistles in no time. It might take a few minutes, or it might take a few days, but the satisfaction of finally cracking the code and being able to create that sharp, attention-grabbing sound is well worth the effort. So, keep practicing, stay patient, and enjoy the journey of mastering this cool and useful skill!