In today’s digital world, capturing what’s on your screen is a fundamental skill. Whether you’re sharing information, creating tutorials, or simply saving a moment, knowing how to take a screenshot on your computer is essential. This guide will walk you through various methods to easily capture screenshots on both Windows and macOS operating systems, ensuring you never miss a screen moment again.
Understanding Screenshots
Before diving into the “how-to,” let’s clarify what a screenshot is. A screenshot, also known as a screen capture or screen grab, is a digital image that shows the contents of a computer display. Think of it as taking a photo of your screen. This image can then be saved, shared, or edited, making it a versatile tool for various purposes. From documenting online information to preserving evidence of online interactions, screenshots are incredibly useful in both personal and professional contexts.
Taking Screenshots on Windows
Windows offers several built-in methods to capture screenshots, catering to different needs and preferences. Here are the most common and effective techniques:
Using the Print Screen (PrtScn) Key
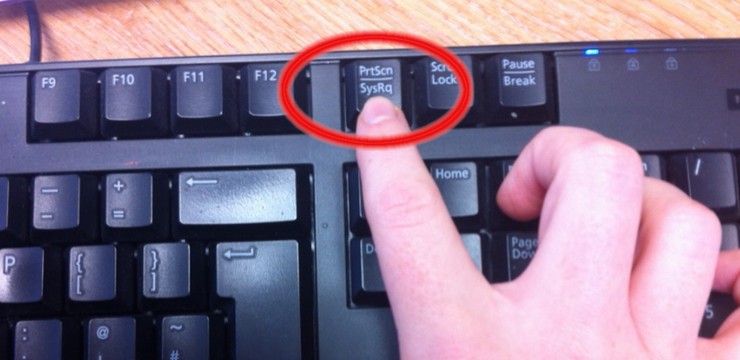
The Print Screen key, often labeled as “PrtScn” or “Print Scrn,” is a quick and easy way to capture your entire screen. Located typically in the top right area of your keyboard, pressing this key copies an image of your entire display to the clipboard – a temporary storage area in your computer’s memory.
Steps:
- Locate the PrtScn Key: Find the “PrtScn” key on your keyboard.
- Press the PrtScn Key: Simply press the key. You might not see any immediate visual confirmation, but the screenshot is now copied to your clipboard.
- Paste the Screenshot: To view and save your screenshot, you need to paste it into an application that supports images, such as:
- Paint: A basic image editing program included with Windows. Open Paint and press Ctrl + V (or right-click and select “Paste”). You can then edit and save the image.
- Word: Microsoft Word or other word processing software. Open a new document and press Ctrl + V to paste the screenshot.
- Image Editors: More advanced image editors like Adobe Photoshop or GIMP also work.
Using the Windows Key + Print Screen Shortcut
For a quicker way to save screenshots directly as files, Windows offers the Windows Key + Print Screen shortcut. This method captures the entire screen and automatically saves it as a PNG image file in the “Screenshots” folder within your “Pictures” library.
Steps:
- Press Windows Key + PrtScn: Hold down the Windows key (located between Ctrl and Alt keys) and press the PrtScn key simultaneously.
- Screen Dimming: Your screen will briefly dim to indicate that a screenshot has been taken and saved.
- Locate the Screenshot: Navigate to your “Pictures” library, and you’ll find a “Screenshots” folder containing your captured image named sequentially (Screenshot (1), Screenshot (2), etc.).
Using Alt + Print Screen for the Active Window
If you only need to capture the currently active window (the window you are currently working in), the Alt + Print Screen combination is your go-to shortcut. This captures only the focused window and copies it to the clipboard, similar to the standard PrtScn key, but without capturing the entire screen.
Steps:
- Ensure Active Window: Make sure the window you want to capture is active and in focus (click on it).
- Press Alt + PrtScn: Hold down the Alt key and press the PrtScn key simultaneously.
- Paste the Screenshot: Paste the captured active window into an image editor, document, or application as described in the “Using the Print Screen (PrtScn) Key” section.
Utilizing the Snipping Tool
For more control and editing options directly after capturing a screenshot, Windows includes the Snipping Tool. This built-in utility allows you to capture specific parts of your screen and offers basic annotation features.
Steps:
- Open Snipping Tool: Search for “Snipping Tool” in the Windows search bar and open the application.
- Choose Capture Mode: Click on “Mode” to select the type of screenshot you want to take:
- Free-form Snip: Draw a freehand shape around the area you want to capture.
- Rectangular Snip: Drag a rectangle to select the area.
- Window Snip: Capture a specific window by clicking on it.
- Full-screen Snip: Capture the entire screen (same as PrtScn).
- Take the Screenshot: Click “New” and select the area you want to capture based on your chosen mode.
- Edit and Save: The screenshot will open in the Snipping Tool window, where you can use pen and highlighter tools to annotate it. Click the “Save Snip” button (disk icon) to save the screenshot as an image file (PNG, JPG, GIF, etc.).
Taking Screenshots on macOS
macOS also provides user-friendly methods for taking screenshots, primarily through keyboard shortcuts, offering flexibility and ease of use.
Keyboard Shortcuts for Screenshots on Mac
macOS relies heavily on keyboard shortcuts for efficient screenshot capture. Here are the primary shortcuts you should know:
Command + Shift + 3: Capture the Entire Screen
The Command + Shift + 3 shortcut is the quickest way to capture a screenshot of your entire Mac display.
Steps:
- Press Command + Shift + 3: Press and hold the Command (⌘) and Shift keys, then press the number 3 key.
- Screenshot Saved to Desktop: You’ll hear a camera shutter sound, and the screenshot will be automatically saved as a PNG file on your desktop, named with the date and time.
Command + Shift + 4: Capture a Selected Portion
For capturing a specific area of your screen, use the Command + Shift + 4 shortcut. This turns your cursor into a crosshair, allowing you to select a rectangular area to screenshot.
Steps:
- Press Command + Shift + 4: Press and hold the Command (⌘) and Shift keys, then press the number 4 key.
- Drag to Select Area: Your cursor will change to a crosshair. Click and drag to draw a rectangle around the area you want to capture.
- Release to Capture: Release the mouse button, and the selected area will be captured as a screenshot and saved as a PNG file on your desktop.
Command + Shift + 5: Advanced Screenshot Options
For more advanced screenshot options, including screen recording and window capture, macOS provides the Command + Shift + 5 shortcut (introduced in macOS Mojave and later). This opens a small toolbar at the bottom of your screen with various screenshot and screen recording choices.
Options in the Toolbar:
- Capture Entire Screen: Takes a screenshot of the entire screen (similar to Command + Shift + 3).
- Capture Selected Window: Allows you to click on a specific window to capture it.
- Capture Selected Portion: Lets you drag to select a rectangular area (similar to Command + Shift + 4).
- Record Entire Screen: Starts recording a video of your entire screen.
- Record Selected Portion: Starts recording a video of a selected area of your screen.
- Options: Provides settings for saving location, timer, microphone recording (for screen recording), and more.
Using the Grab Utility (Older macOS)
On older macOS versions, the Grab utility was a dedicated screenshot application. While keyboard shortcuts are now more commonly used, Grab is still available in older systems and can be found in the Utilities folder within Applications. It offers options similar to the Snipping Tool in Windows but is less frequently used compared to the efficient keyboard shortcuts.
Tips for Effective Screenshots
- Keep it Clean: Before taking a screenshot, close unnecessary windows and applications to keep your screen capture focused and clutter-free.
- Highlight Important Information: Use annotation tools (like those in Snipping Tool or third-party image editors) to highlight key parts of your screenshot if you want to draw attention to specific details.
- Save in Appropriate Format: PNG is generally recommended for screenshots due to its lossless compression and good quality for images with text and graphics. JPG is better for photographs or images with many colors where file size is a concern.
- Organize Your Screenshots: If you take screenshots frequently, create folders to organize them by project or date for easy retrieval.
Conclusion
Mastering the art of taking screenshots on your computer is a valuable skill that enhances your digital productivity and communication. Whether you are a Windows or macOS user, the methods outlined in this guide provide you with the tools to capture your screen effectively for any purpose. Practice these techniques, and you’ll be screenshotting like a pro in no time!