Pork tenderloin is a fantastic choice for a delicious and relatively healthy meal. Lean, flavorful, and quick-cooking, it’s perfect for a weeknight dinner or a special occasion. This guide will show you How To Cook A Pork Tenderloin in the oven to achieve incredibly juicy and tender results every time. Forget dry, disappointing pork – with our simple steps, you’ll master the art of cooking pork tenderloin to perfection.
What is Pork Tenderloin and Why Choose It?
Pork tenderloin, sometimes mistakenly called pork loin, is a long, thin cut of meat from the pig’s loin. Its name truly reflects its nature – it’s incredibly tender! This tenderness comes from the muscle itself, which doesn’t do much work, resulting in a fine-grained, melt-in-your-mouth texture when cooked correctly.
Why should you choose pork tenderloin?
- Lean Protein: Pork tenderloin is surprisingly lean, comparable to skinless chicken breast in terms of fat content. This makes it a healthy option for those watching their fat intake.
- Flavorful: While lean, pork tenderloin is packed with mild yet delicious flavor that pairs well with a variety of seasonings and sauces.
- Quick Cooking: Compared to tougher cuts of pork, tenderloin cooks relatively quickly in the oven, making it ideal for busy schedules.
- Versatile: You can bake it whole, slice it into medallions, use it in stir-fries, or even grill it. The possibilities are endless!
It’s crucial to distinguish pork tenderloin from pork loin. They are different cuts of meat requiring different cooking methods. Pork loin is much larger and wider, requiring longer cooking times and lower temperatures to become tender. For this recipe, ensure you purchase pork tenderloin.
The Secret to Juicy Pork Tenderloin: Brining
The key to achieving truly juicy pork tenderloin is brining. Brining is a simple technique that involves soaking the pork in a salt water solution. This process might sound intimidating, but it’s incredibly easy and makes a world of difference in the final result.
Why brine?
Brining works its magic on a molecular level. The salt in the brine helps the muscle cells retain moisture during cooking. It does this in two ways:
- Hydration: Salt encourages the muscle cells to absorb water through osmosis.
- Moisture Retention: Salt alters the proteins in the muscle, preventing them from contracting too much during cooking. This means less moisture is squeezed out, resulting in a juicier and more tender pork tenderloin.
Our quick brine takes just 20 minutes and dramatically improves the texture and juiciness of your pork. Don’t skip this step!
Step-by-Step Guide to Cooking Pork Tenderloin
Now, let’s get to the exciting part: cooking! Here’s a detailed guide to making perfectly oven-baked pork tenderloin.
Ingredients
- 1 package pork tenderloins (usually contains 2 tenderloins, about 2-2.5 lbs total)
- 1/4 cup kosher salt (Important: use kosher salt for brining, not table salt)
- 4 cups warm water
- 2 tablespoons apple cider vinegar
- 2 tablespoons brown sugar
- 1 cup ice cubes
- 2 tablespoons vegetable oil
- 1 tablespoon chili powder
- 1 tablespoon garlic powder
- 1 teaspoon salt
- 1 teaspoon onion powder
- 1/2 teaspoon smoked paprika
- 1/4 teaspoon black pepper
- 1/2 teaspoon dried parsley
- 1/2 teaspoon dried basil
- 1/2 teaspoon dried oregano
- 1/2 teaspoon dried thyme
- 2 tablespoons lemon juice, freshly squeezed
- 3 tablespoons butter, unsalted, cut into 6 pats
Instructions
-
Preheat Oven & Prepare Foil: Preheat your oven to 400°F (200°C). Lay out two large sheets of aluminum foil on a baking sheet. These will be used to wrap each tenderloin separately for baking.
-
Brine the Pork: In a gallon-sized freezer bag, dissolve kosher salt in warm water. Whisk in apple cider vinegar and brown sugar until dissolved. Add ice cubes to cool the brine down. Place the pork tenderloins in the brine, ensuring they are fully submerged. Brine for exactly 20 minutes. Do not brine for longer as it can make the pork texture mealy.
-
Rinse and Dry: After 20 minutes, remove the pork from the brine and thoroughly rinse under cool water to remove excess salt. Pat the pork very dry with paper towels. This step is crucial for the seasonings to adhere properly and for good searing.
-
Prepare Spice Rub: In a small bowl, combine chili powder, garlic powder, salt, onion powder, smoked paprika, and black pepper.
-
Season the Pork: Generously rub the spice mixture all over both pork tenderloins, ensuring all sides are coated.
-
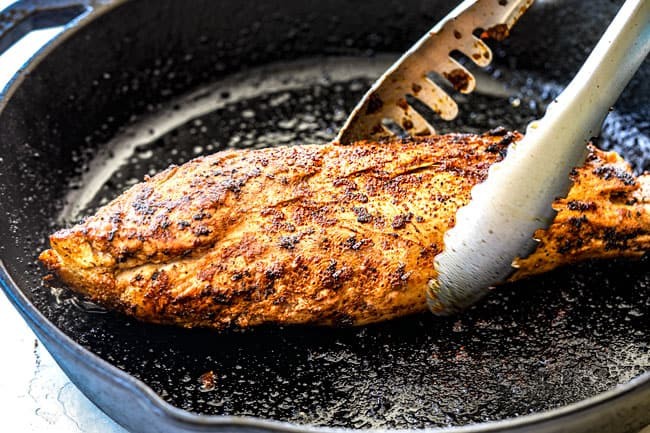
Sear the Pork: Heat vegetable oil in a large skillet (cast iron or non-stick works well) over medium-high heat. Once the oil is hot and shimmering (almost smoking), carefully add the pork tenderloins. Sear each side of the pork until golden brown, about 2-3 minutes per side. Searing adds incredible flavor and helps to lock in juices. You may need to sear in batches to avoid overcrowding the pan.
-
Herb and Butter Time: Transfer the seared pork tenderloins to the prepared foil sheets. Sprinkle the dried parsley, basil, oregano, and thyme evenly over the tops of each tenderloin. Gently rub the herbs into the pork. Drizzle 1 tablespoon of fresh lemon juice over each tenderloin. Top each tenderloin with 3 pats of butter.
-
Wrap and Bake: Bring the sides of the foil up and over the pork tenderloins, completely enclosing each one to create sealed packets. This creates a steamy environment that keeps the pork moist during baking.
-
Bake in the Oven: Place the baking sheet with the foil-wrapped pork in the preheated oven and bake for 15-25 minutes, or until a meat thermometer inserted into the thickest part of the pork registers between 145-150°F (63-65°C). Cooking time will vary depending on the thickness of your tenderloins.
-
Rest and Slice: Once cooked, remove the baking sheet from the oven. Loosen the foil packets to allow steam to escape, and let the pork rest for 5-10 minutes before slicing. Resting is essential as it allows the juices to redistribute throughout the meat, resulting in even more tender and flavorful pork.
-
Slice and Serve: Slice the pork tenderloin against the grain into ½-inch thick slices or thinner, depending on your preference. Serve immediately, drizzling with the flavorful butter sauce that has accumulated in the foil packets.
Tips for the Best Oven-Baked Pork Tenderloin
- Don’t Overcook: Pork tenderloin is lean and can dry out easily if overcooked. Use a meat thermometer to ensure it reaches the perfect internal temperature. Aim for 145-150°F (63-65°C) for optimal juiciness.
- Invest in a Meat Thermometer: A meat thermometer is your best friend when cooking pork tenderloin. It eliminates guesswork and ensures perfectly cooked, juicy pork every time.
- Sear for Flavor: Searing the pork before baking is crucial for developing rich, complex flavors and adding a beautiful crust.
- Rest is Key: Don’t skip the resting period! Resting allows the juices to redistribute, resulting in a more tender and flavorful final product.
- Slice Against the Grain: Slicing against the grain ensures maximum tenderness when you eat the pork.
How Long to Cook Pork Tenderloin?
Cooking time for pork tenderloin in a 400°F (200°C) oven typically ranges from 15 to 25 minutes, depending on the thickness of the tenderloin and your desired level of doneness.
Internal Temperature Guide:
- 145°F (63°C): Slightly pink and very juicy (USDA recommended safe temperature)
- 150°F (65°C): A touch more cooked, still moist and tender, with a hint of pink.
- 160°F (71°C): Cooked through, no pink, still relatively moist but can start to become drier if overcooked further.
It’s best to remove the pork from the oven when it reaches the lower end of these temperature ranges, as the internal temperature will continue to rise slightly as it rests.
Serving Suggestions
This baked pork tenderloin is incredibly versatile and pairs well with a wide variety of side dishes. Here are a few ideas:
- Classic Sides: Roasted vegetables (asparagus, broccoli, Brussels sprouts), mashed potatoes, sweet potato casserole, macaroni and cheese.
- Fresh Salads: Green salad with vinaigrette, pasta salad, quinoa salad.
- Grains: Rice pilaf, couscous, quinoa.
- Sauces: Serve with the pan sauce from the foil packets, or try a fruit chutney, balsamic glaze, or creamy Dijon sauce.
Storing and Freezing Leftovers
Leftover baked pork tenderloin is a treasure! Store it in an airtight container in the refrigerator for up to 3-4 days. It’s delicious cold in sandwiches and salads, or reheated.
Reheating: Reheat gently in the oven at 350°F (175°C) or in a skillet over medium-low heat until warmed through. Avoid overheating as it can dry out the pork.
Freezing: You can freeze cooked pork tenderloin for up to 2-3 months. Wrap it tightly in plastic wrap and then in a freezer bag. Thaw in the refrigerator overnight before reheating.
Pork Tenderloin Recipe FAQs
Do I need to remove the silverskin?
Yes, if your pork tenderloin has silverskin (a thin, silvery membrane), it’s best to remove it before cooking as it can become tough and chewy. Slide a sharp knife under the silverskin and trim it away. Many pre-packaged tenderloins come already trimmed.
Can I marinate the pork instead of brining?
While marinating adds flavor, brining is superior for juiciness. You can combine brining and marinating: brine for 20 minutes, then marinate for a few hours for added flavor complexity.
Can I grill pork tenderloin?
Yes, grilling is another excellent way to cook pork tenderloin. Sear it over direct heat and then move to indirect heat to finish cooking through.
What if I don’t have all the spices in the rub?
Feel free to adjust the spice rub to your liking. Use your favorite spice blends or keep it simple with just salt, pepper, and garlic powder.
Enjoy Your Perfectly Cooked Pork Tenderloin!
Learning how to cook a pork tenderloin doesn’t have to be intimidating. With this easy recipe and our helpful tips, you’ll be able to create a juicy, flavorful, and impressive dish every time. Enjoy this delicious and versatile protein as a centerpiece of your next meal!
Find more delicious recipes on Pinterest!
©Carlsbad Cravings by CarlsbadCravings.com