If you’re the proud owner of silver items, whether it’s elegant silverware, decorative candlesticks, or cherished jewelry, you’ll know the frustration of watching their once brilliant shine fade into dullness. This tarnish, a consequence of silver reacting with sulfur in the air, can appear surprisingly quickly. Household silver isn’t pure silver; it’s usually sterling silver, an alloy of silver and other metals like copper, added for durability. While tarnish is different from rust – it doesn’t eat away at the metal – it definitely detracts from silver’s beauty. Luckily, restoring your silver’s luster is a straightforward process.
We’ve explored a range of methods for cleaning silver, from readily available household items to specialized store-bought solutions. This guide will walk you through the effectiveness of each approach, helping you choose the best way to bring back the sparkle to your silver treasures.
Exploring Different Silver Cleaning Methods: From Least to Most Effective
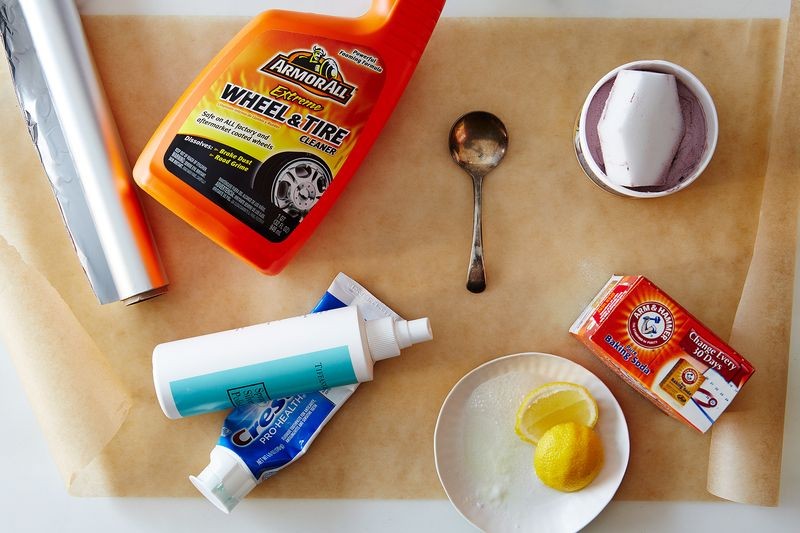
We tested several popular methods for cleaning silver, evaluating their ease of use, effectiveness in removing tarnish, and potential drawbacks. Here’s a breakdown of our findings, starting with the least effective and progressing to our top recommendation.
Toothpaste: Mild but Minimally Effective
Toothpaste is often suggested as a gentle cleaning agent for various household items, and silver is no exception. The idea is that the mild abrasives in toothpaste can buff away tarnish.
- Gentle Action: Toothpaste proved to be the least abrasive cleaner among those we tested. It did lighten the tarnish slightly, but it didn’t fully remove it. For very light tarnish, it might suffice, but for anything more significant, it falls short.
- Pros: Pleasant scent, easy to rinse off, and most households already have toothpaste readily available. It’s a budget-friendly option if you’re looking for a very superficial clean.
- Cons: Ineffective for significant tarnish, may contain abrasives that could potentially scratch delicate silver, especially silver-plated items, as cautioned by some users.
Hubcap Cleaner: Aggressive and Not Recommended
Hubcap cleaner, designed to remove brake dust and grime from car wheels, might seem like a powerful cleaning solution. One source even recommended it for silver-plate utensils.
- Harsh Cleaning: Hubcap cleaner was undeniably the most aggressive cleaner we tested. It did create a very shiny area on the silver, removing tarnish effectively. However, it also stripped away desirable patina and left an uneven, almost bleached appearance.
- Cons: Too harsh for silver, risks damaging the finish, difficult to source (not a common household item), and using a car cleaning product on items you eat with is unappealing and potentially unsafe. Definitely not recommended for cleaning silver.
Lemon Juice & Baking Soda: A Moderately Abrasive DIY Approach
Combining lemon juice and baking soda creates a fizzy, mildly abrasive paste that some recommend for cleaning tarnished silver.
- Decent Tarnish Removal: This natural cleaner was surprisingly effective at removing tarnish, even some of the desirable aging or “good” tarnish. It is more abrasive than toothpaste but less harsh than hubcap cleaner. It left a slightly duller shine compared to professional polishes.
- Pros: Made from common pantry ingredients, readily available and inexpensive. The fizzing action can be visually satisfying.
- Cons: More abrasive than ideal for regular silver cleaning, may dull the shine, and requires some elbow grease to apply effectively.
Tiffany Silver Polish Spray & Wright’s Silver Cream: Effective Store-Bought Solutions
For those seeking commercially formulated silver cleaners, Tiffany Silver Polish Spray and Wright’s Silver Cream are often recommended for their effectiveness and gentler action compared to harsher DIY methods.
- Effective and Gentle: Both Tiffany’s and Wright’s silver polishes proved to be highly effective at removing tarnish while being gentle enough to preserve the silver’s surface. They removed the dark tarnish without stripping away the subtle, desirable patina that gives silver character.
- Pros: Specifically designed for silver, readily available (Wright’s Silver Cream is widely accessible in drugstores and pharmacies, while Tiffany’s is available from their store), easy to use. Tiffany’s spray is particularly convenient for larger items or sets.
- Cons: Tiffany’s is more expensive and less accessible outside major city centers. Wright’s Cream requires a bit more buffing to achieve a high shine and the sponge applicator may be less practical for silverware. Both are chemical products, which some may prefer to avoid.
Aluminum Foil, Baking Soda & Hot Water: The Best Overall Method
The combination of aluminum foil, baking soda, and hot water emerged as our top pick for cleaning silver. This method leverages a chemical reaction to remove tarnish effectively and gently.
- Effortless Tarnish Removal: Soaking silver in this solution loosens tarnish remarkably well. Dark tarnish practically lifts off, leaving behind the subtle, desirable lighter tones of aged silver.
- Gentle and Effective Chemistry: The magic behind this method lies in a chemical reaction. When aluminum, baking soda, and hot water combine, they create an electrolytic reaction. The tarnish (silver sulfide) is converted back to silver, and sulfur transfers to the aluminum foil. This process cleans the silver without harsh abrasives.
- Pros: Easy to set up, requires minimal scrubbing, uses readily available and inexpensive household items, effective even on heavily tarnished silver, and gentle on delicate silver items. It’s particularly well-suited for cleaning large quantities of silverware at once.
- Cons: Requires a bit of preparation (lining a dish with foil), produces a slight sulfurous smell during the reaction (harmless but noticeable).
Step-by-Step Guide: Cleaning Silver with Aluminum Foil, Baking Soda, and Hot Water
This method is our recommended approach for effectively and safely cleaning your silver.
You will need:
- Aluminum foil
- Baking soda
- Hot water
- A casserole dish or shallow container
- Soft cloth or rag
Instructions:
- Prepare the dish: Line the casserole dish or container completely with aluminum foil, ensuring the shiny side is facing up and that the foil is in contact with itself (no gaps). This is crucial for the chemical reaction.
- Add baking soda: Sprinkle a generous amount of baking soda into the foil-lined dish. The amount will depend on the size of your dish and the quantity of silver, but a few tablespoons are usually sufficient.
- Place silver in the dish: Arrange your silver pieces in the dish, ensuring each piece is touching the aluminum foil. For heavily tarnished items, make sure the tarnished areas are in contact with the foil.
- Pour hot water: Carefully pour hot (but not boiling) water into the dish, enough to fully submerge the silver pieces.
- Wait and watch: Let the silver soak in the solution. You should start to see bubbles and possibly a slight yellowish tinge to the water as the tarnish is removed. The soaking time will vary depending on the level of tarnish, from a few minutes for light tarnish to up to an hour for heavy tarnish. Check periodically.
- Remove and rinse: Once the tarnish is removed to your satisfaction, carefully remove the silver pieces from the dish. Rinse them thoroughly under warm water to remove any baking soda residue.
- Dry and buff: Dry the silver pieces immediately and thoroughly with a soft cloth. Buff gently to enhance the shine. For intricate pieces, ensure you dry all crevices to prevent water spots.
Maintaining Your Silver’s Shine: Prevention Tips
Cleaning silver is essential, but preventing tarnish buildup will reduce the frequency of cleaning and keep your silver looking its best for longer.
- Proper Storage: Store silver in airtight containers or tarnish-resistant bags when not in use. Adding anti-tarnish strips or silica gel packets can further absorb moisture and pollutants that contribute to tarnish.
- Regular Gentle Cleaning: Wipe your silver items with a soft, dry cloth after each use to remove fingerprints and food residues that can accelerate tarnishing.
- Avoid Harsh Chemicals: Keep silver away from rubber, felt, and sulfur-containing materials, as these can promote tarnish. Also, avoid using harsh chemical cleaners that can damage the silver surface.
- Handle with Care: Wash silver items separately from stainless steel in the dishwasher to prevent electrolytic reactions that can cause pitting. If handwashing, use a mild dish soap and avoid abrasive scrubbers.
Conclusion: Sparkling Silver Made Simple
While specialized silver polishes offer effective cleaning, the aluminum foil, baking soda, and hot water method stands out as the best overall solution for cleaning silver. It’s easy, inexpensive, gentle, and remarkably effective. By understanding the cause of tarnish and employing the right cleaning and preventative measures, you can keep your silver items gleaming beautifully for years to come, enhancing your home and preserving your cherished heirlooms.