Google Forms is a versatile and free tool that simplifies data collection for various purposes. Whether you need to conduct market research, gather customer feedback, plan an event, or create quizzes for educational purposes, Google Forms offers an efficient and user-friendly solution. Its seamless integration with other Google Workspace applications like Google Sheets and Google Drive makes it a powerful asset for anyone looking to streamline data gathering and analysis.
In this comprehensive guide, we will walk you through the process of How To Make A Google Form from scratch. We’ll cover everything from the initial setup to advanced customization options, ensuring you can create effective and engaging forms tailored to your specific needs. Let’s dive in and explore the world of Google Forms!
Creating a New Google Form Survey: Step-by-Step
Creating a Google Form is a straightforward process that can be completed in just a few simple steps. Follow this step-by-step guide to get your form up and running in no time.
Step 1: Access Google Forms
The first step is to navigate to Google Forms. You can easily access it in two primary ways:
- Directly through your browser: Open your preferred web browser and go to forms.google.com. This will take you directly to the Google Forms homepage.
- Via Google Drive: Alternatively, you can access Google Forms through Google Drive. Go to your Google Drive account, click on the “New” button, hover over “More,” and then select “Google Forms.”
Both methods will lead you to the Google Forms interface, ready for you to start creating your form.
Step 2: Choose a Template or Start Blank
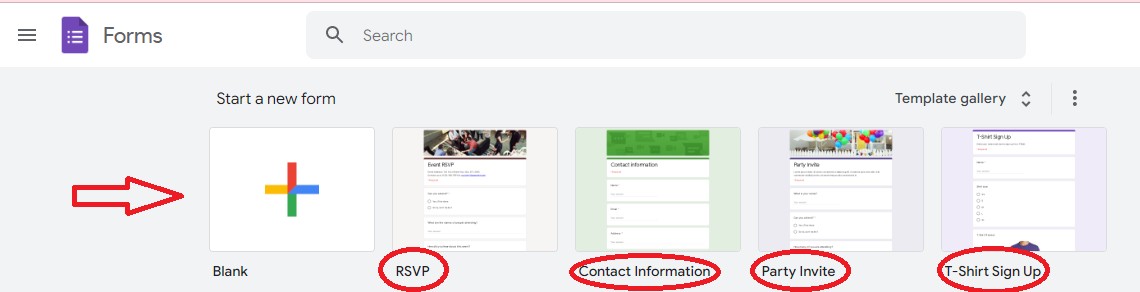
Once you’re in Google Forms, you’ll be presented with a choice: start with a pre-designed template or create a form from scratch using a blank template.
-
Using Templates: Google Forms offers a variety of templates to expedite the form creation process. These templates are categorized for different purposes such as “Contact Information,” “Event RSVP,” “Customer Feedback,” and more. Browsing through the template gallery can provide a quick starting point, especially if your form aligns with a common use case. Simply select a template that closely matches your needs and customize it further.
-
Starting with a Blank Form: If you prefer complete control over the form’s design and questions, or if your form is unique, starting with a “Blank” template is the way to go. This option provides a clean slate, allowing you to build your form structure from the ground up.
For this guide, we’ll proceed with a blank template to illustrate the process comprehensively. Click on the “Blank” option to open a new, untitled form.
Step 3: Title Your Google Form
The next crucial step is to give your form a clear and descriptive title. This title will be visible to respondents and will also help you organize your forms in Google Drive.
- Click on “Untitled form”: At the top left corner of the page, you’ll see the text “Untitled form.” Click on this text.
- Enter your title: Type in a relevant and concise title for your form. For instance, if you’re creating a customer feedback survey, you might title it “Customer Feedback Survey.”
Below the title, you’ll find the “Form description” field. This is optional but highly recommended. Use the description to provide respondents with context about the form’s purpose, instructions, or any additional information they might need before proceeding.
Step 4: Add Questions and Answers to Your Google Questionnaire
With the form titled and described, it’s time to add questions to your Google questionnaire. Google Forms offers a wide array of question types to cater to different data collection needs.
-
Default Question: By default, a new form starts with an “Untitled Question.” Click on this to begin editing your first question.
-
Enter Your Question: Replace the “Untitled Question” text with your actual question. Be clear and concise in your phrasing to ensure respondents understand what’s being asked.
-
Choose Question Type: Click on the dropdown menu next to the question. This menu displays various question types, including:
- Short answer: For brief text responses like names or short comments.
- Paragraph: For longer, more detailed text answers.
- Multiple choice: Allows respondents to select one option from a list.
- Checkboxes: Enables respondents to select multiple options from a list.
- Dropdown: Presents options in a dropdown menu, suitable for long lists.
- File upload: Allows respondents to upload files (ensure you adjust settings for file types and size limits).
- Linear scale: Asks respondents to rate something on a scale (e.g., 1 to 5).
- Multiple choice grid: Presents a grid of options where respondents can choose one option per row.
- Checkbox grid: Similar to multiple choice grid but allows multiple selections per row.
- Date: For collecting date-based information.
- Time: For collecting time-based information.
Select the question type that best suits the nature of your question and the type of response you’re seeking. For example, for a name field, “Short answer” is appropriate. For a question with predefined options, “Multiple choice” or “Dropdown” might be suitable.
-
Add Answer Options (if applicable): For question types like “Multiple choice,” “Checkboxes,” or “Dropdown,” you’ll need to provide answer options. Click on “Option 1” and replace it with your first answer choice. To add more options, click “Add option.” You can also add an “Add ‘Other'” option, allowing respondents to type in a custom answer if none of the provided options fit.
-
Add Images and Videos: To enhance your questions or provide visual context, Google Forms allows you to insert images and videos directly into questions. Click the image icon to insert an image or the video icon to embed a YouTube video. This can be particularly useful for visual surveys or quizzes.
-
Duplicate, Delete, or Make Questions Required: Each question in Google Forms comes with a set of icons at the bottom:
- Duplicate: Click this icon to create an exact copy of the question, useful for similar questions with slight variations.
- Delete: Click the trash can icon to remove the question.
- Required: Toggle this switch to make a question mandatory. Respondents will not be able to submit the form without answering required questions.
-
Add More Questions: To add more questions to your form, click the “+” icon in the floating toolbar on the right-hand side. This will add a new question below the current one, ready for you to customize.
Repeat steps 2-7 to add all the necessary questions to your Google Form, ensuring a logical flow and comprehensive coverage of your data collection needs.
Step 5: Preview Your Google Form Survey
Before sharing your form with respondents, it’s crucial to preview it to ensure everything appears and functions as intended.
- Click “Preview”: In the top-right corner of the Google Forms interface, you’ll find the “Preview” button (it looks like an eye icon). Click on this button.
- Test Your Form: Clicking “Preview” will open your form in a new browser tab as it will appear to respondents. Take this opportunity to:
- Review all questions for clarity and accuracy.
- Test different question types to ensure they function correctly.
- Check the overall layout and flow of the form.
- If you’ve set any questions as “Required,” verify that this functionality is working as expected.
By previewing your form, you can catch any errors or areas for improvement before it goes live, ensuring a smooth experience for your respondents.
Step 6: Share Your Google Form via Link or Email
Once you are satisfied with your Google Form after previewing, the final step is to share it with your intended audience to start collecting responses. Google Forms offers several sharing options:
- Click “Send”: In the top-right corner of the Google Forms interface, click the “Send” button. This will open the “Send form” dialog box.
- Choose Your Sharing Method: In the “Send form” dialog, you’ll see different tabs representing sharing methods:
- Email (Envelope Icon): To send the form directly via email, select this tab. Enter the email addresses of recipients in the “To” field (you can separate multiple addresses with commas). You can customize the email subject and message. Click “Send” to dispatch the emails with a link to your form.
- Link (Link Icon): To generate a shareable link, select this tab. Google Forms will provide a URL for your form. You can copy this link and share it through any communication channel – email, social media, messaging apps, etc. For lengthy URLs, you have the option to “Shorten URL” for a more compact link.
- Embed (
<>Icon): If you want to embed your form directly into a website or blog, select this tab. Google Forms will generate embed code (HTML<iframe>tag). Copy this code and paste it into the HTML source of your webpage where you want the form to appear.
Choose the sharing method that best suits your needs and audience. For broad distribution, sharing a link is often most efficient. For targeted audiences or embedding on a specific platform, email or embed options may be more appropriate.
After sharing your form, responses will be automatically collected and stored in Google Forms, ready for you to review and analyze.
How to Enhance Your Google Form: Customization Tips
Creating a basic Google Form is just the beginning. To make your forms more effective and user-friendly, consider these customization tips:
Step 1: Adjust Important Settings
Google Forms offers a range of settings that can significantly impact how your form functions and how you collect data. Access these settings by clicking on the “Settings” tab at the top of your form.
-
General Settings:
- Collect email addresses: Enable this to automatically collect respondents’ email addresses. You can choose to collect verified emails or allow responses without email verification. If you need to know who submitted each response, this is essential. However, for anonymous surveys, leave this option off.
- Send responders a copy of their response: Allow respondents to receive a copy of their submitted responses via email. This can be helpful for record-keeping and transparency.
- Limit to 1 response: Restrict each respondent to submitting the form only once. This is useful for surveys or quizzes where you want to avoid duplicate submissions from the same individual. Google sign-in is required for this option.
- Edit after submit: Allow respondents to go back and edit their responses after submission. Enable this if you want to give respondents the flexibility to correct mistakes or update their information.
- See summary charts and text responses: Allow respondents to view a summary of responses from everyone who has filled out the form. This can be useful for quick polls or surveys where you want to share overall trends with participants.
-
Presentation Settings:
- Show progress bar: If your form is lengthy and divided into sections, enabling the progress bar helps respondents track their completion progress, improving the user experience.
- Shuffle question order: Randomize the order of questions for each respondent. Useful for quizzes or assessments to minimize bias or cheating.
- Show link to submit another response: After submission, display a link allowing respondents to submit the form again. Disable this if you’ve limited responses to one per person.
- Confirmation message: Customize the message respondents see after submitting the form. Use this to thank them, provide further instructions, or confirm successful submission.
-
Quizzes Settings:
- Make this a quiz: Turn your form into a quiz by enabling this option. This unlocks features like assigning point values to questions, setting correct answers, and providing automated feedback.
- Release grade: Choose when to release grades to respondents – immediately after submission or later after manual review.
- Respondent can see: Control what respondents can see after the quiz – missed questions, correct answers, point values.
Carefully review and adjust these settings to align with your form’s purpose and data collection goals.
Step 2: Organize with Sections and Logic Branching
For longer, more complex forms, organizing content into sections and implementing logic branching can significantly improve user experience and data quality.
-
Sections: Break your form into logical parts using sections. To add a section, click the “Add section” icon (equals sign) in the floating toolbar. Sections act as page breaks, dividing your form into distinct segments. This makes lengthy forms less overwhelming for respondents. You can title and describe each section to provide context.
-
Logic Branching (Conditional Logic): Implement conditional logic to create dynamic forms that adapt based on respondent answers. This feature, also known as “skip logic,” allows you to direct respondents to different sections or questions based on their previous responses.
- Access Section Navigation: For a question where you want to apply logic branching, click on the three dots (More options) at the bottom of the question.
- Choose “Go to section based on answer”: Select this option from the menu.
- Configure Branching: For each answer option in a multiple-choice, dropdown, or checkbox question, you can now choose which section the respondent should be directed to next. You can direct them to a specific section, “Continue to next section” (default behavior), or “Submit form.”
Using sections and logic branching makes your forms more engaging, relevant, and efficient for respondents, as they only see questions pertinent to their situation or previous answers.
Step 3: Customize the Theme
Personalize the visual appearance of your Google Form to align with your brand or the form’s topic. Google Forms offers theme customization options accessible via the “Customize theme” button (palette icon) at the top right.
- Header Image: Add a header image to the top of your form to visually enhance it. You can choose from Google Forms’ pre-set images or upload your own image, such as a logo or a relevant graphic. Ensure your header image is appropriately sized for optimal display.
- Color Theme: Select a color theme that complements your header image or brand. You can choose from pre-set color palettes or customize background, theme, and question colors.
- Font Style: Change the font style to match the overall tone of your form. Google Forms provides a few font options (Basic, Decorative, Formal, Playful). Choose a font that is legible and visually appealing.
Theme customization enhances the visual appeal of your form, making it more engaging for respondents and reinforcing your brand identity.
How to Utilize Google Forms Effectively
Beyond creation and customization, understanding how to effectively use Google Forms is key to maximizing its value for data collection and analysis.
Step 1: Connect Your Form to Google Sheets
Integrating your Google Form with Google Sheets is highly recommended for efficient data management and analysis. Google Sheets provides a spreadsheet format that makes it easier to view, sort, filter, and analyze responses.
- Go to “Responses” Tab: In your Google Form, click on the “Responses” tab.
- Link to Sheets: Look for the Google Sheets icon (green spreadsheet icon) within the “Responses” tab and click on it.
- Choose Destination: You’ll be prompted to choose a destination for responses:
- Create a new spreadsheet: This option creates a new Google Sheet in your Google Drive specifically for your form responses.
- Select existing spreadsheet: Choose this to link your form responses to an existing Google Sheet. You’ll be asked to select the specific sheet from your Google Drive.
- View Responses in Sheets: Once linked, each new form submission will automatically populate a new row in your Google Sheet. The columns will correspond to your form questions, making it easy to organize and analyze the collected data.
Linking to Google Sheets enables advanced data analysis, charting, and reporting capabilities, far beyond the basic summary provided within Google Forms itself.
Step 2: Collaborate with Others
If you’re working with a team, Google Forms allows for collaboration, enabling multiple people to work on the form, review responses, or manage data.
- Open “More” Menu: In your Google Form, click on the three dots (More options) in the top-right corner, next to the “Send” button.
- Select “Add collaborators”: Choose “Add collaborators” from the dropdown menu.
- Invite Collaborators: In the “Share with people and groups” dialog, enter the email addresses of the people you want to add as collaborators.
- Set Permissions: By default, collaborators are added as “Editors,” meaning they have the same editing permissions as you, including the ability to modify the form structure, view responses, and change settings. You can adjust permissions if needed.
- Send Invitation: Click “Send” to invite collaborators. They will receive an email notification with a link to access and collaborate on the form.
Collaboration features streamline teamwork on form creation, management, and response analysis, making Google Forms a valuable tool for group projects or organizational data collection.
Step 3: Analyze Responses and Gather Insights
Google Forms provides basic response summaries directly within the platform. However, for in-depth analysis, leveraging Google Sheets integration is highly recommended.
-
Google Forms Response Summary: Within the “Responses” tab of your Google Form, you’ll find a basic summary of responses. This includes:
- Summary: Overview charts and graphs summarizing responses for each question.
- Question: View responses question by question.
- Individual: Browse through individual responses submitted by each respondent.
The built-in summary is useful for a quick overview of high-level trends.
-
Google Sheets for Advanced Analysis: For detailed analysis, use the linked Google Sheet. In Google Sheets, you can:
- Sort and Filter Data: Sort responses by specific columns or filter data based on criteria to identify patterns and segments.
- Create Charts and Graphs: Generate more sophisticated charts and graphs than those provided in Google Forms’ summary.
- Apply Formulas and Functions: Utilize Google Sheets’ extensive formula library for calculations, statistical analysis, and data manipulation.
- Use Pivot Tables: Create pivot tables to summarize and analyze data from different perspectives.
By combining Google Forms for data collection and Google Sheets for analysis, you can extract valuable insights from your form responses to inform decision-making and improve your products, services, or processes.
Step 4: Extend Functionality with Add-ons
To further enhance the capabilities of Google Forms, explore and utilize add-ons available in the Google Workspace Marketplace. Add-ons can extend Google Forms’ functionality in various ways, such as:
- Form Notifications: Get email notifications for each new form submission or set up custom notification workflows.
- Form Limitations: Set limits on form submissions, time-based restrictions, or response quotas.
- Document Generation: Automatically generate documents (PDFs, Docs) from form responses, ideal for creating personalized reports or certificates.
- Advanced Analytics: Integrate with third-party analytics tools for more comprehensive response analysis and reporting.
- Integrations with Other Apps: Connect Google Forms to other applications and services for seamless workflows and data sharing.
To explore and install add-ons:
- Open “More” Menu: In your Google Form, click on the three dots (More options) in the top-right corner.
- Select “Add-ons”: Choose “Add-ons” from the dropdown menu. This will open the Google Workspace Marketplace in a new window, filtered to Google Forms add-ons.
- Browse and Install: Search for add-ons based on your needs, read reviews, and install add-ons directly from the Marketplace. Follow the installation prompts and grant necessary permissions.
Add-ons can significantly expand Google Forms’ capabilities, tailoring it to specific use cases and workflows.
Diverse Applications of Google Forms
Google Forms is a remarkably versatile tool applicable across a wide spectrum of scenarios. Here are some key use cases:
Conducting Traditional Surveys
Google Forms excels at creating traditional surveys for various purposes, including:
- Market Research: Gather customer opinions on products, services, or brand perception.
- Customer Feedback: Collect feedback post-purchase or post-service to improve customer experience.
- Employee Surveys: Gauge employee satisfaction, gather feedback on company policies, or conduct internal polls.
- Academic Research: Create research questionnaires for data collection in studies and experiments.
Google Forms simplifies survey creation, distribution, and data collection, making it an invaluable tool for researchers, marketers, and organizations seeking to gather insights from their target audiences.
Managing Event RSVPs
Organizing events becomes streamlined with Google Forms for RSVP management:
- Event Invitations: Create visually appealing event invitation forms with details like date, time, location, and event description.
- RSVP Collection: Include questions to collect attendee information, dietary restrictions, and attendance confirmation.
- Automated Response Tracking: Responses are automatically collected in Google Sheets, providing a real-time attendee list.
- Communication: Use collected email addresses for event updates and reminders.
Google Forms simplifies RSVP tracking, eliminates manual tallying, and ensures efficient event planning and management.
Creating Quizzes and Assessments
Google Forms transforms into a powerful quiz and assessment tool with its “Make this a quiz” setting:
- Educational Quizzes: Create online quizzes for students with various question types, automated grading for multiple-choice questions, and manual grading options for short-answer questions.
- Training Assessments: Evaluate employee knowledge retention after training programs.
- Knowledge Checks: Conduct quick knowledge checks or polls for interactive learning or engagement.
- Surveys with Right/Wrong Answers: Even in survey contexts, you can use quiz features to assess respondent knowledge on specific topics.
Google Forms’ quiz features, combined with automated grading and response analysis, make it an effective platform for educational and training assessments.
Streamline Document Generation from Google Form Responses with Add-ons
While Google Forms is excellent for data collection, further enhancing its utility involves seamless document generation from collected responses. Add-ons like Form Publisher extend Google Forms’ capabilities by automating document creation.
Form Publisher, for instance, can automatically generate polished and professional documents (PDF, Google Docs, Microsoft Word) from form submissions. This is particularly useful for:
- Creating Personalized Reports: Generate customized reports for each form respondent based on their individual answers.
- Generating Certificates or Awards: Automatically create certificates of completion or awards for quiz participants or event attendees.
- Automating Approval Workflows: Set up automated approval processes where form responses trigger document generation and routing for approvals.
- Paperless Processes: Digitize administrative tasks like time-off requests, agreements, consent forms, by automating document creation and storage.
By leveraging add-ons like Form Publisher, you can transform Google Forms from a data collection tool into a comprehensive solution that automates document workflows, saves time, and enhances efficiency.
Conclusion
Mastering how to make a Google Form opens up a world of possibilities for efficient data collection, streamlined workflows, and enhanced insights. From simple surveys to complex quizzes and event management, Google Forms provides a user-friendly, versatile, and free platform for diverse needs. By following this comprehensive guide and exploring customization options and add-on functionalities, you can harness the full power of Google Forms to optimize your data gathering processes and make data-driven decisions effectively. Start creating your Google Forms today and experience the simplicity and power of this invaluable tool!