Making soap at home can be a rewarding experience. Are you looking for a new hobby that combines creativity with practicality? How To Make Soap is a skill that allows you to craft personalized skincare products. At HOW.EDU.VN, we understand the importance of quality and safety in DIY projects. Whether you’re a beginner or looking to refine your techniques, this guide provides expert insights and step-by-step instructions to ensure success in your soapmaking journey. With our guidance, you’ll learn to create beautiful, beneficial soaps tailored to your preferences.
This article delves into the artistry of crafting homemade soaps, highlighting the significance of gentle cleansing, moisturizing oils, and captivating scents.
1. Why Make Soap At Home?
Making soap at home offers numerous benefits, from controlling ingredients to creating custom products. Why should you consider embarking on this fulfilling craft?
- Control Over Ingredients: Homemade soap allows you to avoid harsh chemicals and synthetic additives, ensuring a gentle product for your skin.
- Customization: Tailor your soap with specific scents, colors, and additives to match your preferences and skin needs.
- Eco-Friendly: Reduce your environmental impact by using natural, sustainable ingredients and minimizing packaging waste.
- Cost-Effective: Making soap in large batches can be more economical than buying commercial soaps, especially if you source ingredients wisely.
- Creative Outlet: Soapmaking provides a creative outlet to experiment with various techniques and designs, resulting in unique and personalized bars.
2. Understanding the Basics of Soapmaking
Before diving into the process, understanding the science behind soapmaking is essential. What are the key components and reactions involved?
2.1. Saponification: The Chemical Reaction
Saponification is the chemical process that turns fats and oils into soap. It involves reacting triglycerides (fats and oils) with an alkali (lye) to produce soap and glycerin. According to a study by the American Oil Chemists’ Society, the efficiency of saponification depends on the purity of the ingredients and the control of temperature during the reaction.
2.2. Key Ingredients: Oils, Lye, and Water
The three primary ingredients in soapmaking are oils, lye, and water. Each plays a critical role in the final product:
- Oils: Provide the fatty acids necessary for saponification. Different oils contribute unique properties, such as lather, hardness, and moisturizing effects.
- Lye (Sodium Hydroxide): The alkali that reacts with oils to form soap. It’s crucial to handle lye with care, following safety guidelines to avoid burns or injuries.
- Water: Dissolves the lye and facilitates the saponification process. Distilled water is preferred to avoid impurities that may affect soap quality.
2.3. Types of Soapmaking: Cold Process, Hot Process, and Melt & Pour
There are three primary methods for making soap at home:
- Cold Process (CP): Involves mixing oils and lye at relatively low temperatures, allowing the saponification process to occur naturally over time. CP soap requires a curing period of several weeks to allow excess water to evaporate and the soap to harden.
- Hot Process (HP): Similar to CP but uses external heat to accelerate saponification. The soap is cooked until the reaction is complete, resulting in a ready-to-use product with a shorter curing time.
- Melt & Pour (M&P): Uses pre-made soap bases that can be melted, customized with additives, and poured into molds. M&P is a simple method for beginners as it eliminates the need to handle lye directly.
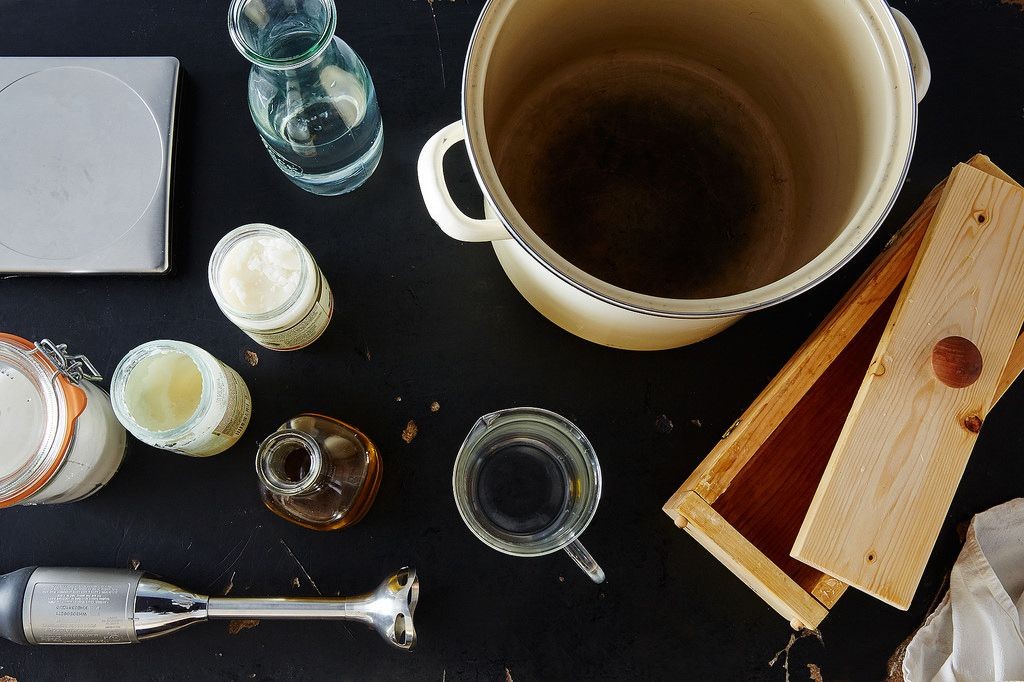
3. Essential Equipment and Safety Precautions
Safety is paramount when working with lye. What tools and protective gear do you need to ensure a safe and successful soapmaking experience?
3.1. Required Tools and Equipment
- Scale: For accurately measuring ingredients. A digital scale that measures in grams and ounces is recommended.
- Heat-Resistant Containers: For mixing lye and oils. Use containers made of stainless steel, Pyrex, or heavy-duty plastic.
- Thermometer: To monitor the temperature of lye and oils. An instant-read thermometer is ideal.
- Immersion Blender: To emulsify the mixture of oils and lye.
- Soap Molds: To shape the soap. Options include silicone molds, wooden molds, and baking pans lined with parchment paper.
- Spatulas and Stirring Utensils: Made of silicone or stainless steel.
- Protective Gear: Rubber gloves, safety goggles, and long sleeves to protect your skin and eyes from lye.
3.2. Safety Guidelines When Handling Lye
- Always Wear Protective Gear: Gloves and goggles are essential to prevent chemical burns.
- Work in a Well-Ventilated Area: Lye fumes can be irritating, so ensure proper ventilation.
- Add Lye to Water, Never Water to Lye: Adding water to lye can cause a dangerous reaction with splattering and potential explosions.
- Keep Children and Pets Away: Ensure the area is inaccessible to children and pets during the soapmaking process.
- Have Vinegar on Hand: Vinegar neutralizes lye, so keep a bottle nearby in case of spills.
4. Step-by-Step Guide to Making Soap Using the Cold Process Method
The cold process method is a popular choice for homemade soap. How do you execute this method safely and effectively?
4.1. Gathering Ingredients and Equipment
Before starting, gather all your ingredients and equipment:
- Oils: Coconut oil, olive oil, palm oil (or alternatives).
- Lye (Sodium Hydroxide): Measure precisely according to your recipe.
- Distilled Water: For dissolving the lye.
- Essential Oils or Fragrance Oils: For scenting the soap.
- Additives: Optional ingredients like herbs, exfoliants, or colorants.
4.2. Mixing the Lye Solution
- Prepare Your Workspace: Put on your gloves and goggles, and work in a well-ventilated area.
- Measure Water: Pour the required amount of distilled water into a heat-resistant container.
- Add Lye: Slowly add the lye to the water, stirring continuously until it dissolves completely. The mixture will heat up.
- Cool the Lye Solution: Allow the lye solution to cool to around 80-100°F (27-38°C).
4.3. Preparing the Oils
- Melt Solid Oils: If using solid oils like coconut or palm oil, melt them in a saucepan or microwave until liquid.
- Combine Oils: Pour all the oils into a large, heat-resistant pot.
- Check Temperature: Ensure the oils are also around 80-100°F (27-38°C).
4.4. Combining Lye and Oils
- Slowly Pour Lye: Carefully pour the cooled lye solution into the pot of oils.
- Blend the Mixture: Use an immersion blender to mix the lye and oils. Blend until the mixture reaches “trace”—a pudding-like consistency where a drizzle of the mixture leaves a visible pattern on the surface.
4.5. Adding Fragrance and Additives
- Add Fragrance: Once the mixture reaches trace, stir in your essential oils or fragrance oils.
- Add Additives: Mix in any additional ingredients like herbs, exfoliants, or colorants.
4.6. Pouring into Molds
- Prepare Molds: Line your soap molds with parchment paper if using wooden or metal molds.
- Pour Soap: Pour the soap mixture into the prepared molds.
- Cover and Insulate: Cover the molds with a lid or plastic wrap and wrap them in a towel or blanket to insulate.
4.7. Curing the Soap
- Let it Sit: Allow the soap to sit undisturbed for 24-48 hours.
- Unmold and Cut: After 24-48 hours, unmold the soap and cut it into bars.
- Cure: Place the bars on a wire rack or parchment paper in a well-ventilated area for 4-6 weeks to cure. This allows excess water to evaporate, resulting in a harder, milder soap.
5. Choosing the Right Oils for Your Soap
Different oils impart unique qualities to soap. Which oils are best suited for your desired soap properties?
5.1. Common Oils and Their Properties
- Coconut Oil: Produces a hard, cleansing bar with a fluffy lather. Use in moderation (15-30%) to avoid drying the skin.
- Olive Oil: Creates a mild, moisturizing soap with a stable lather. Olive oil soap, also known as Castile soap, is gentle and suitable for sensitive skin.
- Palm Oil: Adds hardness and stability to the soap. Ensure it comes from sustainable sources to minimize environmental impact.
- Shea Butter: Provides excellent moisturizing properties and a creamy lather.
- Castor Oil: Enhances lather and adds emollient properties to the soap.
5.2. Creating a Balanced Recipe
A well-balanced soap recipe combines oils that offer a range of properties:
- Hardness: Oils like coconut and palm contribute to a firm bar.
- Lather: Coconut and castor oil produce a rich, bubbly lather.
- Moisturizing: Olive oil, shea butter, and avocado oil provide moisturizing benefits.
- Stability: Palm oil and olive oil enhance the soap’s stability and longevity.
6. Adding Fragrance and Color to Your Soap
Personalize your soap with delightful scents and colors. What are the best practices for incorporating these elements?
6.1. Essential Oils vs. Fragrance Oils
- Essential Oils: Natural oils extracted from plants, offering therapeutic benefits and natural scents. Common choices include lavender, peppermint, and tea tree oil.
- Fragrance Oils: Synthetic oils designed to mimic natural scents or create unique blends. Fragrance oils are generally more cost-effective and offer a wider range of scent options.
6.2. Best Practices for Scenting Soap
- Use Recommended Amounts: Follow the manufacturer’s guidelines for essential oil or fragrance oil usage rates to avoid skin irritation or scent fading.
- Add at Trace: Add fragrance oils or essential oils after the soap mixture reaches trace to ensure they are evenly distributed.
- Consider Scent Notes: Understand the top, middle, and base notes of your chosen scents to create a balanced fragrance profile.
6.3. Natural and Synthetic Colorants
- Natural Colorants: Include herbs, spices, and clays that add subtle colors to soap. Examples include turmeric for yellow, beetroot powder for pink, and spirulina for green.
- Synthetic Colorants: Such as micas and liquid soap dyes, offer vibrant and consistent colors. Ensure they are cosmetic-grade and safe for skin contact.
7. Troubleshooting Common Soapmaking Issues
Even with careful preparation, soapmaking can present challenges. How do you address common issues?
7.1. Soft Soap
- Cause: Too much water in the recipe, insufficient hard oils, or premature unmolding.
- Solution: Reduce water content in future recipes, increase the proportion of hard oils, and allow the soap to sit longer in the mold before unmolding.
7.2. Crumbly Soap
- Cause: Insufficient mixing, rapid saponification, or excessive use of hard oils.
- Solution: Ensure thorough mixing, avoid overheating the mixture, and adjust the oil blend to include more moisturizing oils.
7.3. Seizing
- Cause: Rapid saponification due to certain fragrance oils or high temperatures.
- Solution: Work quickly, avoid fragrance oils known to cause seizing, and keep temperatures low. If seizing occurs, try hot processing the soap to complete saponification.
7.4. Ash on Soap Surface
- Cause: Exposure to air during saponification.
- Solution: Cover the soap mold with plastic wrap or a lid to prevent ash formation. The ash is harmless and can be wiped off after unmolding.
8. Advanced Soapmaking Techniques
Once you’ve mastered the basics, explore advanced techniques to elevate your soapmaking skills.
8.1. Swirling and Layering
Create visually stunning soaps by swirling different colors or layering contrasting shades:
- Swirling: Divide the soap batter into separate containers, add different colorants to each, and then pour them into the mold in a swirling pattern.
- Layering: Pour different colored soap batters into the mold in layers, allowing each layer to set slightly before adding the next.
8.2. Embeds and Inclusions
Incorporate decorative elements into your soap with embeds and inclusions:
- Embeds: Small soap shapes or objects that are placed inside the soap bar for decoration.
- Inclusions: Natural ingredients like herbs, flowers, or exfoliants that are added to the soap mixture for texture and visual appeal.
8.3. Hot Process Soapmaking
Hot process soapmaking involves cooking the soap mixture to accelerate saponification. This method results in a rustic, textured soap that can be used shortly after cooling:
- Combine Lye and Oils: Follow the same steps as cold process soapmaking.
- Cook the Soap: Place the soap mixture in a slow cooker or double boiler and cook for 1-3 hours, stirring occasionally.
- Test for Completion: Check the pH of the soap using a pH strip. The soap is ready when the pH is around 8-10.
- Add Fragrance and Additives: Stir in your fragrance oils and additives.
- Pour into Molds: Pour the soap into molds and allow it to cool and harden.
9. Soap Recipes to Try At Home
Experiment with these recipes to create a variety of soaps with different properties and scents.
9.1. Basic Castile Soap
- 100% Olive Oil
- Lye and water calculated using a soap calculator for superfat of 5%
- A classic, gentle soap ideal for sensitive skin.
9.2. Coconut Oil Soap
- 76% Coconut Oil: 700 grams
- Lye: 130 grams
- Water: 330 grams
- Creates a hard, bubbly soap.
9.3. Shea Butter and Olive Oil Soap
- Olive Oil: 50%
- Shea Butter: 30%
- Coconut Oil: 20%
- Lye and water calculated using a soap calculator for superfat of 5%
- A moisturizing soap with a creamy lather.
9.4. Lavender Essential Oil Soap
- Olive Oil: 40%
- Coconut Oil: 30%
- Palm Oil: 30%
- Lavender Essential Oil: 3% of total oils
- Lye and water calculated using a soap calculator for superfat of 5%
- A calming soap with a soothing lavender scent.
10. The Benefits of Expert Consultation at HOW.EDU.VN
While this guide provides a comprehensive overview of soapmaking, expert consultation can further enhance your skills and ensure safety. Why should you consider consulting with experts at HOW.EDU.VN?
10.1. Personalized Advice
Our team of over 100 Ph.D. experts can provide tailored advice based on your specific needs and challenges. Whether you’re struggling with a particular recipe or looking to optimize your soapmaking process, our experts offer personalized guidance to help you succeed.
10.2. Troubleshooting Complex Issues
Soapmaking can sometimes present unexpected challenges. Our experts can help you diagnose and resolve complex issues, ensuring you avoid costly mistakes and achieve optimal results.
10.3. Access to Cutting-Edge Techniques and Research
Stay ahead of the curve with access to the latest research and techniques in soapmaking. Our experts are constantly exploring new methods and ingredients, providing you with valuable insights to improve your craft.
10.4. Ensuring Safety and Compliance
Safety is paramount in soapmaking. Our experts can help you navigate safety regulations and best practices, ensuring your soapmaking process is safe and compliant with industry standards.
10.5. Connecting with a Community of Experts
Join a vibrant community of soapmaking enthusiasts and experts. Share your experiences, ask questions, and learn from others in the field, fostering a collaborative and supportive environment.
FAQ: Frequently Asked Questions About Making Soap
1. What is lye, and why is it necessary for making soap?
Lye, or sodium hydroxide, is an essential ingredient for saponification, the chemical reaction that turns fats and oils into soap. It’s a strong alkali that reacts with triglycerides to form soap and glycerin.
2. Is it safe to make soap at home with lye?
Yes, it is safe to make soap at home with lye, provided you follow safety guidelines. Always wear protective gear, work in a well-ventilated area, and add lye to water, never water to lye.
3. Can I use essential oils in soapmaking?
Yes, essential oils can be used to add natural scents and therapeutic benefits to soap. Use recommended amounts and add them after the soap mixture reaches trace.
4. How long does soap need to cure?
Soap typically needs to cure for 4-6 weeks. This allows excess water to evaporate, resulting in a harder, milder soap.
5. What is “trace” in soapmaking?
“Trace” is the consistency of the soap mixture when it reaches a pudding-like state. A drizzle of the mixture leaves a visible pattern on the surface before sinking back in.
6. Can I make soap without lye?
Yes, you can make soap without handling lye directly by using the melt & pour method. This involves melting pre-made soap bases and customizing them with additives.
7. What do I do if my soap is too soft?
If your soap is too soft, reduce the water content in future recipes, increase the proportion of hard oils, and allow the soap to sit longer in the mold before unmolding.
8. How do I prevent ash from forming on the surface of my soap?
To prevent ash from forming on the surface of your soap, cover the soap mold with plastic wrap or a lid during saponification.
9. Can I use milk instead of water in soapmaking?
Yes, you can use milk instead of water in soapmaking. Freeze the milk into ice cubes before adding lye to prevent scorching. Milk adds moisturizing properties to the soap.
10. Where can I find reliable soap recipes and information?
Reliable soap recipes and information can be found on reputable soapmaking websites, in soapmaking books, and through consultations with experts at HOW.EDU.VN.
Making soap at home is a rewarding and creative endeavor. By understanding the science behind soapmaking, following safety guidelines, and experimenting with different recipes and techniques, you can create personalized soaps that are gentle, effective, and beautifully crafted. For expert guidance and personalized advice, consult with our team of Ph.D. experts at HOW.EDU.VN.
Ready to elevate your soapmaking skills? Do you have a specific soapmaking challenge or a desire to create unique, high-quality soaps? Contact our team of over 100 Ph.D. experts at HOW.EDU.VN for personalized advice and solutions. We’re here to help you craft the perfect soap every time. Reach out today and let us guide you on your soapmaking journey.
Contact us:
- Address: 456 Expertise Plaza, Consult City, CA 90210, United States
- WhatsApp: +1 (310) 555-1212
- Website: HOW.EDU.VN
Let how.edu.vn be your partner in creating exceptional homemade soaps.