Craving incredibly tender, fall-off-the-bone ribs without firing up the grill? You’re in the right place! Baking ribs in the oven is the foolproof method for achieving barbecue perfection with minimal effort. This recipe takes the guesswork out of cooking ribs, ensuring they turn out juicy and flavorful every single time. Forget complicated techniques – we’re focusing on simple steps and a low and slow bake that lets the oven do all the hard work. Get ready to experience ribs so tender, they practically melt in your mouth.
What You’ll Need for Oven-Baked Rib Bliss
Before we dive into the easy steps, let’s gather our key ingredients. This recipe is wonderfully versatile, allowing for customization with your favorite seasonings and sauces, but here’s a breakdown of the essentials:
- Pork Ribs: Baby back ribs are a popular choice for their tenderness and meatiness, but this method works beautifully with other cuts too. Consider spare ribs, St. Louis-style ribs, or even country-style ribs. Keep in mind that cooking times may vary slightly depending on the cut, so it’s always best to check for tenderness as they cook.
- Seasoning: Simplicity can be incredibly satisfying. A generous coating of salt and freshly ground black pepper is truly all you need to enhance the natural flavor of the pork. However, don’t hesitate to explore your spice rack! Your favorite BBQ rub, seasoned salt, garlic powder, onion powder, paprika, or chili powder can add delicious layers of flavor.
- BBQ Sauce: The sauce is where you can really personalize your ribs. Whether you prefer homemade or store-bought, sweet, smoky, spicy, or tangy BBQ sauce, the choice is yours. For a richer flavor, consider a sauce with a tomato base, molasses, or brown sugar. If you’re feeling adventurous, you can even create your own signature blend!
- Olive Oil (Optional): A touch of olive oil can help the seasoning adhere to the ribs and promote even browning, but it’s not strictly necessary, especially if your ribs have good marbling.
- Aluminum Foil: Essential for creating a sealed environment that steams the ribs and keeps them incredibly moist during the low and slow bake.
Alt text: Video preview image showcasing the preparation of oven-baked ribs, highlighting the juicy texture and barbecue sauce glaze.
Step-by-Step Guide to Oven-Baked Rib Perfection
Cooking ribs in the oven is surprisingly straightforward. Follow these simple steps for guaranteed tender and flavorful results:
1. Prep the Ribs: Removing the Membrane (If Necessary)
For the ultimate fall-off-the-bone tenderness, removing the thin membrane on the bone-side of the ribs is highly recommended. This membrane can become tough and chewy during cooking, preventing the seasonings and flavors from fully penetrating the meat.
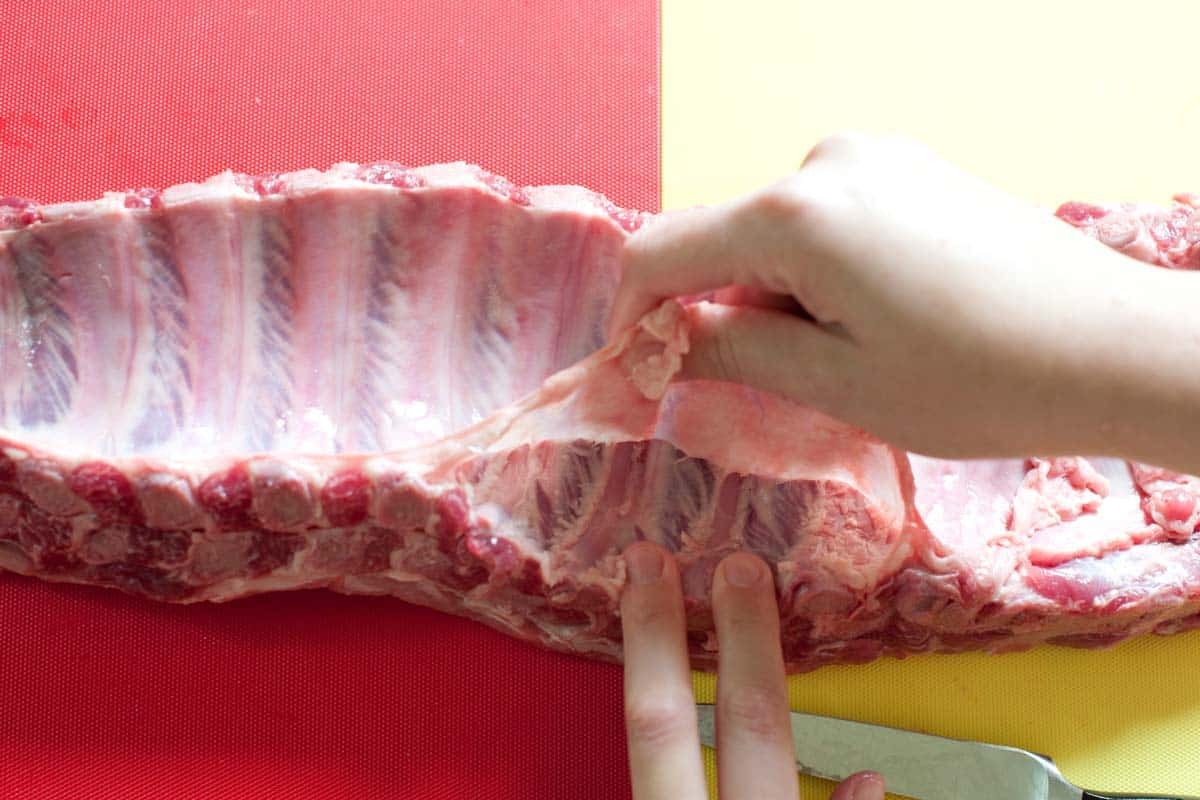
- Locate the Membrane: Place the ribs bone-side up on a cutting board. You’ll see a thin, silvery membrane covering the bones.
- Remove the Membrane: Slide the tip of a butter knife or a paring knife under the membrane, working along one of the bones. Once you’ve lifted a section, use your fingers to grip the membrane and pull it away from the rack. A paper towel can help you get a better grip if it’s slippery. Don’t worry if you don’t get it all in one piece – just remove as much as you can.
- Check if it’s Already Removed: Sometimes butchers remove the membrane for you. Check the bone-side of your ribs to see if it’s already been taken care of. If the bones are clearly visible and there’s no membrane, you can skip this step.
2. Season Generously
Now it’s time to season those ribs! Generously season both sides of the rib rack with your chosen seasonings. Don’t be shy – a good amount of seasoning is key to flavorful ribs. If you’re using a BBQ rub, massage it into the meat for even coverage. For simple salt and pepper, ensure you coat the entire surface.
3. Wrap in Foil for Low and Slow Baking
This is where the magic happens. Tightly wrapping the ribs in aluminum foil creates a steamy environment that tenderizes the meat as it bakes slowly at a low temperature.
- Preheat Oven: Preheat your oven to 275°F (135°C).
- Wrap the Ribs: Place the seasoned ribs meat-side up in a large roasting pan or rimmed baking sheet. You might need to cut the rack in half to fit. Tightly wrap the ribs with heavy-duty aluminum foil, ensuring there are no gaps for steam to escape. If your foil isn’t wide enough, use two pieces and crimp the edges together securely. The goal is to create a sealed packet.
4. Bake Low and Slow
Patience is your best friend for this step. The low temperature and long cooking time are crucial for breaking down the connective tissues and rendering the fat, resulting in incredibly tender ribs.
- Bake Time: Bake the foil-wrapped ribs for 2 ½ to 3 ½ hours, or until they are incredibly tender. Start checking for doneness around the 2-hour mark.
- Checking for Doneness: The ribs are ready when the meat is cooked through and pulls away easily from the bones. You can check by piercing them with a fork or knife – there should be very little resistance. Another way to check is to gently bend the rack of ribs. If the meat appears to be pulling back and almost falling off the bone, they’re ready.
5. BBQ Sauce and Caramelization (The Finishing Touch)
Almost there! The final step is to add that delicious BBQ sauce and create a beautiful caramelized glaze.
- Remove Foil and Sauce: Carefully remove the ribs from the oven and unwrap the foil. Brush both sides of the ribs generously with your favorite BBQ sauce.
- Broil or Grill (Optional but Recommended): For that irresistible sticky, caramelized finish, you have a couple of options:
- Broil: Move an oven rack to the top position and turn on the broiler to high. Broil the sauced ribs for 3-4 minutes, keeping a close eye on them to prevent the sauce from burning.
- Grill: Preheat your grill to medium heat. Grill the sauced ribs for a few minutes per side, until the sauce is caramelized and slightly charred.
- Serve and Enjoy: Let the ribs rest for a few minutes before serving. This allows the juices to redistribute, resulting in even more flavorful and tender ribs.
Tips for Perfect Oven Ribs Every Time
- Don’t Skip the Membrane Removal (Unless It’s Already Done): It truly makes a difference in tenderness.
- Experiment with Seasonings: While salt and pepper are classic, explore different spice rubs and seasonings to find your favorite flavor profiles.
- Choose Your Ribs Wisely: Baby back ribs are leaner and cook faster, while spare ribs are meatier and richer in flavor, but may require slightly longer cooking times.
- Homemade BBQ Sauce Elevates the Dish: While store-bought sauce is convenient, homemade BBQ sauce takes your ribs to another level. Try the easy recipe included in the original article or explore other homemade BBQ sauce recipes online.
- Watch the Broiler/Grill Carefully: The sugar in BBQ sauce can burn quickly under high heat. Keep a close eye on the ribs while broiling or grilling to prevent burning.
- Let Them Rest: Resting the ribs for a few minutes after cooking allows the juices to redistribute, resulting in more tender and flavorful meat.
Serving Suggestions: Complete Your Rib Feast
Oven-baked ribs are fantastic on their own, but they become a true feast when paired with delicious side dishes. Here are some classic and complementary options:
- Classic BBQ Sides:
- Coleslaw: Creamy or vinegar-based coleslaw provides a refreshing crunch and coolness that balances the richness of the ribs.
- Potato Salad: A must-have for any BBQ, potato salad is a comforting and satisfying side.
- Cornbread: Slightly sweet cornbread is perfect for soaking up BBQ sauce and adds a delightful texture contrast.
- Mac and Cheese: Creamy mac and cheese is always a crowd-pleaser and pairs wonderfully with ribs.
- Hearty Potato Dishes:
- Roasted Potatoes: Crispy roasted potatoes seasoned with herbs or spices are a simple and delicious side.
- Mashed Potatoes: Creamy mashed potatoes offer a comforting and classic pairing.
- Mashed Sweet Potatoes: For a touch of sweetness and vibrant color, try mashed sweet potatoes.
- Fresh Salads:
- Pasta Salad: A cold pasta salad with vegetables and a light dressing provides a refreshing contrast to the rich ribs.
- Green Salad: A simple green salad with your favorite dressing adds freshness and lightness to the meal.
Storing and Reheating Leftover Ribs
If you happen to have any leftover ribs (though it’s unlikely!), here’s how to store and reheat them:
- Storing: Store leftover ribs in an airtight container in the refrigerator for up to 4 days. For longer storage, you can freeze them for up to 3 months. Wrap them tightly in freezer-safe wrap or foil, then place them in a freezer bag for optimal protection against freezer burn. Thaw frozen ribs overnight in the refrigerator before reheating.
- Reheating:
- Oven: Wrap the ribs in foil and reheat them in a 275°F (135°C) oven for 20-30 minutes, or until heated through.
- Grill: Reheat ribs on a grill over medium heat, turning occasionally, until warmed through.
- Microwave (Not Recommended for Best Texture): While you can microwave ribs for a quick reheat, it can sometimes dry them out. If using a microwave, reheat in short intervals, covered, until just warmed through.
- Add Fresh Sauce: Brush the reheated ribs with fresh BBQ sauce before serving to revive their flavor and moisture. You can also broil or grill them briefly after reheating to caramelize the new sauce.
Enjoy Your Effortless Oven-Baked Ribs!
With this easy method, you can enjoy incredibly tender, fall-off-the-bone ribs any time, without the fuss of grilling. Baking ribs in the oven is a simple and reliable technique that delivers delicious results every time. Gather your ingredients, follow these steps, and get ready to savor the best oven-baked ribs you’ve ever made!