Fixing a bumper on your car typically costs between $150 and $600 for repairs, or $500 to $1,500 for a full replacement, according to HOW.EDU.VN. The actual cost depends on damage extent, the type of vehicle, and the repair method that’s needed, so understanding the options and associated costs is crucial for making an informed decision. Repairing minor damages can be much cheaper than replacing a heavily damaged bumper, which often involves additional labor and part costs, but it will depend on the type of car, the labor rates and the location. Ultimately, whether you’re dealing with minor scratches or extensive damage, having an understanding of bumper repair costs and factors will help you navigate the repair process more effectively.
1. Fixing vs. Replacing a Bumper: What Are Your Options?
Bumpers are critical for vehicle safety, designed to absorb impact during collisions. Choosing between fixing or replacing a damaged bumper depends on the extent of the damage and its effect on vehicle safety. Let’s explore when each option is best.
1.1. When is Bumper Repair Feasible?
Bumper repair is usually the preferred option for minor damages that don’t compromise the bumper’s structural integrity. Here are situations where repair is advisable:
- Minor Dents and Scratches: Small dents or scratches on your car bumper usually do not affect the bumper’s functionality and can be repaired with techniques like paintless dent repair (PDR).
- Superficial Cracks: If the cracks on your plastic bumper are not deep and don’t affect the underlying structure, repair options like plastic filler, sanding, and repainting are effective.
- Cost Considerations: For older vehicles, repairing even extensive damage may be more economical than a full replacement.
1.2. When is Bumper Replacement the Better Choice?
Bumper replacement is often the most recommended solution in cases of extensive damage:
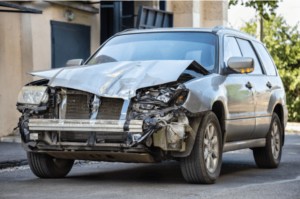
- Severe Damage: Deep cracks, large dents, or holes in the car bumper can compromise its structural integrity, requiring a replacement.
- Multiple Damaged Areas: If the bumper has suffered damage in several places, a new bumper might be more cost-effective and provide greater safety.
- Age and Condition of Bumper: An older bumper that has endured previous repairs might be better off replaced, particularly on luxury vehicles or SUVs.
- Technological Components Affected: Modern bumpers often house components like fog lights and sensors. If these are damaged, it might be necessary to replace the entire bumper assembly.
2. What are the Different Types of Bumper Damage?
Bumpers are vulnerable to various types of damage, mostly due to their exposed position on the car. Let’s look at the most common types of bumper damage:
- Dents: Usually caused by low-speed collisions or bumping into objects. These are indentations in the bumper material that can vary in size.
- Scratches: Can occur from brushes with other vehicles, walls, or even vegetation. They range from surface-level marks to deeper grooves.
- Cracks: More severe than scratches, typically resulting from harder impacts. Cracks can compromise the structural integrity of the bumper.
- Scuffs and Scrapes: Often result from grazing another surface, scuffs may leave paint residue or superficial damage on the bumper.
- Holes and Punctures: These occur from sharp or pointed impacts and can be serious, sometimes requiring a complete bumper replacement.
- Peeling Paint: Caused by exposure to elements, minor collisions, or poor paint jobs, leading to the paint peeling off the bumper.
3. What are the Factors That Determine Car Bumper Repair Costs?
On average, the cost to fix a bumper can vary significantly based on several factors. Understanding these can help you anticipate expenses and make informed decisions. Consulting with experts from HOW.EDU.VN can provide tailored advice based on your specific situation.
3.1. Type and Severity of Damage
The nature and extent of the damage are primary factors in determining the repair cost.
- Minor Scratches and Scuffs: These can often be buffed out or touched up with paint, costing between $100 and $300.
- Dents: Small dents might be fixed using paintless dent repair (PDR) for about $150 to $250.
- Cracks: These require more extensive work, such as plastic welding and reshaping, with costs ranging from $250 to $500.
- Major Damage: Significant damage requiring panel beating and repainting can cost between $350 and $600.
3.2. Materials of the Bumper
The material of your bumper affects the repair complexity and cost.
- Plastic Bumpers: Common in modern cars, plastic bumpers are relatively inexpensive to repair for minor damages. Techniques like plastic welding can fix cracks and dents, but severe damage may necessitate replacement.
- Metal Bumpers: Found in older vehicles, metal bumpers can be more challenging to repair. Dents and rust require specialized tools and techniques, potentially increasing costs.
- Fiberglass Bumpers: Used in some sports cars and custom vehicles, fiberglass bumpers are prone to cracking and require skilled repair work, which can be costly.
3.3. Labor Costs
Labor rates vary by location and shop type.
- Dealerships: Dealerships often have higher labor rates due to specialized equipment and certified technicians.
- Specialty Body Shops: These shops provide quality repairs and may charge slightly less than dealerships.
- Local Garages: Local garages can offer lower labor rates but may not have the same level of expertise or equipment.
3.4. Car Make and Model
The make and model of your car significantly influence repair costs.
- Luxury and Foreign Cars: Parts for luxury or foreign cars are often more expensive and harder to source, increasing overall repair costs.
- Standard Cars: Common car models generally have readily available and affordable parts, reducing repair expenses.
3.5. Additional Features
Bumpers with integrated features like sensors or lights will have higher repair costs.
- Sensor Realignment: Modern bumpers often house parking sensors or advanced driver-assistance systems (ADAS). Repairing these bumpers requires recalibration of the sensors, adding to the labor and equipment costs.
- Fog Lights and Other Accessories: If the bumper includes fog lights or other accessories, repairing or replacing these components will increase the overall cost.
3.6. Paint and Finish
Matching the exact paint color and finish is essential for a seamless repair.
- Color Matching: Achieving a perfect color match requires specialized equipment and skilled technicians, which can add to the cost.
- Multi-Layer Finishes: Cars with multi-layer or custom paint finishes will be more expensive to repair due to the complexity of replicating the finish.
3.7. Location
Geographic location influences material and labor costs.
- Urban Areas: Urban areas typically have higher labor rates and material costs compared to rural areas.
- Remote Areas: Remote locations may incur additional shipping fees for parts, increasing the overall cost.
3.8. Insurance Coverage
Your insurance coverage affects out-of-pocket expenses.
- Deductible: If you file an insurance claim, the amount of your deductible will be your responsibility.
- Premium Increases: Filing a claim might lead to an increase in your insurance premiums, particularly if you are at fault.
4. How Much Does Car Bumper Repair Cost?
Knowing how much it costs to fix a car bumper can help you budget and decide whether to repair or replace it. On average, repairing a car bumper can cost anywhere from $150 to $600.
4.1. Average Costs for Different Types of Damage
| Type of Damage | Repair Needed | Average Cost |
|---|---|---|
| Minor Dent | Dent Removal | $150 – $250 |
| Scratch | Paint Touch-Up | $100 – $300 |
| Crack | Plastic Welding and Reshaping | $250 – $500 |
| Major Dent | Panel Beating and Repainting | $350 – $600 |
4.2. Additional Factors Influencing Bumper Repair Costs
Several other factors can influence the cost of bumper repairs:
- Car Make and Model: Luxury or foreign cars may require specific parts or custom paint that are more expensive and harder to source, driving up costs.
- Labor Rates: Rates vary by location and shop type. Specialized shops or urban areas often charge more, and complex repairs (like welding and reshaping) require more labor time, further increasing the cost.
- Geographic Location: Costs for materials and labor can vary by region. Remote locations may incur extra shipping fees for parts, and environmental regulations on paint can add to the cost.
- Material and Part Availability: Some bumper materials, especially for newer or luxury models, can be rare and costly to obtain, raising repair costs if specific replacements are necessary.
5. How Much Does Car Bumper Replacement Cost?
Sometimes, replacement is more feasible than repair. The cost for bumper replacement ranges between $500 to $1,500, varying with car types and models. Below is a table showing average prices for different cars:
| Car Type | Average Replacement Cost |
|---|---|
| Economy Car | $500 – $700 |
| Mid-Range Car | $700 – $1,000 |
| Luxury Car | $1,000 – $1,500 |
6. Factors Influencing Bumper Replacement Costs
Replacing a car bumper involves several costs, including the price of the new bumper, labor charges, and paint matching. Understanding these factors can help you estimate the overall expense. Consulting with experts from HOW.EDU.VN can provide tailored advice based on your specific situation.
6.1. Bumper Material and Type
The type of bumper and its material significantly impact replacement costs.
- Plastic Bumpers: These are common in modern vehicles and generally more affordable. The cost ranges from $200 to $500, depending on the car model and complexity.
- Metal Bumpers: Found in older cars, metal bumpers are more durable but also more expensive to replace, typically costing between $400 and $800.
- Chrome Bumpers: Often used for aesthetic appeal, chrome bumpers can cost between $500 and $1,000 due to the specialized finishing process.
- Fiberglass Bumpers: Common in sports cars, fiberglass bumpers are lightweight but fragile. Replacement costs range from $300 to $700.
- Carbon Fiber Bumpers: High-end and lightweight, carbon fiber bumpers are the most expensive, ranging from $1,000 to $3,000.
6.2. Vehicle Make and Model
The make and model of your car significantly influence bumper replacement costs.
- Luxury Cars: Bumpers for luxury brands like BMW, Mercedes-Benz, and Lexus tend to be more expensive, ranging from $800 to $1,500 or more, due to higher material costs and brand-specific designs.
- Standard Cars: Bumpers for standard models from brands like Toyota, Honda, and Ford are generally more affordable, costing between $300 and $700.
- Trucks and SUVs: Larger vehicles often have more extensive bumper systems, with replacement costs ranging from $500 to $1,200, depending on features and materials.
6.3. Labor Costs
Labor costs vary depending on the repair shop and the complexity of the replacement.
- Average Labor Costs: Most repair shops charge between $50 and $150 per hour for labor. A bumper replacement can take 2 to 4 hours, resulting in labor costs of $100 to $600.
- Dealerships vs. Independent Shops: Dealerships typically have higher labor rates than independent repair shops due to specialized equipment and certified technicians. However, independent shops may offer more competitive pricing.
6.4. Additional Features
Bumpers with integrated features like sensors, cameras, and lights will have higher replacement costs.
- Sensor and Camera Calibration: Modern bumpers often house parking sensors, adaptive cruise control sensors, and rearview cameras. After replacement, these systems require recalibration, adding to the overall cost. Recalibration can range from $100 to $500 per sensor or camera.
- Lighting Systems: Bumpers with integrated fog lights, daytime running lights, or LED strips will have higher replacement costs due to the added complexity and expense of these components.
6.5. Paint and Finishing
Matching the vehicle’s paint color is crucial for a seamless bumper replacement.
- Paint Matching Costs: Professional paint matching and finishing can add $200 to $500 to the total cost. This involves identifying the exact paint code, mixing the paint, and applying it in multiple coats to ensure a perfect match.
- Multi-Stage Painting: Vehicles with multi-stage paint finishes, such as metallic or pearlescent colors, require more labor and materials, increasing the cost.
6.6. Hidden Damage
Sometimes, a bumper replacement reveals hidden damage that needs to be addressed.
- Structural Damage: If the impact damaged the underlying frame or support structures, additional repairs will be necessary. These can include frame straightening, welding, and rust repair, adding significantly to the cost.
- Component Damage: The accident might have affected other components, such as the radiator, headlights, or cooling systems, requiring additional repairs or replacements.
6.7. Aftermarket vs. OEM Bumpers
Choosing between aftermarket and Original Equipment Manufacturer (OEM) bumpers affects the cost and quality of the replacement.
- OEM Bumpers: These are made by the original manufacturer and guarantee a perfect fit and finish. However, they are typically more expensive, ranging from $500 to $1,500.
- Aftermarket Bumpers: These are produced by third-party companies and can be more affordable, ranging from $200 to $800. While they may not offer the same fit and finish as OEM bumpers, they can be a cost-effective option.
6.8. Insurance Coverage
Your insurance coverage impacts out-of-pocket expenses.
- Deductible: If you file an insurance claim, the amount of your deductible will be your responsibility.
- Premium Increases: Filing a claim might lead to an increase in your insurance premiums, particularly if you are at fault. It’s important to weigh the long-term costs against the immediate repair expenses.
7. How Do You Know What Kind of Repair You Need?
Knowing the best repair approach for your car bumper can be tricky. Whether it’s a minor scratch on your front bumper or extensive damage to your rear bumper, here’s a simple checklist to help you assess the damage and decide the best course of action:
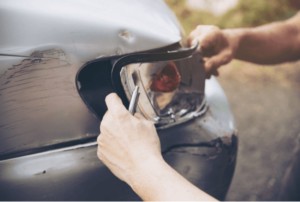
- Inspect the Damage: Carefully examine the bumper for dents, scratches, cracks, or any other visible damage. This initial inspection is key, whether it’s a plastic bumper or one with a bumper cover.
- Assess the Severity: Small dents and light scratches might only need minor repairs like paintless dent repair, while large cracks or holes may require more extensive work or even a bumper replacement.
- Check for Hidden Damage: Damage isn’t always surface level. If the bumper feels loose or there’s damage to the car’s body near the bumper, it might indicate deeper issues, possibly affecting other car parts like the grille or fog lights.
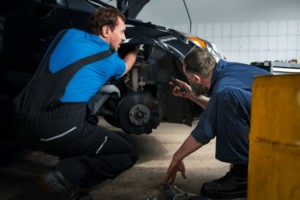
- Consider Safety and Functionality: If the damage might affect the vehicle’s safety, such as interfering with sensors or lights, professional assessment at an auto body shop is necessary.
- Professional Assessment: For complex or severe damage, or if you’re unsure, consult with a reputable repair shop. They can provide a detailed evaluation using specialized tools and advise on whether a simple repair or a new bumper is needed.
8. Step-by-Step Guide to Assessing Bumper Damage
Assessing bumper damage can be straightforward if you follow a systematic approach. This section offers a detailed, step-by-step guide to help you evaluate the extent of the damage and determine the appropriate course of action. For expert advice and comprehensive assessments, consider reaching out to the professionals at HOW.EDU.VN.
8.1. Gather Necessary Tools and Materials
Before you begin, assemble the tools and materials you’ll need for the assessment.
- Clean Cloth or Sponge: To clean the bumper surface.
- Mild Soap and Water: For washing away dirt and debris.
- Bright Light Source: A flashlight or work light to illuminate the damage.
- Measuring Tape: To measure the size of dents, cracks, or scratches.
- Camera or Smartphone: To document the damage for insurance purposes or to get estimates.
- Gloves: To protect your hands from dirt and sharp edges.
- Jack and Jack Stands (Optional): To gain better access to the underside of the bumper.
8.2. Clean the Bumper
Start by cleaning the bumper to get a clear view of the damage.
- Wash the Bumper: Use mild soap and water to remove dirt, grime, and any loose debris.
- Rinse Thoroughly: Rinse the bumper with clean water and dry it with a clean cloth.
- Inspect Closely: Once the bumper is clean and dry, take a close look at the surface to identify all areas of damage.
8.3. Identify and Document Damage Types
Systematically identify and document each type of damage.
- Scratches:
- Surface Scratches: Light scratches that only affect the clear coat.
- Deep Scratches: Scratches that penetrate the paint and reach the primer or metal.
- Measure Length: Use measuring tape to measure the length and width of the scratches.
- Photograph: Take clear photos of the scratches from different angles.
- Dents:
- Small Dents: Minor indentations that don’t significantly alter the bumper’s shape.
- Large Dents: Significant indentations that visibly distort the bumper’s shape.
- Measure Depth: Use a measuring tape to estimate the depth and diameter of the dents.
- Photograph: Capture detailed images of the dents.
- Cracks:
- Hairline Cracks: Small, thin cracks that may be difficult to see.
- Deep Cracks: Wide, noticeable cracks that compromise the bumper’s structural integrity.
- Measure Length: Measure the length of the cracks and note their location.
- Photograph: Take close-up photos of the cracks.
- Holes and Punctures:
- Small Holes: Minor punctures that may not penetrate the entire bumper.
- Large Holes: Significant punctures that go through the bumper material.
- Measure Diameter: Measure the diameter of the holes.
- Photograph: Document the holes with clear photos.
- Discoloration and Paint Damage:
- Fading: Areas where the paint has faded due to sun exposure.
- Peeling: Paint that is peeling or flaking off the bumper.
- Photograph: Take photos of any areas with discoloration or paint damage.
8.4. Assess Structural Integrity
Check for any signs of structural damage that could affect the bumper’s performance.
- Check for Looseness: Gently push and pull on the bumper to see if it feels loose or unstable.
- Inspect Mounting Points: Look for any damage to the mounting points where the bumper attaches to the vehicle.
- Examine Underlying Support: If possible, inspect the underlying support structure for any signs of bending or breakage.
- Document Findings: Note any structural issues that you observe.
8.5. Evaluate Sensor and Component Damage
Modern bumpers often house sensors, lights, and other components. Check these for damage.
- Parking Sensors:
- Visual Inspection: Look for any visible damage to the sensors.
- Functionality Test: If possible, test the sensors to see if they are working correctly.
- Lights:
- Inspect Lenses: Check for cracks or damage to the lenses of fog lights, turn signals, or running lights.
- Test Functionality: Ensure that all lights are functioning properly.
- Cameras:
- Visual Inspection: Look for any damage to the camera lens.
- Functionality Test: Test the camera to ensure that it is providing a clear image.
8.6. Check for Hidden Damage
Hidden damage can be present even if the exterior damage appears minor.
- Feel for Uneven Surfaces: Run your hand along the bumper surface to feel for any uneven areas that may indicate underlying damage.
- Inspect Alignment: Check the alignment of the bumper with the rest of the vehicle to see if it is properly aligned.
- Look for Gaps: Look for any unusual gaps between the bumper and the vehicle body.
- Consider Professional Inspection: If you suspect hidden damage, consider having a professional inspect the vehicle.
8.7. Document Your Findings
Thorough documentation is crucial for insurance claims and repair estimates.
- Detailed Notes: Write down all of your observations, including the type, size, and location of the damage.
- Photographs: Take clear, well-lit photos of all areas of damage.
- Measurements: Record the measurements of any dents, cracks, or scratches.
- Keep Records Organized: Keep all of your notes, photos, and measurements organized for easy reference.
8.8. Seek Professional Advice
For a comprehensive assessment and accurate repair options, consult with experts.
- Contact a Repair Shop: Obtain estimates from multiple repair shops.
- Consult Insurance: Discuss the damage with your insurance company to understand your coverage options.
- HOW.EDU.VN Consultation: Reach out to the experts at HOW.EDU.VN for additional advice and guidance.
9. Insurance and Your Bumper: Balancing Costs and Coverage
When considering whether to file an insurance claim for bumper repair or replacement, it’s crucial to understand the potential impact on your insurance premiums. Here are key points to consider:
- Cost of Repair vs. Deductible: Compare the repair cost to your deductible. If the repair cost is close to or less than your deductible, paying out of pocket might be more cost-effective.
- Nature of the Accident: If you were at fault, filing a claim could lead to an increase in your car insurance premiums. However, for no-fault accidents, your premiums should not be affected.
- Frequency of Claims: Filing multiple claims, even for minor damage, can lead to higher premiums. Your insurance company will consider your claim history.
- Policy Terms: Understand your insurance coverage, including collision repair coverage and whether you have accident forgiveness, which can influence your decision.
- Long-Term Cost Consideration: Weigh the long-term cost of increased premiums against the immediate repair expenses.
- Claim History and Loyalty: A long, claim-free history with your insurance company might influence their decision on premium adjustments.
10. Factors to Consider When Deciding Whether to File an Insurance Claim for Bumper Damage
Deciding whether to file an insurance claim for bumper damage involves weighing several factors to determine the most cost-effective option. This section provides a comprehensive guide to help you make an informed decision. For expert advice tailored to your specific situation, consider consulting with the professionals at HOW.EDU.VN.
10.1. Assess the Damage and Repair Costs
Begin by evaluating the extent of the damage and obtaining repair estimates.
- Get Multiple Estimates: Obtain repair estimates from several reputable body shops to get a clear idea of the potential costs.
- Compare Estimates: Compare the estimates to identify any discrepancies and ensure that they include all necessary repairs.
- Evaluate Damage Severity: Determine whether the damage is minor (scratches, small dents) or significant (cracks, large dents, structural damage).
10.2. Review Your Insurance Policy
Understand the terms and conditions of your insurance policy.
- Deductible Amount: Know the amount of your deductible, which is the amount you will have to pay out-of-pocket before your insurance coverage kicks in.
- Coverage Type: Understand what type of coverage you have (e.g., collision, comprehensive) and whether it applies to the specific type of damage.
- Exclusions: Be aware of any exclusions in your policy that might prevent you from filing a claim for the damage.
10.3. Consider Your Premium Impact
Filing a claim can affect your insurance premiums.
- Potential Premium Increase: Determine whether filing a claim could lead to an increase in your insurance premiums.
- Accident Forgiveness: Check if your policy includes accident forgiveness, which might prevent your premiums from increasing after your first at-fault accident.
- Long-Term Costs: Weigh the long-term costs of increased premiums against the immediate benefits of filing a claim.
10.4. Determine Fault
Assess who was at fault in the incident that caused the damage.
- At-Fault Accident: If you were at fault, filing a claim could lead to higher premiums and might not be the best option if the repair costs are relatively low.
- Not-at-Fault Accident: If you were not at fault, the other driver’s insurance should cover the damage, and filing a claim should not affect your premiums.
- Uninsured/Underinsured Motorist: If the other driver was uninsured or underinsured, your policy might provide coverage, but it could still affect your premiums.
10.5. Evaluate the Cost-Benefit Ratio
Compare the potential costs and benefits of filing a claim.
- Repair Costs vs. Deductible: If the repair costs are close to or less than your deductible, it might be more cost-effective to pay out-of-pocket.
- Long-Term Premium Costs: Calculate the potential long-term increase in premiums and compare it to the repair costs.
- Financial Situation: Consider your current financial situation and whether you can comfortably afford to pay for the repairs out-of-pocket.
10.6. Consider Your Claim History
Your claim history can affect your insurance rates.
- Number of Claims: Filing multiple claims within a short period can lead to higher premiums or even policy cancellation.
- Claim Frequency: Insurance companies consider the frequency of claims when determining rates.
- Claim Severity: The severity of previous claims can also affect your rates.
10.7. Consult with Your Insurance Agent
Seek advice from your insurance agent.
- Policy Specifics: Your agent can provide detailed information about your policy coverage and potential premium impacts.
- Claim Guidance: They can guide you through the claims process and help you understand your options.
- Cost-Benefit Analysis: Your agent can help you analyze the cost-benefit ratio of filing a claim based on your specific circumstances.
10.8. Document Everything
Keep detailed records of all communications, estimates, and decisions.
- Estimates: Save all repair estimates for future reference.
- Communications: Document all conversations with insurance agents, repair shops, and other parties.
- Photos: Keep photos of the damage as evidence for your claim.
10.9. Make an Informed Decision
Based on your assessment, make an informed decision about whether to file a claim.
- Pay Out-of-Pocket: If the repair costs are low, and you can afford to pay out-of-pocket, this might be the best option to avoid premium increases.
- File a Claim: If the repair costs are high, and you were not at fault, filing a claim might be the most cost-effective option.
- Seek Expert Advice: If you’re unsure, consult with the experts at HOW.EDU.VN for additional guidance.
11. DIY Bumper Repair vs. Professional Service: What’s Right for You?
Choosing between DIY bumper repair and professional service depends on your skills, the extent of the damage, and your budget. This section outlines the pros and cons of each approach to help you make an informed decision. For personalized advice and professional services, consider consulting with the experts at HOW.EDU.VN.
11.1. DIY Bumper Repair
Pros:
- Cost Savings: DIY repairs can be significantly cheaper than professional services, as you avoid labor costs and only pay for materials.
- Flexibility: You can work on your own schedule and take your time to complete the repair.
- Learning Opportunity: DIY repairs can be a valuable learning experience, allowing you to develop new skills and knowledge about car maintenance.
Cons:
- Skill Requirement: DIY repairs require a certain level of skill and experience. If you’re not comfortable working on cars, you might end up causing more damage.
- Time Commitment: DIY repairs can be time-consuming, especially if you’re not familiar with the process.
- Quality Concerns: DIY repairs might not achieve the same level of quality as professional services, particularly for complex damage.
- Risk of Further Damage: If not done correctly, DIY repairs can lead to further damage to the bumper or other parts of the vehicle.
- Limited Tools: You might need to purchase specialized tools and equipment, adding to the overall cost.
When to Choose DIY:
- Minor Damage: If the damage is minor, such as small scratches, scuffs, or very small dents, DIY repair might be a viable option.
- Cost Constraints: If you’re on a tight budget and can’t afford professional services, DIY repair can be a more affordable alternative.
- Experience and Skills: If you have experience working on cars and are comfortable with basic repair techniques, DIY might be a good fit.
11.2. Professional Bumper Repair
Pros:
- Expertise and Skill: Professional technicians have the training, experience, and skills to perform high-quality repairs.
- Quality Assurance: Professional services typically come with a guarantee, ensuring that the repairs are done correctly.
- Time Efficiency: Professional repairs are usually completed more quickly than DIY repairs, saving you time and hassle.
- Comprehensive Service: Professional services can handle all types of bumper damage, from minor scratches to structural repairs.
- Access to Tools and Equipment: Professional shops have access to specialized tools and equipment that are necessary for certain repairs.
Cons:
- Higher Costs: Professional repairs can be significantly more expensive than DIY repairs, due to labor costs and overhead expenses.
- Scheduling Constraints: You might need to schedule an appointment and wait for the repair to be completed.
- Limited Control: You have less control over the repair process compared to DIY repairs.
When to Choose Professional Service:
- Significant Damage: If the damage is significant, such as large dents, cracks, or structural damage, professional service is usually the best option.
- Safety Concerns: If the damage affects the safety or functionality of the vehicle, professional repair is essential.
- Lack of Experience: If you don’t have experience working on cars or are not comfortable with repair techniques, professional service is recommended.
- Insurance Claims: If you’re filing an insurance claim, professional repair might be required to ensure that the repairs are done correctly and meet insurance standards.
- Desired Quality: If you want the highest quality repair and a seamless finish, professional service is the way to go.
11.3. Factors to Consider
When deciding between DIY and professional bumper repair, consider the following factors:
- Damage Severity: How extensive is the damage? Minor scratches or major cracks?
- Skill Level: How comfortable are you with car repairs?
- Budget: How much can you afford to spend on the repair?
- Time: How much time do you have to dedicate to the repair?
- Tools: Do you have the necessary tools and equipment?
- Quality Expectations: What level of quality do you expect from the repair?
- Insurance: Are you filing an insurance claim?
- Safety: Does the damage affect the safety or functionality of the vehicle?
11.4. DIY Repair Steps
If you decide to tackle the repair yourself, here are some general steps to follow:
- Assess the Damage: Determine the type and extent of the damage.
- Gather Supplies: Purchase the necessary materials and tools.
- Prepare the Area: Clean the bumper and mask off the surrounding area.
- Repair the Damage: Follow the appropriate repair techniques for the specific type of damage (e.g., sanding, filling, painting).
- Apply Finish: Apply a clear coat to protect the repair and blend it with the surrounding area.
- Clean Up: Remove the masking and clean up the area.
11.5. Expert Consultation
For personalized advice and professional bumper repair services, contact the experts at HOW.EDU.VN. Our experienced technicians can assess the damage and provide you with the best options for your specific situation.
12. Preparing Your Car for Bumper Repair: A Comprehensive Guide
Proper preparation is essential for a successful bumper repair, whether you’re opting for a DIY approach or taking your car to a professional. This section offers a comprehensive guide to help you prepare your car for bumper repair, ensuring a smooth and effective process. For expert advice and professional services, consider consulting with the experts at how.edu.vn.
12.1. Assess the Damage
Before you begin, carefully assess the extent of the damage to your bumper.
- Identify Damage Types: Determine whether you’re dealing with scratches, dents, cracks, or structural damage.
- Evaluate Severity: Evaluate the severity of the damage to determine the appropriate repair method.
- Document Damage: Take photos and notes of the damage for insurance purposes and repair estimates.
12.2. Gather Necessary Supplies
Collect all the tools and materials you’ll need for the preparation process.
- Cleaning Supplies: Mild soap, water, clean cloths, degreaser.
- Masking Supplies: Masking tape, masking paper or plastic.
- Sanding Supplies: Sandpaper (various grits), sanding block.
- Safety Gear: Safety glasses, gloves, dust mask.
- Lighting: Work light or flashlight.
12.3. Clean the Bumper
Thoroughly clean the bumper to remove dirt, grime, and debris.
- Wash the Bumper: Use mild soap and water to wash the bumper surface.
- Rinse Thoroughly: Rinse the bumper with clean water and dry it with a clean cloth.
- Degrease the Surface: Apply a degreaser to remove any wax, grease, or oil from the bumper.
- Wipe Clean: Wipe the bumper clean with a clean cloth.
12.4. Mask the Surrounding Area
Protect the surrounding areas from damage during the repair process.
- Apply Masking Tape: Apply masking tape around the edges of the bumper to protect the surrounding paint.
- Cover Adjacent Panels: Cover the adjacent panels with masking paper or plastic to prevent overspray and accidental damage.
- Secure Masking: Ensure that the masking is securely attached and covers all necessary areas.