Rust is the nemesis of metal equipment, especially for those who have invested in a home or garage gym. Over time, the combination of humidity, sweat, and neglect can lead to unsightly and damaging rust, particularly on steel barbells. This reddish-brown oxide doesn’t just look bad; it can transfer to your clothes, compromise the integrity of your equipment, and even affect your workout experience.
If you’re noticing rust accumulating on your metal tools, gym equipment, or even a barbell you’ve recently acquired, don’t worry. Cleaning rust off metal is a manageable task that can restore your items to their former glory and protect them from further degradation. This comprehensive guide will walk you through a proven method to effectively remove rust and ensure your metal equipment stays in top condition for years to come.
Understanding Rust on Metal Equipment
Before diving into the cleaning process, it’s helpful to understand what rust is and why it forms. Rust is essentially iron oxide, a result of the electrochemical reaction between iron, oxygen, and moisture. This process, known as oxidation or corrosion, is accelerated in humid environments and when metal is exposed to sweat and salts, common occurrences in a garage gym setting.
For metal gym equipment, especially barbells made of steel without special coatings, rust is a common problem. Ignoring rust can lead to several negative consequences:
- Aesthetic Degradation: Rust diminishes the appearance of your equipment, making your gym space look less appealing and maintained.
- Clothing Stains: Rust can easily transfer onto your workout clothes, leaving stubborn stains.
- Reduced Lifespan: Over time, rust weakens the metal, potentially shortening the lifespan and structural integrity of your valuable equipment.
- Performance Impact: A heavily rusted barbell can have a rougher surface, affecting grip and the smooth movement of weights.
Essential Supplies for Rust Removal
Fortunately, cleaning rust off metal doesn’t require harsh chemicals or expensive tools. The method we’ll outline uses common household items and readily available supplies. Here’s what you’ll need to gather:
- White Vinegar: This is the workhorse of rust removal. Vinegar’s acetic acid reacts with rust, loosening it from the metal surface.
- Baking Soda: Used to neutralize the acidic vinegar after the rust removal process, preventing “flash rust.”
- Steel Brush and Brass Brush: A steel brush is more aggressive for removing stubborn rust, while a brass brush is gentler for less severe rust and final cleaning.
- Three-in-One Oil: This light lubricating oil is crucial for protecting the metal after cleaning and preventing future rust. It also helps to keep moving parts smooth.
- Paper Towels: For applying vinegar, wiping away rust, and applying oil.
- Plastic Wrap: To prevent vinegar from evaporating during the soaking process and enhance its effectiveness.
- Bucket: To soak paper towels in vinegar.
Optional but helpful supplies include:
- Wire Wheel Attachment for Drill: For more efficient and thorough oil application and polishing.
- Gloves: To protect your hands during the cleaning process.
- Tarp or Sawhorses: To protect your work surface and elevate the barbell for easier access.
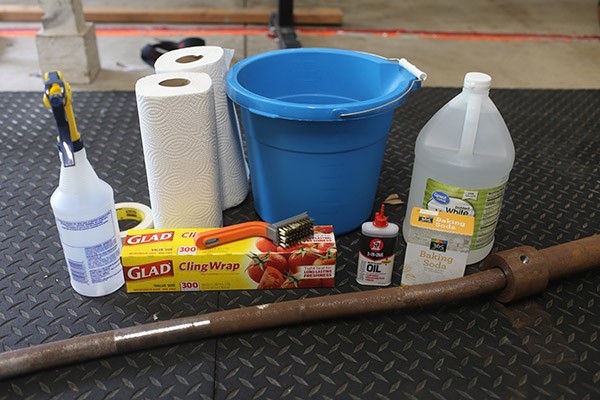
Image: Essential supplies for cleaning rust off metal, including brushes, vinegar, baking soda, and oil.
Step-by-Step Guide to Cleaning Rust off Your Barbell (or Other Metal Equipment)
This method focuses on cleaning rust off a barbell, a common piece of gym equipment susceptible to rust. However, these steps can be adapted for cleaning rust off other metal items as well.
Step 1: Initial Dry Brushing
Begin by using a brass brush to perform an initial brushing of the rusted metal surface. The primary goal here is to remove any loose dirt, debris, or flaky rust particles. This pre-cleaning step makes the subsequent vinegar soak more effective. There’s no need to be overly thorough at this stage; a quick once-over, taking just a couple of minutes, is sufficient.
Step 2: Vinegar Soak – The Rust Removal Powerhouse
The soaking step in white vinegar is where the majority of rust removal magic happens. Vinegar’s mild acetic acid gently dissolves the rust, making it easier to scrub away. You have two main options for soaking, depending on the size and type of your metal equipment.
For smaller items or disassembled barbell sleeves, submersion is ideal. You can disassemble the barbell sleeves if possible (refer to your barbell’s manufacturer instructions for disassembly). Place the rusted parts in a plastic container or bucket lined with a garbage bag to prevent leaks. Pour white vinegar into the container until the rusted components are fully submerged. Allow them to soak overnight, or even for 24 hours for heavily rusted items.
For larger items like a complete barbell, the “paper towel method” is more practical:
- Soak Paper Towels: Pour white vinegar into a bucket. Submerge paper towels in the vinegar until they are thoroughly soaked.
Image: Soaking paper towels in white vinegar in a bucket in preparation for wrapping a barbell to remove rust.
-
Wrap the Metal: Take a vinegar-soaked paper towel and wrap it tightly around a section of the rusted barbell or metal equipment. Work in sections to cover the entire rusted area.
-
Plastic Wrap Barrier: Immediately after wrapping a section with vinegar-soaked paper towels, cover it with plastic wrap. This crucial step prevents the vinegar from evaporating too quickly. Evaporation can lead to “flash rust,” a thin layer of new rust that forms rapidly when the vinegar dries, counteracting your cleaning efforts. Flash rust, while not structurally damaging, adds more rust to clean.
Image: Close-up of a barbell wrapped in vinegar-soaked paper towels and plastic wrap to prevent flash rust and enhance rust removal.
- Complete Wrapping: Continue wrapping sections of the barbell with vinegar-soaked paper towels and plastic wrap until the entire rusted surface is covered. Your barbell should resemble a plastic-wrapped mummy when finished.
Image: A barbell fully wrapped in plastic after being covered with vinegar-soaked paper towels, left to soak overnight for rust removal.
- Soak Overnight: Allow the vinegar-soaked wrapping to sit on the barbell overnight, giving the vinegar ample time to work on dissolving the rust. For heavier rust, you may consider soaking for up to 24 hours.
Step 3: Rust Removal, Rinsing, and Neutralization – Act Fast!
Once the overnight soak is complete, it’s time for the more intensive cleaning. This stage is time-sensitive because you need to rinse off the vinegar and neutralize the metal quickly to prevent flash rust from forming rapidly. Have all your supplies ready before unwrapping the barbell.
-
Prepare Neutralizing Solution: Fill a spray bottle with water and add baking soda. The exact ratio isn’t critical, but aim for a fairly concentrated solution – the more baking soda dissolves, the better. This baking soda solution will neutralize the acidic vinegar and inhibit flash rust.
-
Gather Brushes and Water: Have your brass brush and steel brush (for stubborn rust) readily available, along with a water hose or bucket of clean water for rinsing.
-
Choose Your Workspace Wisely: Avoid cleaning the barbell directly on a wooden weightlifting platform or squat rack, as the vinegar and baking soda mixture can stain wood. The ideal location is your driveway (vinegar can harm grass), or on a tarp to protect the surface. Elevating the barbell on sawhorses makes it easier to work on all sides.
-
Remove Wrapping and Brush: Unwrap the barbell and immediately start brushing the rusted areas with the brass brush. For any stubborn rust spots that don’t come off easily with the brass brush, switch to the steel brush for more aggressive scrubbing.
-
Rinse Thoroughly: After the initial brushing, rinse the barbell thoroughly with water to remove as much vinegar and loosened rust as possible.
Image: Spraying a barbell with a baking soda and water solution to neutralize the vinegar and prevent flash rust after soaking.
- Neutralize with Baking Soda: Immediately after rinsing, generously spray the entire barbell with the baking soda and water solution. Ensure all surfaces are coated to neutralize any residual vinegar and prevent flash rust.
If you work efficiently, you should now see a significant improvement, with your barbell looking much closer to its original, rust-free condition.
Step 4: Oiling and Brushing for Protection and Shine
With the rust removed and vinegar neutralized, the next step is to protect the metal from future rust and give it a nice finish. This is where the three-in-one oil comes in.
-
Dry the Barbell: Wipe the barbell completely dry with paper towels.
-
Apply and Brush Oil: Take your three-in-one oil and apply a few drops to a section of the barbell. Use a brush (the brass brush works well here) to thoroughly work the oil into the metal. Brush vigorously to distribute the oil evenly and penetrate any crevices. For a more efficient process, especially for larger items or frequent maintenance, consider using a wire wheel attachment on a cordless drill to apply and buff the oil. However, manual brushing with elbow grease is perfectly effective.
Image: Applying three-in-one oil to a barbell section by section to protect and lubricate the metal after rust removal.
Image: Using a brush to thoroughly distribute three-in-one oil across the barbell, ensuring complete coverage and protection against future rust.
- Repeat and Polish: Continue applying oil section by section and brushing it in until you have treated the entire barbell. This process, while requiring some effort, can be quite therapeutic, much like cleaning a firearm.
Step 5: Final Protective Oil Wipe-Down
For an extra layer of rust protection, and to leave a smooth finish, apply a final wipe-down. Put a few drops of three-in-one oil on a clean paper towel and wipe down the entire barbell one more time. This leaves a thin, protective film of oil that will help prevent rust from returning.
Image: Before and after comparison of a barbell, showing the dramatic difference after rust removal and cleaning.
Maintaining Your Metal Equipment Rust-Free
Once you’ve gone through the rust removal process, the key is to prevent rust from returning. Regular maintenance is crucial for keeping your metal equipment in optimal condition.
-
Post-Workout Brushing: Make it a habit to brush your barbell (and other metal gym equipment) with a wire brush after each workout, especially if you use chalk. This takes less than 30 seconds and removes sweat and chalk residue that can contribute to rust.
-
Weekly Oil Wipe-Down: Once a week, wipe down your barbells and other metal equipment with a cloth lightly dampened with three-in-one oil. This regular oiling minimizes the chance of future rusting.
-
Control Humidity: If possible, consider dehumidifying your garage gym space, especially in humid climates. Reducing moisture in the air significantly reduces the risk of rust formation.
Conclusion
Cleaning rust off metal, particularly from gym equipment like barbells, is a worthwhile endeavor. By following these steps, you can effectively remove existing rust and implement preventative maintenance measures to keep your equipment in excellent condition for years to come. Taking care of your metal equipment ensures its longevity, maintains its performance, and enhances your overall workout experience.