Are you struggling to understand How Much To Feed Sourdough Starter for optimal growth and baking results? At HOW.EDU.VN, we understand the importance of a well-fed starter, providing the guidelines you need for sourdough success. This guide provides expert advice on feeding ratios, storage, and troubleshooting to help you maintain a healthy and active sourdough culture. Master the art of sourdough starter feeding and unlock the potential for creating amazing sourdough bread, discard recipes, and more, with the right sourdough feeding schedule, feeding techniques, and understanding of starter maintenance.
1. What is a Sourdough Starter and Why Does Feeding Matter?
A sourdough starter is a living culture of flour and water, teeming with beneficial yeasts and bacteria. It acts as the natural leavening agent in sourdough bread, providing its characteristic flavor and texture. Proper feeding is essential to maintaining a healthy and active starter, ensuring it can effectively leaven your dough. Without consistent feeding, your starter will weaken, impacting its ability to produce the desired rise and flavor in your baked goods.
The ongoing care of a sourdough starter is vital because it directly impacts its strength and performance. Regular feeding provides the necessary nutrients for the yeast and bacteria to thrive, leading to a more robust and flavorful starter. Neglecting this care can result in a sluggish, weak starter that struggles to leaven dough, leading to dense and unappealing bread. Therefore, understanding and implementing a consistent feeding routine is crucial for any baker looking to achieve consistent and high-quality sourdough results.
2. Essential Tools for Feeding Your Sourdough Starter
To accurately and effectively feed your sourdough starter, having the right tools is essential. These tools will help you maintain the correct ratios and ensure a healthy, thriving culture.
- Sourdough Starter: The heart of your baking journey. If you don’t have one, The Clever Carrot has a Beginner Sourdough Starter Recipe
- Jar with Lid: A clear glass jar is ideal for monitoring your starter’s growth. A lid, whether airtight or loose-fitting, helps maintain humidity and prevents contamination.
- Kitchen Scale: Precision is key in sourdough baking. A digital kitchen scale ensures accurate measurements of flour and water, leading to consistent results.
- Bread Flour or All-Purpose Flour: The food for your starter. Choose a high-quality flour to provide the necessary nutrients for the yeast and bacteria.
- Filtered Water: Chlorine and other chemicals in tap water can harm your starter. Filtered water provides a clean and nurturing environment.
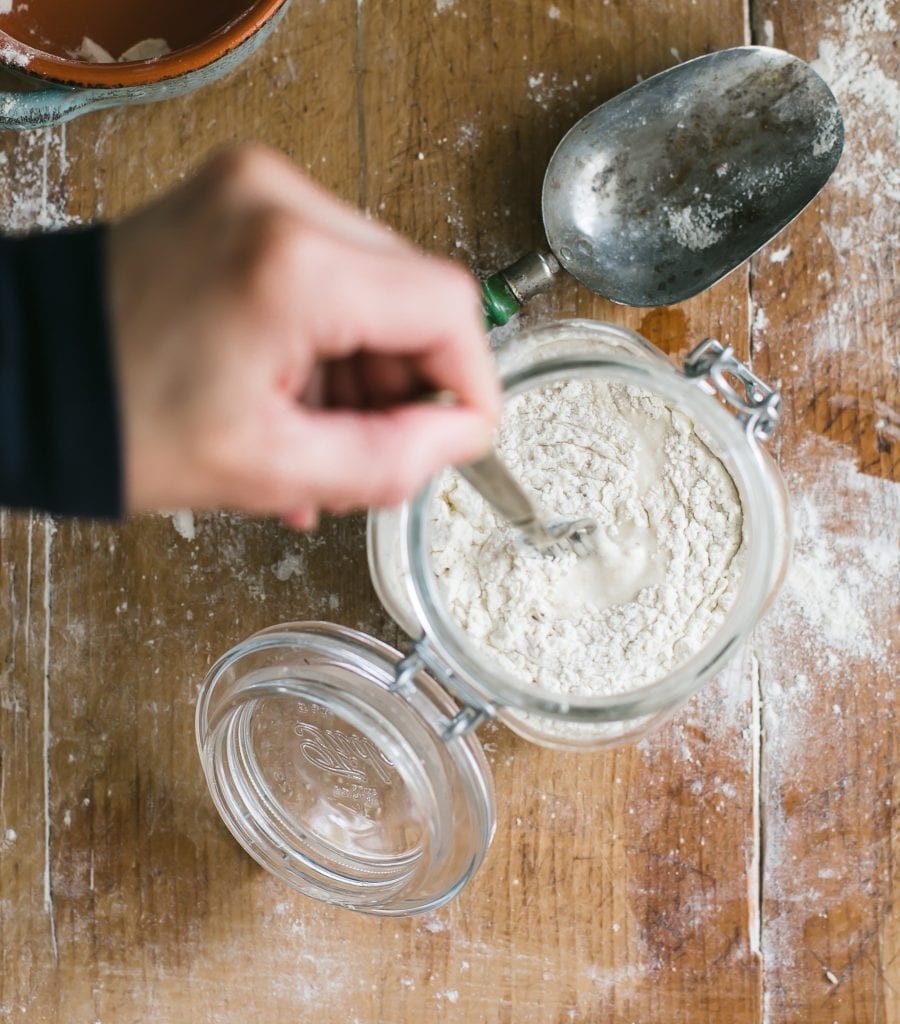 Sourdough starter in a glass jar with a lid
3. Understanding the Sourdough Starter Feeding Ratio
The sourdough starter feeding ratio is a crucial concept for maintaining a healthy and active culture. It refers to the proportion of starter, flour, and water used during feeding. The most common ratio is 1:1:1, meaning equal parts of each ingredient by weight. For example, if you have 50 grams of starter, you would feed it with 50 grams of flour and 50 grams of water. This ratio ensures a balanced environment for the yeast and bacteria to thrive.
Feeding by ratio is essential because it allows for flexibility and scalability. Whether you have a small or large amount of starter, the ratio remains consistent, making it easy to adjust the feeding according to your needs. This method also accounts for variations in flour hydration and environmental conditions, ensuring your starter receives the appropriate nourishment regardless of external factors. Consistency in ratio feeding leads to a stable and predictable starter, crucial for successful sourdough baking.
4. Step-by-Step Guide to Feeding Your Sourdough Starter
Feeding your sourdough starter is a simple yet crucial process that ensures its health and activity. Follow these steps to maintain a thriving culture:
4.1. Step 1: Remove and Discard
Before each feeding, discard a portion of your starter to maintain its balance and control its growth. This step prevents the starter from becoming too acidic and ensures it has enough food to thrive.
- Why Discard? Discarding helps refresh the acidity levels and controls the overall growth of the starter.
- How Much to Discard: Remove about half of your starter. The exact amount isn’t critical, but consistency helps.
- What to Do with Discard? Instead of throwing it away, use the discard in various recipes like pancakes, waffles, or crackers. This reduces waste and adds a tangy flavor to your cooking.
4.2. Step 2: Feed the Starter
After discarding, it’s time to feed your starter with fresh flour and water. This provides the necessary nutrients for the yeast and bacteria to thrive.
- Ratio: Use a 1:1:1 ratio (starter: flour: water) by weight.
- Example: If you have 60 grams of starter, add 60 grams of flour and 60 grams of water.
- Mixing: Mix well with a fork or spatula, ensuring no lumps remain. The mixture should resemble a thick pancake batter.
4.3. Step 3: Wait for Activation
After feeding, place your starter in a warm spot (ideally 75-80°F or 24-27°C) to activate. This allows the yeast and bacteria to ferment and produce the gases necessary for leavening bread.
- Temperature: The warmer the environment, the faster the starter will activate.
- Signs of Activity: Look for a doubling in size, bubbles on the surface and throughout the culture, a spongey texture, and a pleasant, slightly sour aroma.
- Timeframe: This process can take anywhere from 2 to 12 hours, depending on the starter’s strength and the ambient temperature.
5. Detailed Guide to Feeding Sourdough Starter
For those seeking a more detailed explanation of each step, here’s an in-depth guide to feeding your sourdough starter:
5.1. Discarding Sourdough Starter
The discard process is essential for maintaining a balanced and healthy sourdough starter.
- Purpose of Discarding: Discarding helps regulate the acidity and prevents the starter from growing uncontrollably.
- How to Discard: Use a spoon or spatula to remove approximately half of the starter from the jar. Be sure to only discard if it’s extremely smelly or discolored. If the discard is in good condition, reserve it to make a sourdough discard recipe.
- What to Look For: Healthy discard should have a slightly sour smell and a creamy texture. Avoid using discard that is overly pungent or has visible mold.
5.2. Feeding the Sourdough Starter
This step involves adding fresh flour and water to the remaining starter, providing it with the nutrients needed to thrive.
- Precise Measurements: Use a kitchen scale to weigh the starter, flour, and water accurately, ensuring the correct 1:1:1 ratio.
- Mixing Technique: Combine the starter, flour, and water in the jar. Use a fork or spatula to mix thoroughly, scraping down the sides to ensure everything is well incorporated.
- Texture Adjustment: If the mixture appears too thick, add a small amount of water until it reaches a thick, pancake batter-like consistency. If it’s too thin, add a bit more flour. The correct texture is crucial for optimal fermentation.
5.3. Activating the Sourdough Starter
After feeding, the starter needs a warm environment to activate and rise.
- Ideal Temperature: Maintain a temperature of 75-80°F (24-27°C) for optimal fermentation. Use a proofing box, a microwave with the light on, or inside the oven (turned off) with the light on for 1-2 hours to maintain this temperature.
- Monitoring the Rise: Keep an eye on the starter. It should double in size and show signs of bubbling within 2 to 12 hours. This indicates that the yeast and bacteria are active and producing the gases needed for leavening.
- Peak Activity: Use the starter when it reaches its peak height, as this is when it has the most leavening power. Be aware that the starter will eventually fall back down, so timing is key.
6. Storing Your Sourdough Starter: Room Temperature vs. Refrigerator
The way you store your sourdough starter significantly impacts its feeding schedule and overall maintenance. There are two primary storage methods: room temperature and refrigeration.
6.1. Room Temperature Storage
If you bake frequently, storing your starter at room temperature is a convenient option.
- Frequency of Baking: Ideal for those who bake a few times a week.
- Feeding Schedule: Feed the starter once per day, even when not in use.
- Advantages: Keeps the starter active and ready to use more quickly.
- Considerations: Requires daily maintenance and is best suited for warmer environments.
6.2. Refrigerator Storage
For less frequent bakers, storing the starter in the refrigerator is a more manageable approach.
- Frequency of Baking: Suitable for those who bake once a week or less.
- Feeding Schedule: Feed the starter once per week to maintain its strength.
- Advantages: Slows down fermentation, reducing the need for frequent feedings.
- Considerations: Requires reactivating the starter before use, which can take a day or two.
7. Addressing Common Sourdough Starter Feeding Questions
Here are some frequently asked questions about feeding your sourdough starter:
7.1. Why Do We Need to Remove and Discard Sourdough Starter?
Discarding is essential for maintaining the balance and controlling the growth of your starter. It refreshes the acidity levels and prevents the culture from becoming too large to manage.
- Refreshing Acidity: Discarding helps remove excess acids that can inhibit yeast activity.
- Controlling Growth: Prevents the starter from growing exponentially, which would require excessive amounts of flour and water for feeding.
- Adjusting Amounts: You can adjust the amount you discard based on the starter’s condition, but removing approximately half is a good guideline.
7.2. What Can I Do with Sourdough Discard?
Sourdough discard is a versatile ingredient that can be used in a variety of recipes.
- Sourdough Discard Recipes: Use discard in pancakes, waffles, crackers, cookies, and more.
- Refrigeration: Save discard in the refrigerator for later use, though it’s best to use it within a week for optimal flavor.
- Freezing: Freeze discard for longer storage, but be aware that the texture may change slightly upon thawing.
7.3. Can I Use Measuring Cups Instead of a Scale?
While a scale is more accurate, you can use measuring cups if necessary.
- Weight vs. Volume: Remember that equal parts by weight do not translate directly into measuring cups, as flour and water have different densities.
- Adjusting Consistency: If using measuring cups, adjust the texture by adding more flour or water until the mixture reaches a thick, batter-like consistency.
- Consistency is Key: Aim for a consistency similar to thick pancake batter, regardless of whether you use a scale or measuring cups.
7.4. Do I Need to Feed and Activate My Starter Every Time Before Using It?
Yes, you should feed and activate your starter before each use to ensure it has the necessary leavening power.
- Inactive Starter: You cannot bake with an inactive starter, as it will not provide the necessary rise.
- Activation Process: Feed the starter with fresh flour and water, then wait for it to bubble and double in size, indicating it’s ready to use.
- Consistent Feeding: Consistent feeding is not a one-time process but an ongoing requirement to maintain the starter’s activity.
7.5. What Happens if I Forget to Feed My Starter?
Forgetting to feed your starter is common and not a cause for panic.
- Reviving the Starter: Continue feeding it regularly until it becomes bubbly and active again.
- Warmth and Warm Water: Place it in a warm spot and use warm water to give it a boost.
- Patience and Time: Starters are resilient and usually recover with time and patience.
7.6. What Is the Best Flour for Feeding Sourdough Starter?
Using the right flour is crucial for maintaining a healthy starter.
- Consistency: Feed your starter with the same type of flour it was made from to maintain consistency.
- White Flour Starters: Use unbleached all-purpose flour or bread flour, as they are inexpensive and reliable.
- Whole Wheat Starters: Use whole wheat flour.
- Rye Starters: Use rye flour.
- Enzyme Boost: Some bakers use a 50/50 blend of whole wheat and white flour to boost enzyme activity, promoting starter growth.
7.7. What Kind of Jar or Container Should I Use?
The choice of jar or container can impact your starter’s health and activity.
- Glass vs. Plastic: Glass jars are preferable to plastic as they are easy to clean and don’t absorb odors or chemicals.
- Size: Choose a jar large enough to accommodate the starter’s growth when it doubles in size.
- Lid Options: Use an airtight lid to speed up bubbling, but monitor closely to prevent bursting. Alternatively, rest the lid on top of the jar without securing it.
7.8. How Long Will It Take for My Starter to Rise?
The activation process varies depending on several factors.
- Timeframe: Plan on 2-12 hours for the starter to rise, depending on temperature and starter strength.
- Temperature: Warmer temperatures accelerate the rising process.
- Patience: Be patient and monitor the starter for signs of activity.
7.9. How Can I Find a Warm Spot for My Starter to Rise?
Finding a warm spot is crucial for activating your starter.
- Proofing Box: Use a proofing box to maintain a consistent temperature.
- Microwave: Place the starter in a microwave with the light on, but avoid turning it on.
- Oven: Use the oven with the light on for 1-2 hours, but not overnight, as it can become too warm.
- Warm Water Bath: Place the starter in a warm water bath, changing the water frequently to maintain temperature.
7.10. What Is Hooch?
Hooch is a liquid that sometimes forms on the surface of your sourdough starter.
- Sign of Hunger: Hooch indicates that the starter needs to be fed.
- Appearance: It appears as a dark, grayish liquid.
- Action: Pour off the hooch and any discolored starter underneath, then give the starter a fresh feeding.
8. Advanced Tips for Optimal Sourdough Starter Feeding
To take your sourdough starter feeding to the next level, consider these advanced tips:
- Experiment with Different Flours: Try feeding your starter with different types of flour to enhance its flavor and activity.
- Monitor Temperature Closely: Use a thermometer to ensure your starter is in the ideal temperature range for fermentation.
- Adjust Feeding Ratios: Experiment with slightly different feeding ratios to find what works best for your starter and baking goals.
- Observe and Learn: Pay close attention to how your starter behaves and adjust your feeding routine accordingly.
9. Expert Insights from HOW.EDU.VN on Sourdough Starter Feeding
At HOW.EDU.VN, we connect you with leading experts in various fields, including baking. Our team of experienced bakers and food scientists provides personalized advice and solutions to help you master the art of sourdough.
9.1. The Importance of Expert Guidance
Navigating the complexities of sourdough baking can be challenging. Expert guidance can provide:
- Personalized Solutions: Tailored advice based on your specific starter and baking conditions.
- Troubleshooting: Expert help to diagnose and solve any issues you encounter.
- Advanced Techniques: Insights into advanced feeding and baking techniques to elevate your skills.
9.2. Connect with Our Experts
Ready to take your sourdough to the next level? Contact our team of experts at HOW.EDU.VN for personalized advice and support.
- Address: 456 Expertise Plaza, Consult City, CA 90210, United States
- WhatsApp: +1 (310) 555-1212
- Website: HOW.EDU.VN
10. Optimizing Your Sourdough Starter for Different Recipes
Different sourdough recipes may require different starter characteristics. Here’s how to optimize your starter for specific uses:
- High-Hydration Doughs: Feed your starter more frequently to increase its activity and ensure it can handle the extra moisture.
- Whole Grain Breads: Use a higher percentage of whole grain flour in your starter to enhance its flavor and nutritional content.
- Sweet Breads: Add a small amount of sugar or honey to your starter to boost its fermentation rate and add sweetness.
11. How Feeding Affects the Taste of Your Sourdough Bread
The feeding routine and flour type directly impact the flavor of your sourdough bread.
- Regular Feeding: Consistent feeding results in a more balanced and flavorful starter.
- Flour Type: Different flours impart distinct flavors to the starter and bread.
- Fermentation Time: Longer fermentation times develop more complex and tangy flavors.
12. Troubleshooting Common Sourdough Starter Issues
Even with the best care, sourdough starters can sometimes encounter problems. Here are some common issues and how to address them:
- Sluggish Starter: Increase feeding frequency and ensure a warm environment.
- Mold Growth: Discard the starter and start fresh with a new culture.
- Unpleasant Odor: Discard and feed regularly with fresh flour and water.
- Lack of Bubbles: Ensure the starter is in a warm spot and feed regularly.
13. Maintaining a Healthy Sourdough Starter in Different Climates
Climate plays a significant role in sourdough starter activity.
- Warm Climates: Feed more frequently and store in the refrigerator to slow down fermentation.
- Cold Climates: Ensure a warm environment for activation and consider using a heating pad.
- Humid Climates: Monitor moisture levels and adjust flour hydration accordingly.
- Dry Climates: Keep the starter covered to prevent it from drying out.
14. Sourdough Starter Feeding Schedule Templates
Here are some sample feeding schedules to help you stay organized:
14.1. Room Temperature Feeding Schedule
| Time | Action | Notes |
|---|---|---|
| 8:00 AM | Remove and discard half of the starter | Save discard for recipes |
| 8:15 AM | Feed with equal parts flour and water | Use a 1:1:1 ratio |
| 8:30 AM | Place in a warm spot to activate | Monitor for doubling in size and bubbling |
14.2. Refrigerator Feeding Schedule
| Day | Action | Notes |
|---|---|---|
| Sunday | Remove from refrigerator | |
| Feed with equal parts flour and water | Use a 1:1:1 ratio | |
| Let activate at room temperature | Monitor for doubling in size and bubbling | |
| Monday | Return to refrigerator |
15. Understanding the Science Behind Sourdough Starter Feeding
Delving into the science behind sourdough starter feeding can provide a deeper understanding of the process.
- Yeast and Bacteria: Sourdough starters contain a complex ecosystem of yeast and bacteria that work together to leaven bread.
- Fermentation: Feeding provides the necessary nutrients for these microorganisms to ferment, producing carbon dioxide and organic acids.
- Enzymes: Enzymes in the flour break down starches into sugars, which the yeast consumes.
- Acidity: The organic acids produced during fermentation contribute to the tangy flavor of sourdough bread.
*University of California, Davis, research shows that the balance between yeast and bacteria in sourdough starters is influenced by feeding practices.
16. Common Mistakes to Avoid When Feeding Your Sourdough Starter
Avoiding common mistakes can help ensure a healthy and active starter.
- Using Contaminated Utensils: Always use clean utensils to prevent contamination.
- Ignoring Temperature: Maintain a consistent temperature for optimal fermentation.
- Overfeeding or Underfeeding: Follow the recommended feeding ratios to avoid imbalances.
- Using Expired Flour: Use fresh flour for the best results.
17. Creative Ways to Use Sourdough Discard
Sourdough discard is a versatile ingredient that can be used in a variety of creative ways.
- Pancakes and Waffles: Add discard to pancake and waffle batter for a tangy flavor.
- Crackers: Use discard to make crispy and flavorful crackers.
- Cookies: Add discard to cookie dough for a unique texture and taste.
- Pizza Dough: Incorporate discard into pizza dough for a chewier crust.
*A study by the хлеб.ру Baking School demonstrated that using sourdough discard enhances the flavor profile of baked goods.
18. How To Revive a Neglected Sourdough Starter
Even if your starter has been neglected, it can often be revived.
- Assess the Starter: Check for signs of mold or foul odors.
- Discard and Feed: Discard most of the starter and feed regularly with fresh flour and water.
- Warm Environment: Place in a warm spot to encourage activity.
- Patience: It may take several days of regular feeding to revive the starter.
19. Choosing the Right Water for Your Sourdough Starter
The type of water you use can impact your starter’s health.
- Filtered Water: Use filtered water to remove chlorine and other chemicals that can inhibit yeast activity.
- Spring Water: Spring water is a good alternative to filtered water.
- Avoid Tap Water: If using tap water, let it sit for 24 hours to allow chlorine to dissipate.
20. Maintaining Your Sourdough Starter While Traveling
Traveling doesn’t have to disrupt your sourdough routine.
- Refrigerate: Store your starter in the refrigerator before leaving.
- Feed Before Leaving: Feed the starter just before refrigerating it.
- Revive Upon Return: Upon returning, revive the starter with regular feedings.
- Dehydrate: Consider dehydrating a portion of your starter as a backup.
21. Benefits of Using Sourdough in Your Diet
Sourdough bread offers several health benefits.
- Improved Digestion: The fermentation process breaks down gluten, making it easier to digest.
- Lower Glycemic Index: Sourdough bread has a lower glycemic index than other types of bread.
- Increased Nutrient Availability: Fermentation increases the availability of certain nutrients.
- Probiotic Content: Sourdough bread contains beneficial probiotic bacteria.
*Research at the University of Ghent indicates that sourdough fermentation enhances the bioavailability of minerals.
22. The Role of Acidity in Sourdough Starters
Acidity plays a crucial role in the flavor and texture of sourdough bread.
- Lactic Acid: Lactic acid produced during fermentation contributes to the tangy flavor.
- Acetic Acid: Acetic acid adds a more sour and vinegary note.
- pH Level: The pH level of the starter affects yeast and bacteria activity.
- Balancing Acidity: Discarding and feeding help balance the acidity levels.
23. Sourdough Starter Troubleshooting Guide
| Issue | Possible Cause(s) | Solution(s) |
|---|---|---|
| Sluggish Starter | Inconsistent Feeding, Cold Temperature | Increase Feeding Frequency, Provide Warm Environment |
| Mold Growth | Contamination | Discard and Start Fresh |
| Unpleasant Odor | Improper Acidity | Discard and Feed Regularly |
| Lack of Bubbles | Cold Temperature, Inactivity | Ensure Warm Environment, Regular Feeding |
| Hooch Formation | Hunger | Feed the Starter |
| Inconsistent Rise Time | Temperature Fluctuations | Maintain a Consistent Temperature |
24. How to Create a Backup Sourdough Starter
Creating a backup sourdough starter ensures you have a safety net in case something happens to your main culture.
- Dehydrate: Spread a thin layer of starter on parchment paper and let it dry completely.
- Freeze: Freeze a portion of your starter for later use.
- Share: Share a portion of your starter with a friend or fellow baker.
25. Exploring Different Types of Flour for Sourdough Starter
Experimenting with different flours can enhance the flavor and texture of your sourdough bread.
- Rye Flour: Adds a robust, earthy flavor and promotes activity.
- Whole Wheat Flour: Enhances the nutritional content and adds a nutty flavor.
- Bread Flour: Provides structure and chewiness to the bread.
- All-Purpose Flour: A versatile option for general use.
26. Using Sourdough Starter in Non-Bread Recipes
Sourdough starter is a versatile ingredient that can be used in a variety of non-bread recipes.
- Cakes and Muffins: Adds a tangy flavor and enhances the texture.
- Pancakes and Waffles: Creates light and fluffy pancakes with a hint of sourness.
- Cookies: Adds a unique texture and flavor to cookies.
- Pizza Dough: Makes a chewier and more flavorful pizza crust.
27. The Impact of Altitude on Sourdough Starter
Altitude can affect sourdough starter activity.
- Adjust Hydration: Reduce the amount of water to compensate for faster evaporation.
- Monitor Temperature: Ensure a consistent temperature for fermentation.
- Increase Feeding Frequency: Feed more frequently to maintain activity.
28. Making Sourdough Bread with Different Types of Starters
Different types of sourdough starters can impart unique characteristics to your bread.
- White Flour Starter: Creates a lighter, milder flavor.
- Whole Wheat Starter: Adds a nutty, earthy flavor.
- Rye Starter: Creates a robust, tangy flavor.
29. Expert Tips for Perfect Sourdough Bread Every Time
Follow these expert tips to achieve perfect sourdough bread every time:
- Use High-Quality Ingredients: Choose the best flour, water, and salt.
- Maintain a Healthy Starter: Feed and care for your starter properly.
- Control Fermentation Time: Allow adequate time for fermentation.
- Master the Shaping Technique: Shape the dough carefully to create a good structure.
- Bake at the Right Temperature: Bake at the correct temperature for optimal results.
30. The Future of Sourdough Baking
Sourdough baking continues to evolve, with new techniques and innovations emerging.
- New Flour Varieties: Exploring different types of flour for unique flavors and textures.
- Advanced Fermentation Techniques: Experimenting with different fermentation methods.
- Sustainable Practices: Implementing sustainable practices in sourdough baking.
- Community Engagement: Sharing knowledge and experiences with fellow bakers.
31. Benefits of Consulting with a Sourdough Expert at HOW.EDU.VN
Consulting with a sourdough expert at HOW.EDU.VN offers numerous benefits:
- Personalized Advice: Receive tailored advice based on your specific needs and goals.
- Troubleshooting Support: Get expert help to resolve any issues you encounter.
- Advanced Techniques: Learn advanced techniques to elevate your baking skills.
- Time-Saving Solutions: Save time and effort with expert guidance.
- Improved Results: Achieve better and more consistent results with expert support.
Don’t let sourdough challenges hold you back. Contact our team of experts at HOW.EDU.VN today for personalized advice and support.
- Address: 456 Expertise Plaza, Consult City, CA 90210, United States
- WhatsApp: +1 (310) 555-1212
- Website: HOW.EDU.VN
FAQ:
1. How often should I feed my sourdough starter?
The feeding frequency depends on whether you store your starter at room temperature or in the refrigerator. At room temperature, feed it once daily. In the refrigerator, feed it once a week.
2. What is the best ratio for feeding sourdough starter?
The most common and effective ratio is 1:1:1, meaning equal parts of starter, flour, and water by weight. For example, if you have 50 grams of starter, use 50 grams of flour and 50 grams of water.
3. What should I do with the sourdough discard?
Sourdough discard can be used in various recipes, such as pancakes, waffles, crackers, and cookies. Storing it in the refrigerator for up to a week or freezing it for longer storage is also an option.
4. Can I use all-purpose flour to feed my sourdough starter?
Yes, you can use all-purpose flour, but bread flour or a blend of all-purpose and whole wheat flour often yields better results. Different flours can affect the flavor and activity of your starter.
5. How do I know when my sourdough starter is ready to use?
A ready-to-use starter should be bubbly, doubled in size, and have a slightly sour aroma. It should also pass the float test, where a small amount of starter floats in water, indicating it’s active enough to leaven bread.
6. What if my sourdough starter is not rising?
Ensure your starter is in a warm environment (75-80°F or 24-27°C). If it’s sluggish, increase feeding frequency and use warm water. Consistent feeding and a warm environment are key to reviving a starter that’s not rising.
7. Is it possible to overfeed my sourdough starter?
While it’s not typically a problem, overfeeding can dilute the culture, making it less active. Stick to the recommended 1:1:1 ratio and discard before each feeding to maintain balance.
8. What does hooch mean, and what should I do about it?
Hooch is a liquid that forms on top of the starter, indicating it’s hungry. Simply pour off the hooch and feed your starter as usual.
9. How can I store my sourdough starter long-term if I won’t be baking for a while?
For long-term storage, refrigerate your starter and feed it once a week. Alternatively, dehydrate your starter by spreading a thin layer on parchment paper, allowing it to dry completely, and storing it in an airtight container.
10. What are the signs of a bad or contaminated sourdough starter?
Signs of a bad starter include mold growth, a foul odor (like rotten eggs), and unusual discoloration. If you notice these signs, it’s best to discard the starter and begin with a new culture.
If you’re facing challenges with your sourdough starter or want to elevate your baking skills, don’t hesitate to reach out to the experts at HOW.EDU.VN. Our team of experienced bakers is ready to provide personalized advice and solutions to help you achieve sourdough success. Contact us today and take your baking to the next level.
- Address: 456 Expertise Plaza, Consult City, CA 90210, United States
- WhatsApp: +1 (310) 555-1212
- Website: how.edu.vn