Sticky Keys is a helpful accessibility feature in Windows 10 that allows you to use keyboard shortcuts by pressing keys sequentially instead of simultaneously. This can be particularly useful for individuals who find it difficult to press multiple keys at once. However, for many users, Sticky Keys can be accidentally activated, leading to unwanted pop-ups and potentially disrupting workflow, especially during gaming or fast-paced tasks.
If you find yourself frequently triggering Sticky Keys unintentionally or simply don’t need this feature, disabling it is a straightforward process. This guide will walk you through various methods to disable Sticky Keys on Windows 10, ensuring a smoother and less interrupted computer experience.
Disabling Sticky Keys Using a Keyboard Shortcut
The quickest way to disable Sticky Keys is by using a keyboard shortcut. This method is convenient when Sticky Keys is accidentally turned on and you need to turn it off immediately. There are a couple of keyboard shortcuts you can use:
-
The Shift Key Method: Press the Shift key five times in quick succession. This is the same shortcut that typically activates Sticky Keys, and repeating it will deactivate the feature.
-
The Two-Key Press Method: Simultaneously press any two of the following keys: Ctrl, Alt, Shift, or the Windows key. This action will also disable Sticky Keys, provided that this option is enabled in your settings.
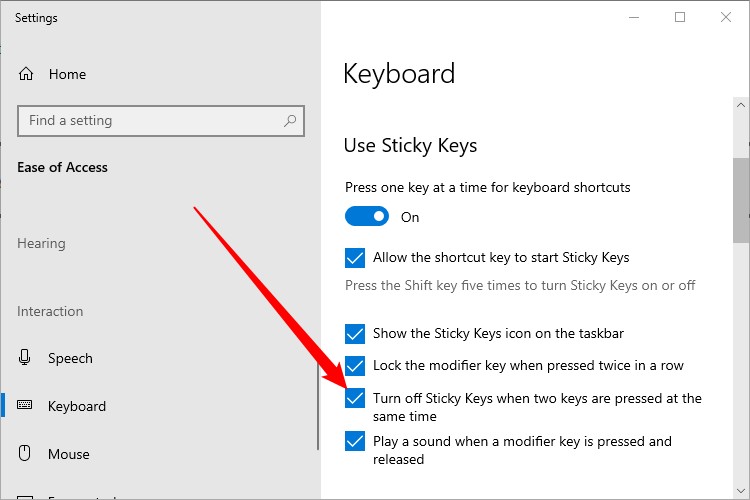
If the two-key press method isn’t working for you, you may need to check your Sticky Keys settings to ensure this shortcut is enabled. Here’s how:
-
Type “Ease of Access” in the Windows Search bar, located in the bottom-left corner of your screen next to the Windows icon.
-
Click on “Ease of Access keyboard settings” from the search results.
-
In the “Keyboard” settings window, under the “Use Sticky Keys” section, ensure that the checkbox next to “Turn off Sticky Keys when two keys are pressed at the same time” is selected.
It’s important to note that this option will only be visible if Sticky Keys is currently enabled. If Sticky Keys is already disabled, you won’t see this specific setting.
Disabling Sticky Keys Through the Settings Menu
For a more permanent solution, you can disable Sticky Keys directly from the Windows Settings menu. This method ensures that Sticky Keys remains turned off until you decide to enable it again.
-
Again, type “Ease of Access” into the Windows Search bar.
-
Select “Ease of Access keyboard settings” from the list of results.
-
In the “Keyboard” settings window, locate the “Use Sticky Keys” section.
-
Toggle the switch under “Press one key at a time for keyboard shortcuts” to the “Off” position. This will completely disable the Sticky Keys feature.
By toggling this switch to “Off,” you have successfully disabled Sticky Keys through the Settings menu.
Disabling Sticky Keys via the Control Panel
Another way to disable Sticky Keys is through the Control Panel. While the Settings app is gradually replacing the Control Panel, it still provides access to certain accessibility options, including Sticky Keys settings.
-
Open the Control Panel. You can do this by typing “Control Panel” in the Windows Search bar and selecting the Control Panel app.
-
In the Control Panel, navigate to “Ease of Access” and then click on “Ease of Access Center.”
-
Within the Ease of Access Center, select “Make the keyboard easier to use.”
-
In the “Make the keyboard easier to use” window, find the section labeled “Make it easier to type.”
-
Uncheck the box next to “Turn on Sticky Keys.”
-
Click “Apply” at the bottom-right corner of the window, and then click “OK” to close the window.
By unchecking the “Turn on Sticky Keys” box and applying the changes, you have disabled Sticky Keys through the Control Panel.
Preventing Sticky Keys Notification Pop-ups
Even after disabling Sticky Keys, you might still encounter the annoying pop-up notification when you press the Shift key five times. To prevent these notifications from appearing, you can adjust the Sticky Keys settings further.
When you access the “Set up Sticky Keys” page through the Control Panel method (by double-clicking the Sticky Keys icon in the System Tray if it’s enabled), or through the Ease of Access Center, you’ll find options to control the behavior of Sticky Keys. Ensure that options like “Display a warning message when Sticky Keys is turned on” and “Make a sound when Sticky Keys is turned on” are unchecked. This will prevent the visual and auditory cues that accompany Sticky Keys activation, further streamlining your user experience.
Conclusion
Disabling Sticky Keys on Windows 10 is a simple process that can be achieved through various methods, including keyboard shortcuts, the Settings menu, and the Control Panel. By choosing the method that best suits your needs, you can effectively turn off Sticky Keys and prevent accidental activation, leading to a more seamless and efficient computing experience. Whether you opt for a quick keyboard shortcut or a more permanent setting change, this guide provides you with all the necessary steps to take control of your Sticky Keys settings in Windows 10.