Your iPhone is more than just a communication device; it’s also a powerful and portable audio recorder right in your pocket. Whether you need to capture quick voice notes, important lectures, musical inspirations, or even interviews, your iPhone is equipped to handle it all with ease. The built-in Voice Memos app is your go-to tool for recording high-quality audio. This guide will walk you through everything you need to know about how to record audio on your iPhone, from basic recording to advanced features, ensuring you get the best possible sound capture every time.
Getting Started with Basic Audio Recording
The Voice Memos app comes pre-installed on every iPhone, making it instantly accessible. Here’s how to start recording audio quickly and easily:
-
Locate the Voice Memos App: Find the Voice Memos app on your iPhone. It’s usually located in the Utilities folder. For quicker access, you can move it to your Home Screen for easy one-tap launching.
-
Initiate Recording: Open the Voice Memos app and tap the prominent red Record button located at the bottom of the screen. As soon as you tap this button, recording begins.
-
Optimize Audio Level: For the best audio quality, position the microphone appropriately. Moving the microphone closer to the sound source will increase the recording level, ideal for quieter sounds. Moving it further away is better for louder environments to avoid distortion. Experiment to find the optimal distance for clear audio capture.
-
Stop Recording: Once you’ve captured the audio you need, tap the Stop button (which replaces the Record button during recording).
-
Saving and Naming Your Recording: Your recording is automatically saved. By default, it will be named “New Recording” or with your current location if Location Services is enabled. To rename your recording for better organization:
- Tap on the recording in the list.
- Tap on the default name.
- Type in your desired new name and tap Save.
Your audio recording is now saved and ready to be listened to, edited, or shared.
Exploring Advanced Recording Features
Beyond basic recording, Voice Memos offers several advanced features to enhance your audio capture experience.
Stereo Recording for Enhanced Audio Depth
For a richer, more immersive audio experience, especially useful for recording music or environments with diverse sounds, you can enable stereo recording.
- Access Settings: Open the Settings app on your iPhone.
- Navigate to Voice Memos Settings: Scroll down and tap on Voice Memos.
- Enable Stereo Recording: Toggle the switch next to Stereo Recording to the ON position.
With stereo recording enabled, Voice Memos utilizes multiple microphones on your iPhone to capture audio with distinct left and right channels. When listening back through headphones, you’ll notice a more spatial and detailed sound. Note that while stereo recording enhances audio depth, the waveform display in the app will still appear mono. Also, stereo recording availability may vary depending on your iPhone model.
Recording in Parts with Pause and Resume
Need to record in segments or take breaks during a longer recording session? Voice Memos allows you to pause and resume recording seamlessly.
-
Start Recording: Begin your recording as usual by tapping the Record button.
-
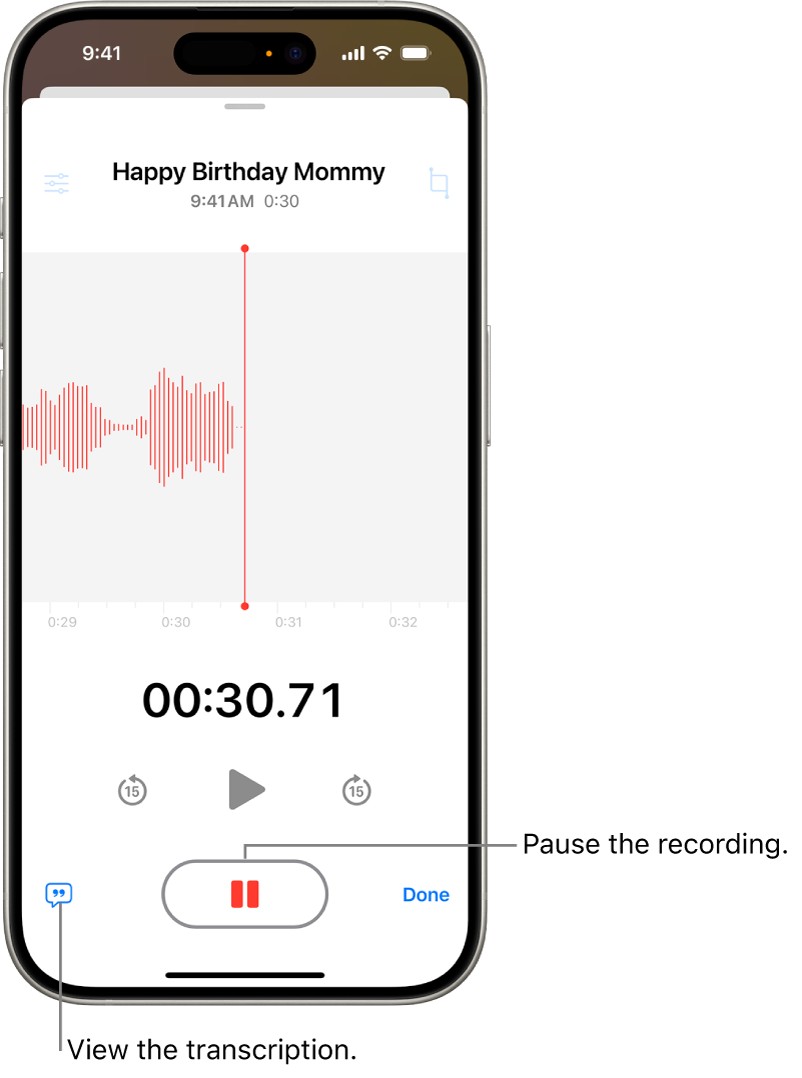
Pause Recording: To pause, tap the Pause button (a pause icon) that appears during recording.
-
Resume Recording: When you’re ready to continue, tap Resume. The recording will pick up exactly where you left off, creating a single, continuous audio file.
-
Review and Save: You can review your recording at any point by tapping the Play button. To adjust the playback start point, drag the waveform. Once satisfied, tap Done to save your complete recording.
This feature is incredibly useful for lectures, meetings, or any situation where you need to stop and start recording without creating multiple files.
Tips for Optimizing Your iPhone Audio Recordings
To ensure you get the best possible audio recordings on your iPhone, consider these additional tips:
Muting Start and Stop Tones for Silent Recording
In situations where you need discreet recording without any start or stop sounds, you can easily mute these tones:
- Start Recording: Initiate your recording in the Voice Memos app.
- Mute Volume: Immediately use the Volume Down button on the side of your iPhone to turn the volume all the way down. This will mute the start and stop tones without affecting the recording level of the audio you’re capturing.
Multitasking While Recording Audio
Need to refer to notes or use another app while recording? Voice Memos allows you to use other apps simultaneously, as long as they don’t play audio.
-
Begin Recording: Start your audio recording in Voice Memos.
-
Navigate Away from Voice Memos: Swipe up from the bottom of the screen to return to the Home Screen and open any other app you need to use.
-
Dynamic Island for Easy Access: On supported iPhone models, you’ll see the recording in progress indicated in the Dynamic Island at the top of your screen. Tap the Dynamic Island to quickly expand it and return to the Voice Memos app for more control. Be aware that if another app starts playing audio, Voice Memos will automatically stop recording to prevent interference.
Using External Microphones for Professional Quality
While the built-in microphone on your iPhone is excellent for everyday recording, for professional-grade audio, especially for music or interviews, consider using an external microphone.
- Stereo External Microphones: For stereo recording, use an external stereo microphone designed for iPhones. Look for accessories with the “Made for iPhone” or “Works with iPhone” logo to ensure compatibility and optimal performance.
- Connecting External Microphones: Most external microphones connect via the Lightning or USB-C port on your iPhone. Simply plug in the microphone before starting your recording in Voice Memos. The app will automatically use the external microphone as the audio input.
By using an external microphone, you can significantly improve the audio quality, reduce background noise, and achieve a more professional sound for your recordings.
Conclusion
Recording audio on your iPhone is incredibly straightforward and versatile, thanks to the Voice Memos app. From basic voice notes to stereo recordings and multitasking capabilities, your iPhone is a powerful audio recording tool for various situations. By mastering these features and tips, you can confidently capture high-quality audio whenever and wherever you need it. Explore the Voice Memos app and discover how it can enhance your productivity and creative endeavors.