Making your own dill pickles at home is surprisingly easy and incredibly rewarding. Forget the store-bought versions – homemade pickles offer a superior crispness, tang, and flavor that will elevate your sandwiches, burgers, and snacking game. This simple, 8-ingredient recipe will guide you through the process of creating delicious, crunchy dill pickles right in your own kitchen. Once you learn How To Make Pickles, you’ll wonder why you haven’t been doing it all along!
Why Make Pickles at Home?
While grocery store pickles are convenient, homemade pickles offer a world of difference in taste and quality. Here’s why you should try making your own:
- Unmatched Flavor: Homemade pickles are bursting with fresh dill and garlic flavor, perfectly balanced with tangy vinegar and salt. You control the ingredients, ensuring a taste that’s far superior to mass-produced options.
- Crisp and Crunchy Texture: The texture of homemade pickles is undeniably better. They retain a satisfying crunch that is often lost in commercially made pickles.
- Freshness and Control: You know exactly what goes into your pickles. No artificial preservatives or mystery ingredients – just fresh cucumbers, spices, and a simple brine.
- Easy and Fun: The process of making refrigerator pickles is incredibly simple and doesn’t require any special canning equipment. It’s a fun kitchen project that yields delicious results.
- Customizable: Once you master the basic recipe, you can experiment with different spices and flavors to create your own signature pickle variations.
Ingredients You’ll Need for Homemade Pickles
This recipe is based on simple ingredients, most of which you likely already have in your pantry. Here’s what you’ll need to gather to learn how to make dill pickles:
- Cucumbers: 12 to 14 Persian cucumbers or 8 to 10 pickling cucumbers. Persian cucumbers are readily available and work wonderfully, offering a great size and crispness. Pickling cucumbers are another excellent choice if you can find them.
- Garlic: 4 cloves of garlic, halved. Garlic adds a pungent and savory depth to the pickle flavor.
- Mustard Seeds: 2 teaspoons of mustard seeds. These tiny seeds provide a subtle peppery and tangy note, essential for classic dill pickle flavor.
- Peppercorns: 2 teaspoons of peppercorns. Black peppercorns add a mild spice and complexity to the brine.
- Fresh Dill: Fresh dill sprigs, a few per jar. Dill is the star of the show, imparting its signature herbaceous and slightly anise-like flavor.
- Water: 2 cups of water. The base of the brine.
- Distilled White Vinegar: 2 cups of distilled white vinegar. Vinegar is the key pickling agent, providing the necessary acidity to preserve the cucumbers and create that characteristic tangy flavor. White vinegar is preferred for its clean taste and clear color.
- Cane Sugar: ¼ cup of cane sugar. Don’t be afraid of the sugar! It’s not meant to make the pickles sweet. Instead, it balances the sharpness of the vinegar and salt, resulting in a more rounded and irresistible sour pickle taste.
- Sea Salt: 2 tablespoons of sea salt. Salt is crucial for both flavor and preservation. It helps to draw out moisture from the cucumbers, contributing to their crisp texture, and also inhibits the growth of unwanted bacteria.
Step-by-Step Guide: How to Make Dill Pickles
Now, let’s dive into the easy steps to make your own crunchy dill pickles. This method focuses on refrigerator pickles, which are quick to prepare and don’t require canning.
Step 1: Prepare the Cucumbers
- Choose your cut: Decide whether you want dill pickle spears or chips. For spears, slice the cucumbers lengthwise into quarters. For chips, thinly slice them horizontally. The cut affects not only the shape but also the pickling time. Chips will pickle faster due to their smaller size.
Step 2: Prepare the Jars and Spices
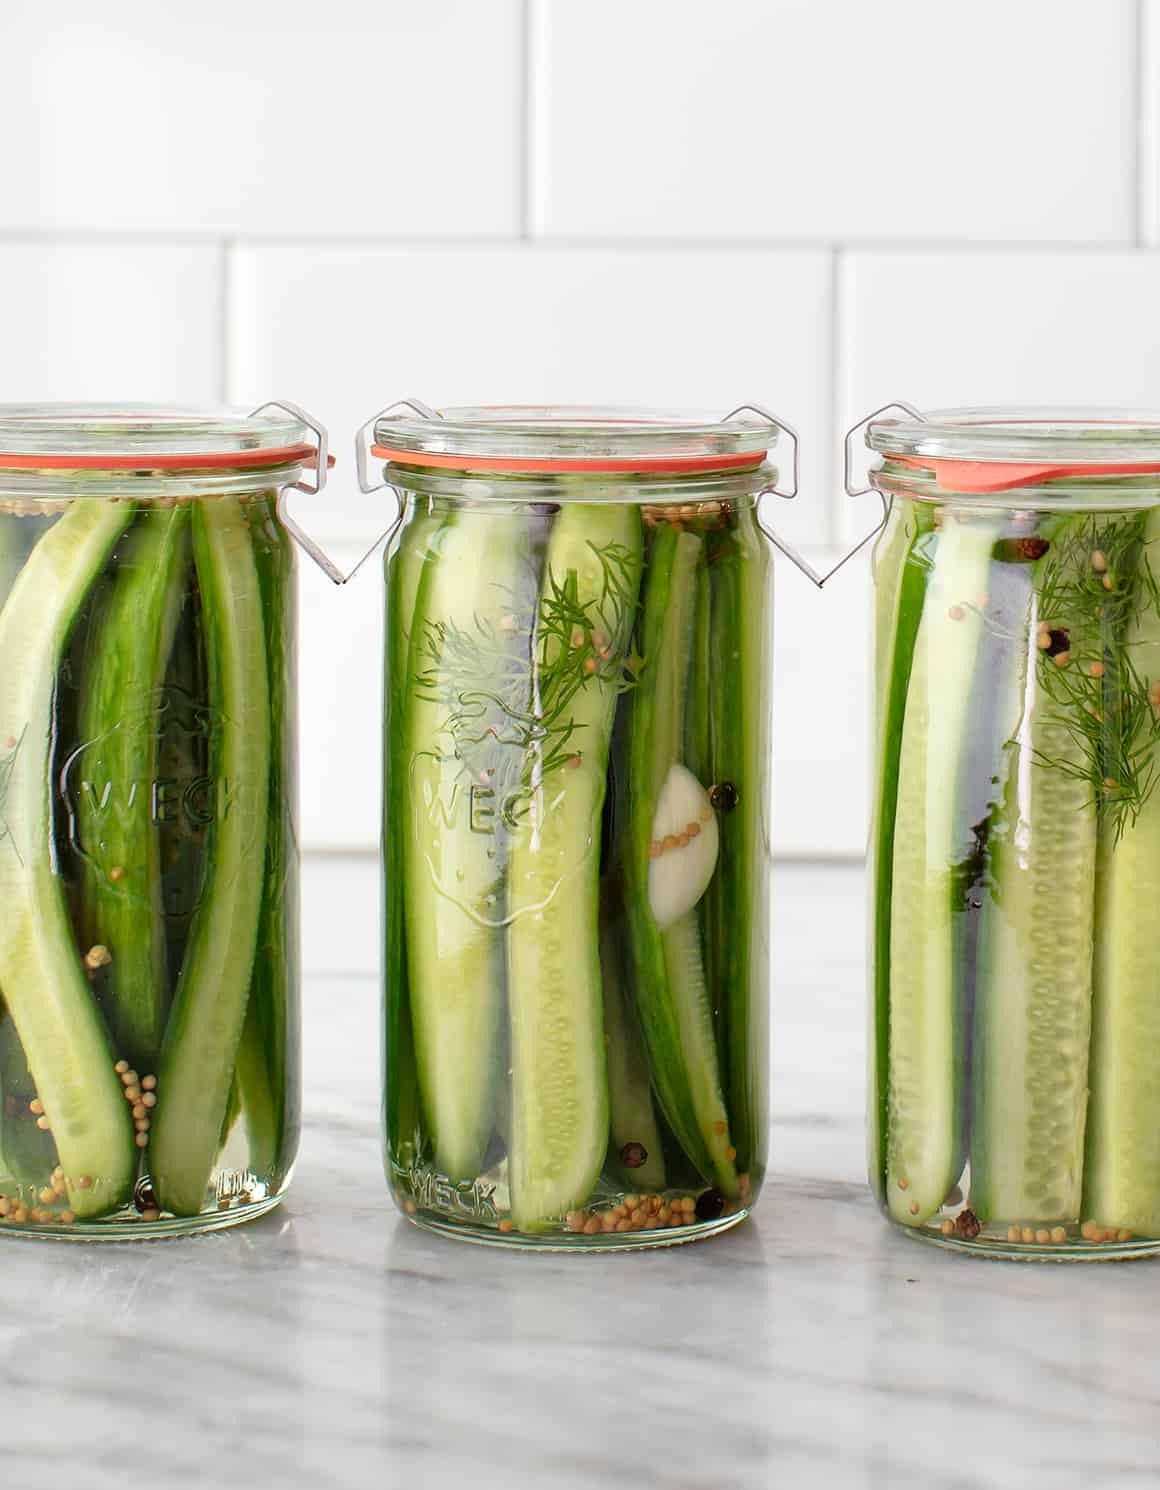
- Jar selection: Divide the sliced cucumbers among 4 (8-ounce) or 2 (16-ounce) clean jars. Mason jars are ideal for pickling due to their airtight seal.
- Spice layering: To each jar, add halved garlic cloves, mustard seeds, peppercorns, and fresh dill sprigs. Distribute the spices evenly between the jars to ensure consistent flavor in each batch of pickles.
Step 3: Make the Brine
- Brine mixture: In a medium saucepan, combine water, white vinegar, sugar, and salt.
- Heat and dissolve: Heat the brine mixture over medium heat, stirring until the sugar and salt are completely dissolved. This usually takes just about a minute. Heating helps the sugar and salt dissolve more readily and also slightly pasteurizes the brine.
- Cool slightly: Let the brine cool slightly before pouring it over the cucumbers. Pouring hot brine directly onto the cucumbers can soften them, so allowing it to cool for a few minutes is important.
Step 4: Jarring and Cooling
- Pour brine: Carefully pour the slightly cooled brine over the cucumbers in each jar, ensuring that the cucumbers are fully submerged in the liquid. If needed, you can gently press the cucumbers down to ensure they are covered.
- Cool to room temperature: Set the jars aside and allow them to cool to room temperature completely. This is crucial before refrigeration to prevent condensation inside the jars and ensure proper pickling.
Step 5: Refrigerate and Wait (The Hardest Part!)
- Refrigeration: Once the jars have cooled to room temperature, seal them tightly with lids and transfer them to the refrigerator.
- Pickling time: This is where patience comes in! Dill pickle chips will be lightly pickled and ready to enjoy in about 24 hours. Dill pickle spears will take longer, requiring at least 48 hours to develop a good pickle flavor.
- Flavor development: The pickles will continue to develop flavor as they sit in the brine. For the best and most pronounced dill pickle flavor, wait for about 5 days before enjoying them.
- Storage: These refrigerator pickles will keep in the fridge for several weeks and, in fact, often taste even better as time goes on.
Tips for the Crispiest Pickles
Achieving perfectly crisp pickles is the goal! Here are a few tips to ensure your homemade dill pickles are wonderfully crunchy:
- Use fresh, firm cucumbers: Start with the freshest and firmest cucumbers you can find. Avoid cucumbers that are soft or have blemishes.
- Don’t skip the chilling time: Refrigeration is essential for crispness. The cold temperature helps to slow down the enzymatic activity that can soften pickles.
- Proper brine ratio: Follow the brine recipe closely. The correct ratio of vinegar to water is crucial for both flavor and texture.
- Consider adding tannins (optional): Some pickling recipes recommend adding a grape leaf or black tea bag to the jar. Tannins in these ingredients are believed to help keep pickles crisp. This is an optional step, but worth exploring if you want extra insurance for crispness.
- Store properly: Always store your pickles in the refrigerator and ensure the cucumbers are fully submerged in the brine.
Serving Suggestions for Your Homemade Pickles
Homemade dill pickles are incredibly versatile and can be enjoyed in countless ways. Here are some delicious serving suggestions:
- Classic Snack: Enjoy them straight from the fridge as a refreshing and tangy snack.
- Burger and Sandwich Topping: Pile dill pickle chips or spears on veggie burgers, mushroom burgers, cauliflower po’ boys, black bean burgers, or BBQ jackfruit sandwiches. They add a fantastic crunch and tang that complements savory flavors perfectly.
- Deli-Style Lunch Side: Serve pickle spears alongside your favorite sandwiches for a classic deli-style lunch.
- Salad Ingredient: Dice pickles and add them to salads like potato salad, macaroni salad, or even green salads for a burst of flavor and texture.
- Charcuterie Boards: Include homemade pickles on your charcuterie boards for a salty, tangy, and crunchy element that balances rich cheeses and meats.
Troubleshooting Common Pickle Problems
Even with a simple recipe, you might encounter a few common issues when learning how to make pickles. Here’s how to troubleshoot them:
- Soft Pickles:
- Cause: Using old or soft cucumbers, not enough vinegar in the brine, or not chilling them quickly enough.
- Solution: Use the freshest, firmest cucumbers. Ensure you are using the correct vinegar to water ratio in your brine. Make sure to refrigerate the pickles promptly after they cool to room temperature.
- Cloudy Brine:
- Cause: Minerals in your water, or naturally occurring bacteria activity. This is often harmless with refrigerator pickles but can be a sign of spoilage in canned pickles.
- Solution: For refrigerator pickles, cloudy brine is often normal and doesn’t necessarily indicate spoilage. If you are concerned, trust your senses – if it smells or tastes off, discard it. Using distilled water can help minimize cloudiness due to minerals. For canning, cloudy brine can be a sign of spoilage, so follow proper canning procedures carefully.
- Pickles Not Sour Enough:
- Cause: Not enough fermentation time, or not enough vinegar in the brine.
- Solution: Allow the pickles to sit in the refrigerator for a longer period to develop more sourness. Ensure you are using the correct amount of vinegar in your brine.
Explore More Pickle Recipes
Once you’ve mastered dill pickles, why not explore other exciting pickle variations? Try these homemade pickle recipes for your next culinary adventure:
- Pickled Jalapeños: Add a spicy kick to your dishes with these fiery pickled jalapeños.
- Pickled Red Onions: Versatile and vibrant, pickled red onions are great on tacos, salads, and sandwiches.
- Banh Mi Pickles: Quick-pickled carrots and daikon radish with a sweet and tangy flavor, perfect for banh mi sandwiches and Asian-inspired dishes.
Making homemade dill pickles is a simple and satisfying way to enjoy this classic condiment at its best. With just a few ingredients and minimal effort, you can create incredibly flavorful and crisp pickles that are far superior to anything you can buy at the store. So, gather your cucumbers, spices, and get pickling!
Dill Pickles Recipe
Rate this recipe: 4.98 from 201 votes
Prep Time: 10 minutes
Cook Time: 1 minute
Chilling Time: 1 day
Serves: 16
Save Recipe Print Recipe
Learn how to make pickles at home! They’re crisp, tangy, and refreshing – a perfect snack or sandwich fixing.
Equipment
- Jars (4 8-ounce or 2 16-ounce)
- Medium saucepan
- Measuring cups and spoons
- Knife and cutting board
Ingredients
- 12 to 14 Persian cucumbers or 8 to 10 pickling cucumbers
- 4 garlic cloves, halved
- 2 teaspoons mustard seeds
- 2 teaspoons peppercorns
- Fresh dill sprigs, a few per jar
- 2 cups water
- 2 cups distilled white vinegar
- ¼ cup cane sugar
- 2 tablespoons sea salt
Instructions
- To make dill pickle spears, slice the cucumbers lengthwise into quarters. To make dill pickle chips, thinly slice them horizontally.
- Divide the cucumbers among 4 (8-ounce) or 2 (16-ounce) jars. Divide the garlic, mustard seeds, peppercorns, and dill sprigs among each jar.
- Heat the water, vinegar, sugar, and salt in a medium saucepan over medium heat. Stir until the sugar and salt dissolve, about 1 minute. Let cool slightly and pour over the cucumbers. Set aside to cool to room temperature, then store the pickles in the fridge.
- Pickle spears will be lightly pickled in 2 days, but their best flavor will start to develop around day 5 or 6. Pickle chips will be lightly pickled in 1 day, and will become more flavorful every day after that. Store in the fridge for several weeks.
Notes
- Pictured are these Weck jars.
Enjoy your homemade dill pickles!