Apple Pay has revolutionized how we make payments, offering a seamless and secure way to handle transactions. Beyond just purchasing goods and services, Apple Pay also allows you to send money to friends, family, and others you know. This guide will walk you through everything you need to know about How To Send Money With Apple Pay, ensuring you can easily and efficiently transfer funds using your Apple devices.
Before you start sending money, it’s important to understand the requirements and features of Apple Cash, the service that powers person-to-person payments within Apple Pay.
What You Need to Send Money with Apple Pay
To send and receive money using Apple Pay, you’ll primarily be using Apple Cash. Here’s what you need to get started:
- Eligible Device: You’ll need an iPhone, iPad, or Apple Watch that is compatible with Apple Pay and running the latest version of iOS, iPadOS, or watchOS.
- Apple Cash Account: Apple Cash is integrated into the Wallet app on your Apple devices. In some cases, you might need to verify your identity to unlock the full functionality of your Apple Cash account, including FDIC insurance eligibility. This verification process typically involves providing personal information to confirm your identity. Once verified, your Apple Cash account becomes FDIC-insured.
- Debit Card (Optional but Recommended): While your Apple Cash balance is used by default for sending money, you can also send money directly from a debit card linked to your Apple Pay. Having a debit card added ensures you have a backup funding source and can send money even if your Apple Cash balance is low. To add a debit card, you’ll need to go to the Wallet app and follow the prompts to add a new card.
Now that you have everything set up, let’s explore the different ways you can send money with Apple Pay.
Sending Money Through the Messages App
The Messages app provides a convenient way to send money directly within your conversations. Here’s how to do it on both iPhone and Apple Watch:
On Your iPhone
-
Open Messages: Launch the Messages app on your iPhone and either start a new conversation or select an existing one with the person you want to send money to.
-
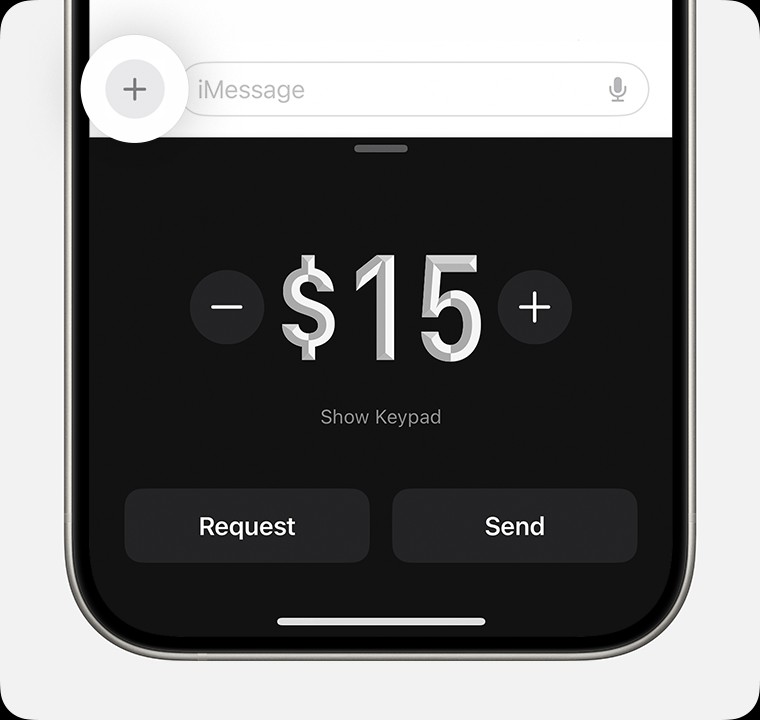
Access Apple Cash: Tap the plus (+) icon located to the left of the message input field. In the menu that appears, tap the Apple Cash icon.
Alt Text: Sending money with Apple Cash in the Messages app on an iPhone, showing the Apple Cash icon selected after tapping the plus icon.
-
Enter Amount: Enter the dollar amount you wish to send. Then, tap “Send”.
-
Add a Comment (Optional): You have the option to add a comment. This comment will be visible in the transaction history for both you and the recipient, helping to identify the purpose of the payment.
-
Review and Send: Tap the “Send” button again to review the payment details.
-
Change Payment Method (If Needed): If you prefer to use a debit card instead of your Apple Cash balance, tap “Change Payment Method.”
- Toggle the Apple Cash slider to the “off” position.
- Select your desired debit card from the list of cards linked to your Apple Pay.
-
Insufficient Apple Cash Balance: If your Apple Cash balance doesn’t cover the full amount, you can use a debit card to pay the remaining balance. The screen will display both your Apple Cash card and debit card, showing the respective amounts to be deducted from each.
-
Confirm Payment: Double-click the side button on your iPhone to initiate the payment process. Confirm the transaction using Face ID, Touch ID, or your passcode for secure authorization.
If you haven’t yet added a debit card to your Wallet app, you’ll be prompted to add one before you can send money using a debit card directly.
On Your Apple Watch
-
Open Messages: Open the Messages app on your Apple Watch and select an existing conversation.
-
Access Apple Cash: Tap the plus (+) icon, then tap the Apple Cash icon.
Alt Text: Sending money with Apple Cash via Messages on an Apple Watch, interface showing amount adjustment using plus and minus signs.
-
Adjust Amount: To modify the default amount, tap the minus (-) or plus (+) signs. You can also use the Digital Crown for more precise adjustments.
-
Review and Send: Tap “Send” to review the payment. You’ll have the option to cancel at this stage if needed.
-
Confirm Payment: Double-click the side button on your Apple Watch to send the payment.
Sending Money Directly from the Wallet App
You can also initiate money transfers directly from the Wallet app, providing another straightforward method to send funds:
-
Open Wallet App: On your iPhone, open the Wallet app.
-
Select Apple Cash Card: Tap on your Apple Cash card within the Wallet app.
-
Choose Send or Request: Tap either “Send” or “Request.” Since you want to send money, tap “Send.” Then, select a recipient from your contacts or add a new contact.
Alt Text: Initiating money transfer from the Apple Wallet app on iPhone, highlighting the ‘Send or Request’ options and contact selection screen.
-
Enter Amount: Tap “Next,” then enter the amount you wish to send.
-
Send and Confirm: Tap “Send,” then tap the “Send” button to proceed.
-
Confirm Payment: Double-click the side button and authenticate with Face ID, Touch ID, or your passcode to finalize the payment.
Utilizing Tap to Cash for In-Person Transfers
For situations where you are physically near the recipient, Apple Pay offers “Tap to Cash” for even faster transfers:
Alt Text: Tap to Cash feature in Apple Pay demonstrated with two iPhones touching at the top to initiate a money transfer.
“Tap to Cash” allows you to send and receive money with someone nearby without needing to exchange phone numbers or email addresses. Simply hold your iPhone near the recipient’s iPhone to initiate the transfer. For detailed instructions on using Tap to Cash, you can refer to Apple’s support documentation.
Setting Up Recurring Apple Cash Payments
If you need to send money regularly, Apple Pay allows you to set up recurring payments, simplifying routine transfers:
-
Open Wallet and Apple Cash: Open the Wallet app on your iPhone and tap your Apple Cash card.
-
Access Recurring Payments: Tap the “More” button (represented by three dots), then select “Recurring Payments,” and finally, tap “New Recurring Payment.”
Alt Text: Accessing the Recurring Payments setup in Apple Wallet, menu showing ‘More’ button and ‘Recurring Payments’ option highlighted.
-
Configure Payment Schedule: Add the recipient, then follow the on-screen prompts to specify the payment amount, start date, and frequency (weekly, biweekly, or monthly). You can also add a memo for identification.
-
Review and Confirm: Tap “Send,” then tap the “Send” button to review the recurring payment details.
-
Finalize Setup: Double-click the side button and confirm with Face ID, Touch ID, or passcode to set up the recurring payment schedule.
You can easily edit, cancel, or pause recurring payments at any time through the “Recurring Payments” section in your Apple Cash card settings within the Wallet app.
Accepting Money with Apple Pay (Apple Cash)
When someone sends you money via Apple Cash, it’s securely deposited into your Apple Cash balance. You can use these funds to make purchases with Apple Pay, send money to others, or transfer it to your bank account or an eligible debit card.
Upon receiving a payment, you might be prompted to verify your identity if you haven’t done so already.
You can choose to accept payments automatically or manually:
- Open Wallet and Apple Cash: Open the Wallet app, then tap your Apple Cash card.
- Access Card Details: Tap the “More” button, then tap “Card Details.”
- Payment Acceptance Settings: Choose between “Manually Accept Payments” or “Automatically Accept Payments.”
With manual acceptance enabled, you’ll need to open the Messages conversation, tap “Accept,” and follow the instructions to receive the money. You have 7 days to accept a payment manually. Automatic acceptance means payments are immediately added to your Apple Cash balance.
If you haven’t set up Apple Cash and someone sends you money, you’ll see an “Accept” option in the message. Tapping “Accept” will guide you through the Apple Cash setup process.
Requesting Money with Apple Pay (Apple Cash)
Need to request money from someone? Apple Cash makes it easy:
On Your iPhone
-
Open Messages: Open the Messages app and start or select a conversation.
-
Access Apple Cash Request: Tap the plus (+) icon, tap Apple Cash, enter the amount you are requesting, and then tap “Request.”
Alt Text: Requesting money via Apple Cash in Messages app on iPhone, showing the request interface and amount input.
-
Send Request: Tap the “Send” button to send your payment request.
On Your Apple Watch
- Open Messages: Open the Messages app on your Apple Watch and choose a conversation.
- Access Apple Cash Request: Tap the plus (+) icon, then tap Apple Cash.
- Enter Amount and Request: Enter the amount, then swipe left on the “Send” button to reveal the “Request” button. Tap “Request.”
Responding to a Payment Request
When you receive a payment request:
On Your iPhone
- Open Request in Messages: Open the payment request in the Messages app and tap “Pay” on the message.
- Review and Send Payment: Review the amount, tap “Send” to continue, or change the amount if necessary before tapping “Send.”
- Confirm Payment: Double-click the side button and authenticate with Face ID, Touch ID, or passcode to send the payment.
You can decline a request simply by ignoring the message.
On Your Apple Watch
- Open Request in Messages: Open the request in Messages and tap “Pay.”
- Review and Send: Review the amount and tap “Send.” Adjust the amount using the Digital Crown if needed, and then tap “Send.”
- Confirm Payment: Double-click the side button to confirm and send the payment.
Cancelling a Sent Payment
If you’ve sent a payment and need to cancel it, you can do so if the transaction is still pending (i.e., the recipient hasn’t accepted it yet). You can check the status in your Apple Cash transaction history. If the status is “pending,” you can cancel the payment.
Remember, Apple Cash person-to-person payments are designed for transactions between people you know and trust.
Conclusion
Sending money with Apple Pay via Apple Cash is a remarkably convenient and secure way to transfer funds. Whether you’re splitting bills with friends, sending gifts to family, or managing recurring payments, Apple Pay provides a user-friendly experience across your Apple devices. By following this guide, you can confidently utilize Apple Pay to send and receive money, making the most of your digital wallet.
* Apple Cash services are provided by Green Dot Bank, Member FDIC. Apple Payments Services LLC, a subsidiary of Apple Inc., is a service provider of Green Dot Bank for Apple Cash accounts. Neither Apple Inc. nor Apple Payments Services LLC is a bank. Learn more about the Terms and Conditions. Only available in the U.S. on eligible devices. To send and receive money with an Apple Cash account, you must be 18 and a U.S. resident. If you’re under 18, your family organizer can set up Apple Cash for you as part of their Apple Cash Family account, but you may not be able to access features that require a supported payment card. Security checks may require more time to make funds available. Apple Cash Family accounts can only send or receive up to $2000 within a rolling seven-day period. Tap to Cash transactions can only be used to send or receive up to $2000 within a rolling seven-day period. Other limits apply, see Terms and Conditions for details. To access and use all Apple Cash features, you must have an eligible device with Wallet that has the latest version of iOS.
Apple Pay is a service provided by Apple Payments Services LLC, a subsidiary of Apple Inc. Neither Apple Inc. nor Apple Payments Services LLC is a bank. Any card used in Apple Pay is offered by the card issuer.