Baking chicken breast seems straightforward, right? But achieving that perfectly juicy, tender chicken, rather than a dry, rubbery disappointment, can be trickier than it looks. If you’ve ever wondered, “How Long Do You Bake Chicken Breast to get it just right?”, you’re not alone. Countless home cooks search for the answer to this very question, and for good reason. Overcooked chicken breast is a common kitchen mishap, but with the right technique and timing, you can master this healthy and versatile protein. This guide will walk you through the essential steps to baking chicken breast to perfection every time, ensuring it’s flavorful, moist, and ready to be the star of your meal.
Why Baking Time Matters for Chicken Breast?
Understanding why baking time is crucial for chicken breast is the first step to culinary success. Chicken breast is lean, which means it lacks the fat content that keeps darker meats moist during cooking. When subjected to heat, the proteins in chicken breast contract, expelling moisture. Overcooking accelerates this process, resulting in dry, tough meat. Conversely, undercooked chicken is unsafe to eat and can be unappetizingly rubbery.
The goal is to cook the chicken breast just until it reaches a safe internal temperature without losing all its moisture. This is where precise baking time comes into play. Factors like the thickness of the chicken breast, oven temperature, and whether the chicken is bone-in or boneless all influence how long to bake chicken breast. Mastering the correct baking time, alongside proper techniques, unlocks the secret to consistently delicious and juicy chicken breast.
The Perfect Baking Time for Chicken Breast
So, how long do you bake chicken breast to achieve that ideal balance of cooked and juicy? A general rule of thumb for boneless, skinless chicken breasts is to bake them at 450°F (232°C) for approximately 15-18 minutes. However, this is just an estimate, and several factors can affect the ideal baking time.
Factors Affecting Baking Time:
- Thickness of the Chicken Breast: Thicker breasts will naturally require longer baking times. For even cooking, consider pounding thicker breasts to a uniform thickness of about ½ inch.
- Oven Temperature Accuracy: Ovens can vary in temperature. Using an oven thermometer to ensure your oven is accurately preheated to 450°F is helpful.
- Bone-in vs. Boneless: Bone-in chicken breasts generally take longer to cook than boneless ones. This guide focuses on boneless, skinless breasts.
- Starting Temperature of Chicken: Starting with chicken breasts that are closer to room temperature can slightly reduce cooking time, but for food safety, it’s generally recommended to bake chicken directly from the refrigerator.
The Ultimate Tool: A Meat Thermometer
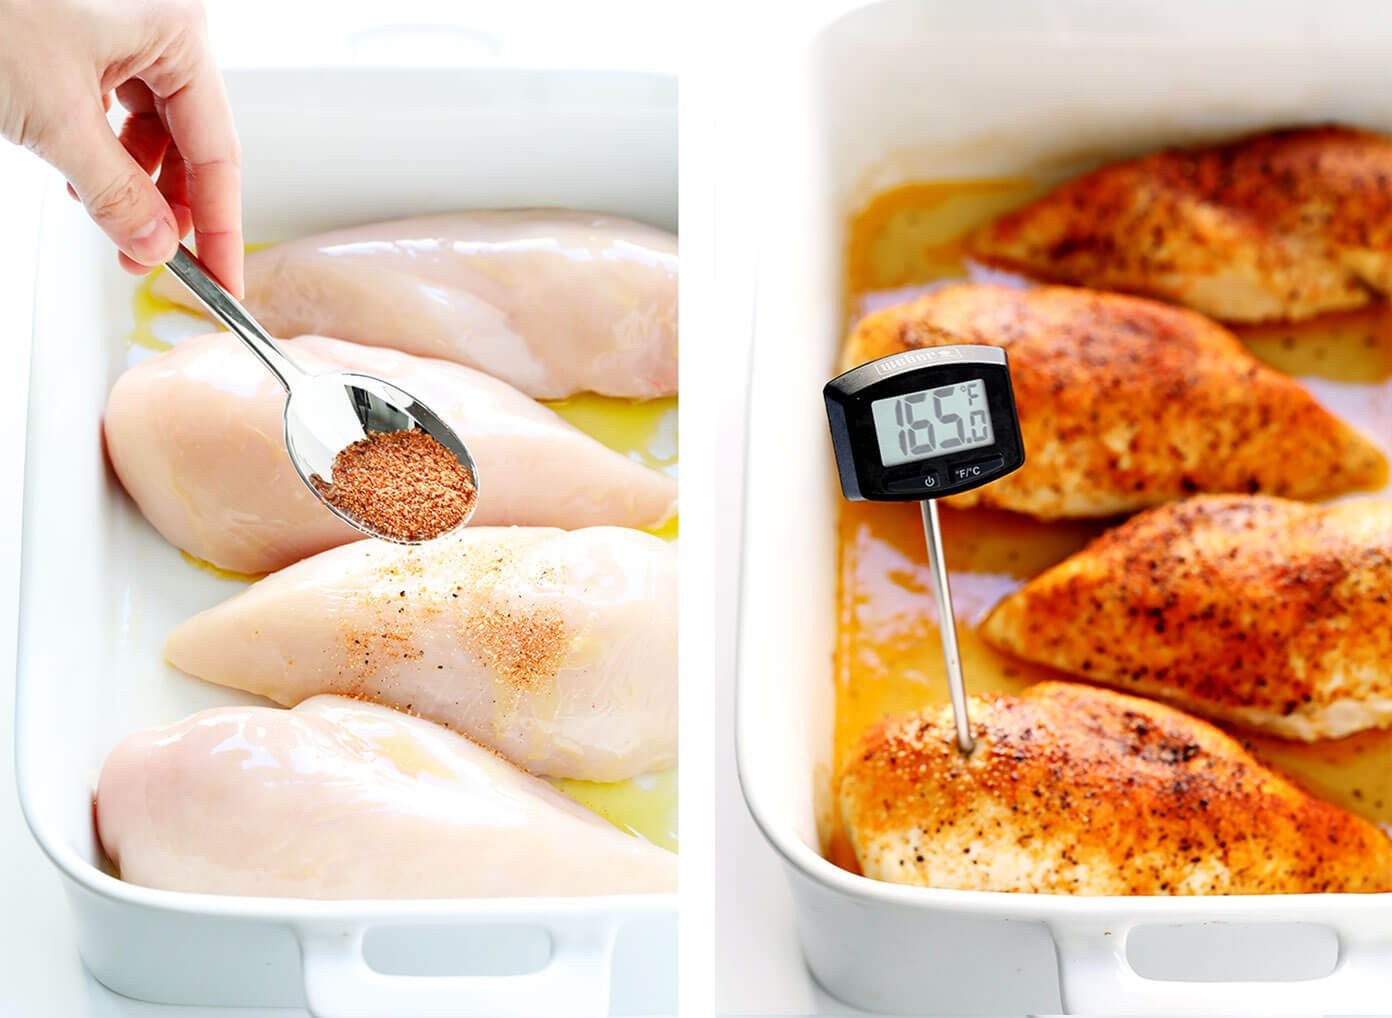
Forget guesswork! The most reliable way to determine if your chicken breast is perfectly cooked and to know exactly how long to bake chicken breast is to use a meat thermometer. The FDA recommends cooking chicken to an internal temperature of 165°F (74°C) to ensure it is safe to eat.
Insert an instant-read meat thermometer into the thickest part of the chicken breast, avoiding the bone if present. When the thermometer registers 165°F, your chicken is cooked, regardless of the time. This takes the uncertainty out of baking and guarantees juicy, safe chicken every time.
Step-by-Step Guide to Baking Juicy Chicken Breast
While knowing how long to bake chicken breast is essential, the technique also plays a significant role in achieving optimal juiciness. This 5-step method, often remembered by the acronym B.B.R.R.R. (Brine, Brush, Rub, Roast, Rest), is a game-changer for baking chicken breast.
Step 1: Brining for Extra Moisture
Brining is a simple yet incredibly effective technique to ensure your chicken breast stays juicy during baking. It involves soaking the chicken in a saltwater solution, which helps the meat retain moisture and enhances its flavor.
How to Brine:
- In a large bowl, dissolve ¼ cup of kosher salt in 2 cups of lukewarm water.
- Add 2 cups of cold water or ice to cool the mixture down.
- Submerge the chicken breasts in the saltwater brine, ensuring they are fully covered.
- Brine for at least 15 minutes, or up to 6 hours in the refrigerator for enhanced flavor and moisture.
- Remove the chicken from the brine, rinse it thoroughly with cold water to remove excess salt, and pat it completely dry with paper towels. Drying the chicken is crucial for browning in the oven.
Note: Some commercially sold chicken breasts are pre-brined. Check the packaging; if sodium solution is listed, skip this brining step.
Step 2: Brush with Butter or Olive Oil
Brushing the chicken breasts with melted butter or olive oil serves two important purposes. Firstly, it adds flavor and richness. Butter, in particular, lends a wonderful savory note and helps create a golden-brown crust. Olive oil is a healthier alternative that still contributes to browning and flavor. Secondly, the fat helps prevent the chicken from drying out during baking and aids in even cooking.
How to Brush:
- Melt 1 tablespoon of butter or measure out 1 tablespoon of olive oil.
- Place the dried chicken breasts in a baking dish.
- Liberally brush both sides of each chicken breast with the melted butter or olive oil. This ensures the chicken is coated and ready for seasoning.
Step 3: Rub with Flavorful Seasonings
This is where you can truly customize the flavor of your baked chicken breast. While simple salt and pepper are sufficient, a flavorful rub elevates the dish significantly. A basic yet delicious blend includes salt, black pepper, garlic powder, and smoked paprika. Feel free to experiment with your favorite herbs and spices.
How to Rub:
- In a small bowl, combine your chosen seasonings. A recommended blend is: 1 teaspoon kosher salt, ½ teaspoon black pepper, ½ teaspoon garlic powder, and ½ teaspoon smoked paprika.
- Sprinkle the seasoning mixture generously and evenly over both sides of the buttered or oiled chicken breasts. Gently rub the seasonings into the chicken to ensure they adhere well.
Step 4: Roast at High Heat
Roasting chicken breast at a high temperature, specifically 450°F (232°C), is the secret to achieving a slightly crispy exterior while keeping the inside juicy. High heat cooking sears the outside of the chicken quickly, locking in the juices.
How to Roast:
- Preheat your oven to 450°F (232°C). Ensure your oven is accurately heated for consistent results.
- Place the seasoned chicken breasts in a single layer in a baking dish. Avoid overcrowding the pan, as this can steam the chicken instead of roasting it.
- Bake for 15-18 minutes, depending on the thickness of the chicken breasts.
- Use a meat thermometer to check for doneness. Insert it into the thickest part of a breast. The chicken is cooked when it reaches an internal temperature of 165°F (74°C).
For a browner and crispier top, you can broil the chicken for the last 3-5 minutes of cooking. Watch carefully to prevent burning.
Step 5: Rest for Ultimate Tenderness
Resting is a critical step often overlooked, but it’s essential for achieving the most tender and juicy baked chicken breast. During cooking, the juices in the meat are pushed towards the center. Resting allows these juices to redistribute throughout the chicken, resulting in a more evenly moist and flavorful final product.
How to Rest:
- Once the chicken reaches 165°F, remove the baking dish from the oven.
- Transfer the chicken breasts to a clean plate.
- Loosely tent the plate with aluminum foil to keep the chicken warm.
- Let the chicken rest for 5-10 minutes before slicing or serving. This resting period makes a significant difference in the final texture and juiciness.
Tips for Perfectly Baked Chicken Breast
Beyond the 5-step method, here are some additional tips to ensure your baked chicken breast is always perfect:
- Pound Chicken for Even Thickness: Unevenly thick chicken breasts cook unevenly. Pounding thicker parts to about ½-inch thickness ensures consistent cooking and prevents dry edges while waiting for the thicker parts to cook through.
- Don’t Overcrowd the Pan: Overcrowding the baking dish leads to steaming instead of roasting. Use a large enough dish or bake in batches to ensure each chicken breast has space for heat circulation.
- Experiment with Seasonings: Don’t be afraid to get creative with your seasoning blends. Consider Italian herbs, Cajun spices, lemon pepper, or your favorite dry rubs to vary the flavor profile.
- Use a Suitable Baking Dish: Avoid glass baking dishes at high temperatures as they can sometimes shatter. Metal baking pans or roasting pans are ideal for 450°F baking.
Serving and Storing Baked Chicken Breast
Baked chicken breast is incredibly versatile. Serve it immediately as a main course with your favorite side dishes, or slice, shred, or dice it for use in salads, sandwiches, wraps, soups, and casseroles.
Serving Suggestions:
- Serve hot with roasted vegetables like asparagus, broccoli, or Brussels sprouts.
- Slice and add to salads, such as Caesar salad or garden salad.
- Dice and use in chicken salad sandwiches or wraps.
- Shred and add to tacos, enchiladas, or pasta dishes.
Storing Leftovers:
- Store cooked chicken breast in an airtight container in the refrigerator for up to 3 days.
- For longer storage, freeze cooked chicken for up to 3 months. It’s best to slice, dice, or shred the chicken before freezing for easier use later.
Conclusion
Mastering how long to bake chicken breast is a fundamental skill for any home cook. By following this guide, focusing on the 5-step B.B.R.R.R. method, and using a meat thermometer, you can consistently bake juicy, tender, and flavorful chicken breasts. Say goodbye to dry chicken forever and enjoy this healthy and adaptable protein in countless delicious meals. Try this method tonight and taste the difference!