Capturing what’s on your computer screen, also known as taking a screenshot or screen capture, is a fundamental skill for anyone using a Windows PC. Whether you need to share an error message with tech support, show off your high score in a game, or create visual aids for a presentation, knowing How To Print Screen is essential. In Windows, the Print Screen key, often abbreviated as PrtScn, is your gateway to quickly grabbing a snapshot of your display. This guide will walk you through everything you need to know about using the Print Screen function effectively on Windows devices.
Locating the Print Screen Key on Your Keyboard
Before you can master the art of print screening, you first need to find the Print Screen key on your keyboard. Its location can vary slightly depending on whether you are using a desktop or laptop computer.
Desktop Keyboards
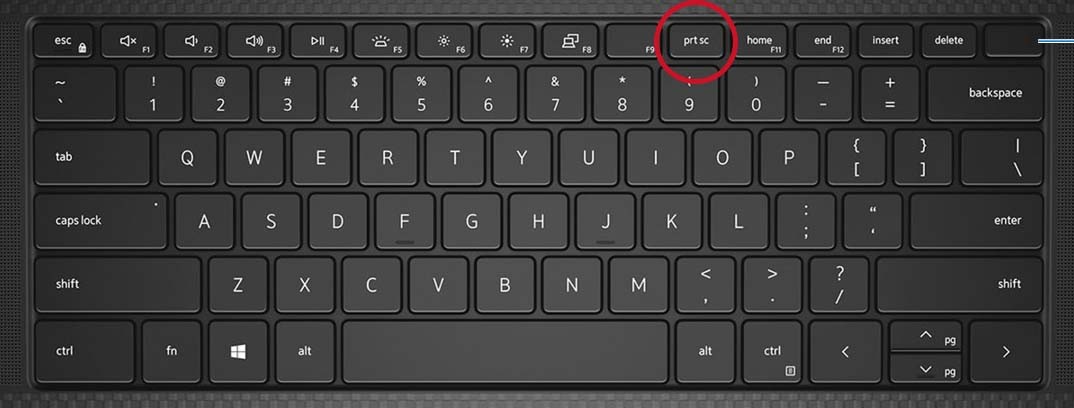
On most desktop keyboards, the Print Screen key is typically located in the upper right-hand corner. You’ll usually find it to the right of the F12 key and above the Insert, Home, Page Up, Delete, End, and Page Down keys. Keep an eye out for labels such as Print Screen, PrtScn, PrntScr, PrtSc, or similar abbreviations. For simplicity, we’ll use PrtScn throughout this article to refer to all these variations.
Laptop Keyboards
Laptop keyboards can sometimes have a more compact layout. The Print Screen key is often found within the Function key row (F1 to F12). You may need to press the Fn (Function) key in combination with the appropriate Function key (often F10 or Insert) to activate the print screen function.
Some laptops feature capacitive or illuminated Function Key rows. On these models, you might need to press the Fn key first to switch the Function keys to their secondary functions, which will then reveal the PrtScn key label. Refer to your laptop’s user manual for specific instructions if you’re unsure.
Note: In some very compact laptop designs, a dedicated Print Screen key might be absent. In these cases, you can usually perform a print screen by pressing and holding Fn + Insert keys simultaneously.
Mastering the Print Screen Function in Windows 10 & 11
The way the Print Screen key works is consistent across Windows 10 and Windows 11, offering several options to capture different parts of your screen.
Capturing the Entire Screen
To take a screenshot of your entire display, including everything visible on your monitor(s), simply press the PrtScn key. When you do this, Windows will automatically copy a picture of your entire screen to the clipboard. You won’t see any visual confirmation that a screenshot has been taken, but it’s there, ready to be used.
For users on Windows tablets, you can achieve the same result by pressing the Windows logo button and the volume down button at the same time. On tablets, screenshots are often automatically saved as image files in the “Screenshots” folder within your “Pictures” library.
Capturing All Active Windows
If you have multiple windows open and you want to capture all of them at once, press the PrtScn key alone. This will capture a screenshot of your entire desktop, including all open windows, and copy it to the clipboard. You can then paste this image into an image editing program to crop or further manipulate it if needed.
Capturing a Single Active Window
Sometimes, you only need to capture a specific window, like a browser window or a particular application. To do this, first, make sure the window you want to capture is active – that is, it’s the window you are currently working in. Then, press and hold the Alt key while pressing the PrtScn key (Alt + PrtScn). This command captures only the active window and copies it to the clipboard.
What to Do After You Print Screen
Once you’ve successfully captured your screen or window using the Print Screen key, the screenshot is temporarily stored on your clipboard. To use or save this screenshot, you need to paste it into an application.
The most common application for this is Paint, which comes standard with Windows. You can also paste screenshots into other image editors like Paint.NET, GIMP, or Adobe Photoshop, as well as document programs like Microsoft Word, email clients, and even messaging apps.
To paste your screenshot, open your chosen application and press Ctrl + V (paste shortcut). The screenshot will then appear in the application window, allowing you to view, edit, save, or share it as needed.
Beyond the Basics: Exploring Other Screenshot Methods
While the Print Screen key is quick and convenient for basic screen captures, Windows also offers more advanced tools for taking screenshots. For more control and options, consider using the Snipping Tool, a built-in Windows utility that allows you to capture specific regions of your screen, free-form selections, or window captures with annotations. You can find the Snipping Tool by searching for it in the Windows search bar.
Another useful shortcut is Windows Key + Shift + S. This combination opens the Snip & Sketch tool, which provides a modern interface for capturing different types of screenshots and immediately annotating them.
Mastering the Print Screen key and exploring these additional screenshot tools will significantly enhance your ability to capture and share information visually on your Windows computer. Practice these techniques to become proficient in taking screenshots for all your needs!