Screen recording on a Mac is an incredibly useful skill, whether you’re creating tutorials, capturing gameplay, or preserving important video calls. Fortunately, macOS comes equipped with built-in tools that make screen recording straightforward and efficient. This guide will walk you through the simple steps to screen record on your Mac using both the Screenshot app and QuickTime Player, ensuring you capture exactly what you need.
Method 1: Utilizing the Screenshot App for Mac Screen Recording
For users running macOS Mojave 10.14 or later, the Screenshot app offers a robust and convenient way to record your screen. This application provides an intuitive toolbar with easily accessible controls for both capturing still screenshots and recording videos.
-
Launch the Screenshot Toolbar: Begin by pressing Shift + Command + 5 keys simultaneously. This will bring up the Screenshot toolbar at the bottom of your screen.
-
Select Your Recording Mode: Within the toolbar, you’ll find two video recording options:
- Record Entire Screen: This option, represented by an icon of a full screen, will record everything visible on your display.
- Record Selected Portion: The icon depicting a dashed rectangle allows you to record a specific area of your screen. Click this option, and then drag your cursor to select the portion you wish to capture. You can fine-tune the selected area by dragging the edges of the highlighted rectangle.
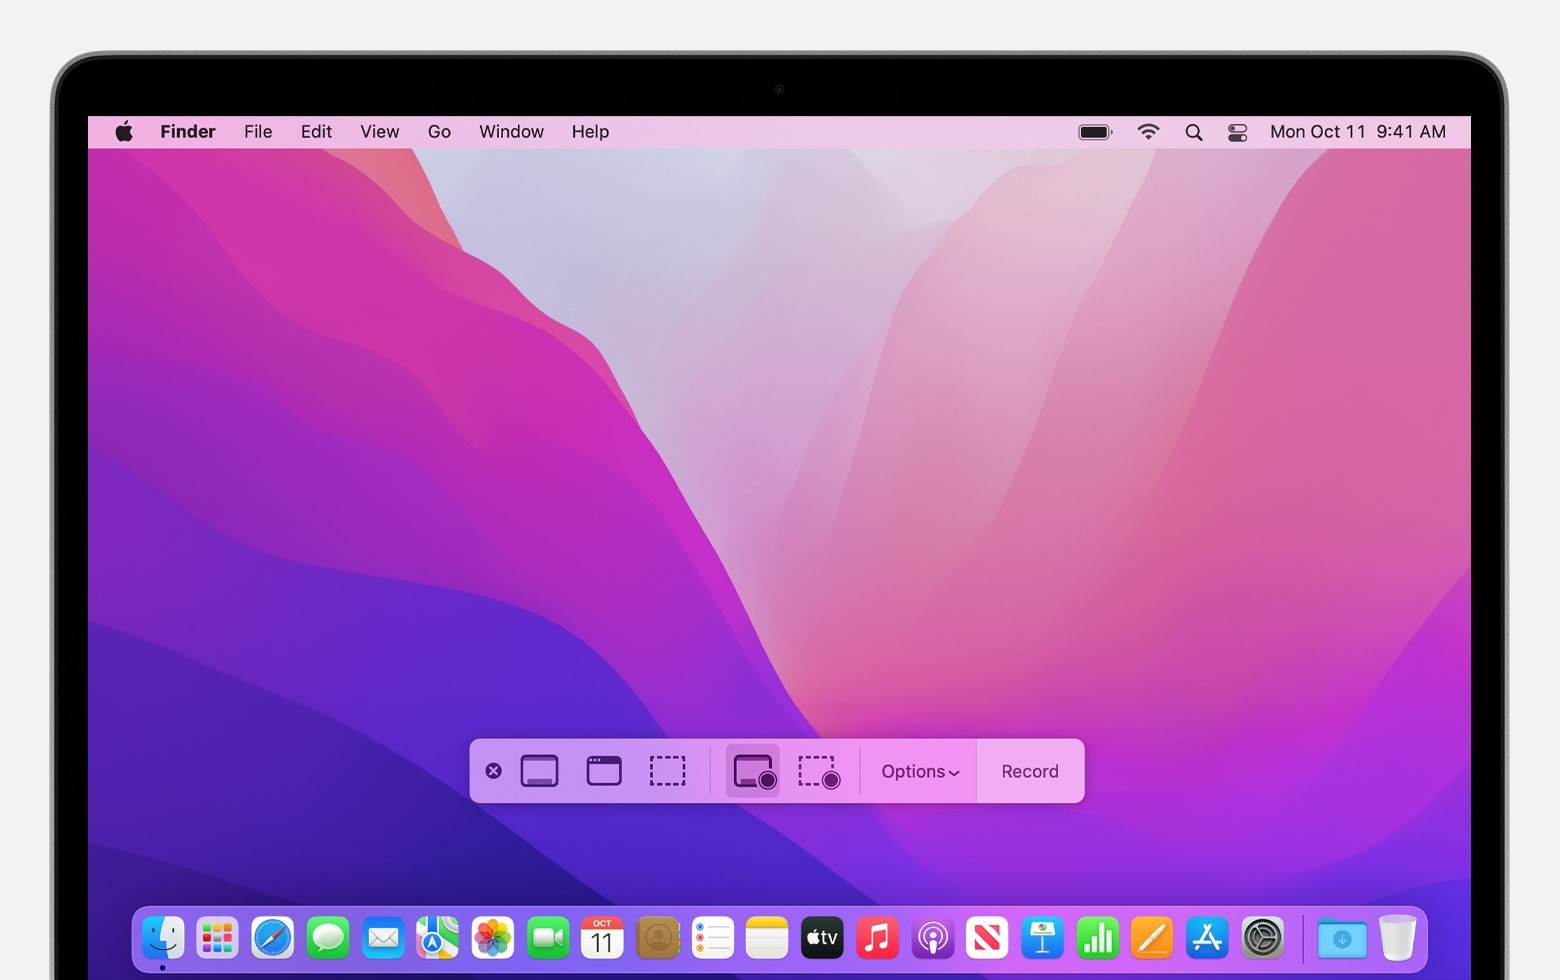 Screenshot app toolbar on macOS Monterey displaying options for screen capture and screen recording.
 -
Configure Recording Options: Before you hit record, click on Options in the Screenshot toolbar to customize your recording settings:
- Microphone Input: To include your voice or any external audio in your screen recording, select a microphone from the dropdown menu. This is ideal for creating tutorials or adding commentary to your recordings.
- Show Mouse Clicks: Enable “Show Mouse Clicks” to visually highlight mouse clicks with a black circle in your recording. This can be very helpful for viewers to follow your actions on screen.
- Recording Timer: Set a timer (5 or 10 seconds) if you need a short delay before the recording begins. This gives you time to prepare your screen or navigate to the window you want to record.
- Save Location: By default, screen recordings are saved to your desktop. You can choose a different location from the “Save to” menu for better file management.
-
Start Recording: Click the Record button in the Screenshot toolbar to initiate your screen recording. If you selected “Record Entire Screen,” the recording will start immediately. If you chose “Record Selected Portion,” click “Start Recording” within the selected area.
-
Stop Recording: To stop recording, click the Stop button (a square inside a circle) located in the menu bar at the top of your screen. Alternatively, you can press Command + Control + Esc (Escape).
-
Review and Edit (Optional): Once you stop recording, a thumbnail preview of your video will briefly appear in the corner of your screen. Click on this thumbnail to quickly trim or share your recording. If you miss the thumbnail, don’t worry, your screen recording is automatically saved to your chosen location.
Learn more about leveraging the Screenshot app for advanced screen capture and recording techniques.
Method 2: Using QuickTime Player for Screen Recording on Older macOS Versions
QuickTime Player, a pre-installed application on all Macs, also offers screen recording capabilities. While the Screenshot app is the more modern and feature-rich option, QuickTime Player remains a reliable alternative, especially for users on older macOS versions or those who prefer a simpler interface.
-
Open QuickTime Player: Navigate to your Applications folder and open QuickTime Player.
-
Initiate New Screen Recording: In the QuickTime Player menu bar at the top of your screen, click File and select New Screen Recording. Alternatively, use the keyboard shortcut Control + Command + N.
- Note: If you see the Screenshot app toolbar appear at this stage, it indicates that your Mac is using the Screenshot app for screen recording by default. In this case, refer back to Method 1 for instructions. If you see a smaller “Screen Recording” window, continue with the steps below.
-
Adjust QuickTime Player Recording Settings: Before starting, click the small arrow next to the red Record button in the “Screen Recording” window to access recording options:
- Microphone Selection: Choose a microphone from the dropdown list to record audio along with your screen video.
- Show Mouse Clicks in Recording: Enable “Show Mouse Clicks in Recording” to make mouse clicks visible in the final recording.
-
Start Screen Recording with QuickTime: Click the red Record button in the “Screen Recording” window. You’ll then have two choices:
- Record Full Screen: Click anywhere on your screen to start recording the entire display.
- Record Selected Area: Drag your cursor to select a specific area of the screen you want to record, and then click Start Recording within that selected area.
-
Stop Recording: To stop recording, click the Stop button in the menu bar, or press Command + Control + Esc (Escape).
-
Edit and Share Your Recording: After stopping, QuickTime Player will automatically open the recorded video. You can now use QuickTime Player’s basic editing tools to trim your recording, or share it directly.
Explore more about QuickTime Player’s functionalities and how to maximize its use for media playback and recording.
Tips for Effective Screen Recording on Mac
To ensure your screen recordings are clear, professional, and effectively convey your message, consider these helpful tips:
- Plan Ahead: Before you start recording, outline what you want to demonstrate or capture. A little planning can make your recording more focused and efficient.
- Minimize Distractions: Close unnecessary applications and browser tabs to keep your recording clean and avoid distractions. Turn off notifications to prevent interruptions during your recording.
- Test Your Audio: If you are including audio, do a quick test recording to ensure your microphone is working correctly and the audio levels are appropriate.
- Speak Clearly and Slowly: When recording narration, speak clearly and at a moderate pace. This will make it easier for viewers to understand your instructions or commentary.
- Edit Your Recordings: Utilize QuickTime Player or iMovie to trim any unnecessary sections from the beginning or end of your recording. Editing helps to create a polished and concise final video.
- Consider Your Audience: Keep your target audience in mind when creating screen recordings. Adjust your pace, level of detail, and language to suit their needs and technical understanding.
By mastering these methods and incorporating these tips, you’ll be well-equipped to create high-quality screen recordings on your Mac for a variety of purposes. Whether for work, education, or personal projects, screen recording is a valuable tool in today’s digital world.