In today’s digital communication landscape, email signatures are more than just a formality; they are a vital part of your professional identity. A well-crafted email signature not only provides essential contact information but also enhances your brand image and credibility. If you’re looking to learn How Do I Add A Signature In Outlook, you’ve come to the right place. This guide will walk you through the process step-by-step, ensuring you can effortlessly set up and utilize email signatures in classic Outlook for Windows.
Step-by-Step Guide to Creating an Outlook Signature
Outlook makes it straightforward to create and manage your email signatures. Whether you need a simple signature with your name and title or a more elaborate one with contact details and a logo, Outlook’s signature settings are highly customizable. Let’s dive into the steps:
Accessing Signature Settings
- Start a New Email: Begin by opening a new email message in Outlook. This action activates the necessary menu options for signature creation.
- Navigate to the Signature Menu: In the new message window, locate the Message menu. Depending on your Outlook window size and whether you are composing a new message, replying, or forwarding, the Signature button might appear in slightly different positions within the ribbon. Click on Signature, then select Signatures from the dropdown menu. This will open the Signatures and Stationery dialog box, where you’ll manage your email signatures.
Creating Your Signature
- Create a New Signature: Within the Signatures and Stationery dialog box, under the “Select signature to edit” section, click on New.
- Name Your Signature: A New Signature dialog box will pop up. Type a descriptive name for your signature. This name is for your reference, helping you identify different signatures if you plan to create multiple ones (e.g., “Professional Signature,” “Simple Signature”).
- Compose Your Signature: In the “Edit signature” box, you can now type and design your signature content. Outlook provides a mini formatting toolbar just above the edit box, allowing you to:
- Change Fonts, Sizes, and Colors: Customize the text style to match your branding or personal preference.
- Adjust Text Alignment: Align your signature text to the left, center, or right.
- Insert Links and Images: Add website links or social media icons to enhance your signature’s functionality and visual appeal.
- Use Rich Text Formatting: For more complex designs with bullet points, tables, or borders, you can compose your signature in Microsoft Word. Then, copy the formatted content and paste it into the “Edit signature” box. This method allows for greater control over the visual aspects of your signature. You can also use pre-designed templates for inspiration and efficiency.
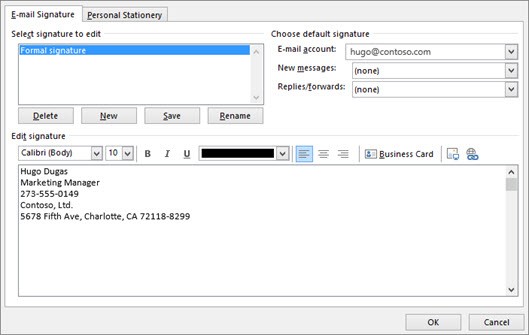 Outlook Signature Editor window where users can create and customize their email signatures.
Customizing Default Signature Options
After creating your signature, you can set up default options to automate signature insertion:
- Choose Default Signature: Look for the “Choose default signature” section in the Signatures and Stationery dialog box.
- Email Account Association: In the “E-mail account” dropdown, select the email account you want to associate with this signature. This is particularly useful if you manage multiple email accounts within Outlook, allowing you to set different signatures for each.
- New Messages Signature: To automatically add your signature to all new emails, use the “New messages” dropdown menu. Choose the signature you want to use by default for new emails. If you prefer not to automatically add a signature to new messages, select (none).
- Replies/Forwards Signature: Similarly, you can set a signature for replies and forwarded emails using the “Replies/forwards” dropdown. Choose your desired signature or select (none) if you don’t want automatic signatures for these types of emails.
Adding a Logo or Image to Your Outlook Signature
A logo or professional headshot can significantly enhance your email signature. Here’s how to add an image:
- Open Signature Settings: Follow steps 1 and 2 in the “Accessing Signature Settings” section to open the Signatures and Stationery dialog box.
- Select Signature to Edit: Choose the signature you want to modify from the “Select signature to edit” box.
- Insert Image: Within the “Edit signature” box, place your cursor where you want to insert the image. Click the Image icon in the formatting toolbar.
- Locate and Insert Image File: Browse your computer to find your image file and select Insert. Outlook supports common image formats like JPG, PNG, and GIF.
- Resize Image (If Necessary): If your image appears too large or small, right-click on the image within the “Edit signature” box and select Picture. Go to the Size tab to adjust the image dimensions. Ensure “Lock aspect ratio” is checked to maintain the image proportions while resizing. Click OK to save changes.
- Save Signature Changes: Click OK in the Signatures and Stationery dialog box to save all your signature settings.
Manually Inserting a Signature in Outlook
Even if you set up default signatures, there might be times when you want to insert a specific signature manually, or if you chose not to have signatures automatically added. Here’s how to insert a signature manually:
- In an Open Email: In your email message window, go to the Message tab.
- Click Signature: Locate and click the Signature button.
- Choose Your Signature: A dropdown menu will appear, listing all the signatures you’ve created. Select the signature you wish to insert into the current email. It will be immediately added to your message.
Conclusion
Mastering how do i add a signature in outlook is a simple yet powerful step towards enhancing your email communication. By following this guide, you can create professional, informative, and visually appealing email signatures that reinforce your identity with every email you send. Whether you opt for automatic insertion or manual selection, Outlook provides the flexibility to manage your email signatures effectively, ensuring you always make a lasting impression.