The motherboard is the unsung hero of your computer, often referred to as the backbone or central nervous system. It’s a crucial printed circuit board (PCB) that connects all your computer’s components, allowing them to communicate and work together harmoniously. Think of it as the foundation upon which your entire system is built. Without a functioning motherboard, your CPU, RAM, GPU, storage drives, and peripherals would be isolated islands, unable to interact and bring your digital world to life.
Understanding your motherboard’s specifications can be incredibly beneficial. Whether you’re considering upgrading components, troubleshooting compatibility issues, or simply curious about your system’s inner workings, knowing your motherboard model is the first step. This is particularly important for laptops, where upgrades are often more restricted compared to desktop PCs. Identifying your motherboard helps you determine what upgrades are possible and ensures compatibility, preventing costly mistakes and compatibility headaches. For desktop users, this knowledge is invaluable when planning component upgrades or even when building a new PC from scratch. It allows you to choose compatible CPUs, RAM modules, and expansion cards, ensuring a smooth and efficient build process. If you’re experiencing system crashes or performance bottlenecks, knowing your motherboard’s capabilities, such as its maximum RAM capacity, can guide you towards effective solutions and targeted upgrades.
Fortunately, finding out what motherboard you have is a straightforward process, regardless of whether you’re using Windows, macOS, or Linux. You don’t need to be a tech expert or open up your computer case. This guide will walk you through simple methods to quickly identify your motherboard using built-in tools within your operating system.
Discovering Your Motherboard on Windows
Windows offers several built-in tools to easily identify your motherboard. Here are three simple methods:
Using System Information
The System Information tool is a comprehensive utility in Windows that provides detailed hardware and software information about your computer, including your motherboard.
-
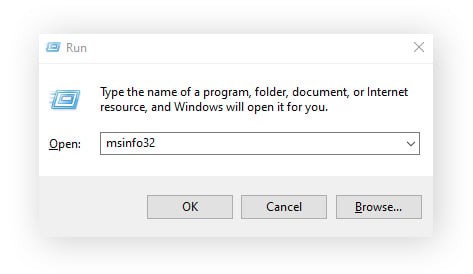
Press the Windows key + R simultaneously to open the Run dialog box.
-
Type msinfo32 in the text box and click OK. This command will launch the System Information window.
-
In the System Information window, ensure System Summary is selected in the left-hand panel.
-
Look for the following entries in the right-hand panel to find your motherboard information:
- BaseBoard Manufacturer: This will tell you the company that made your motherboard.
- BaseBoard Product: This is the model name of your motherboard.
- BaseBoard Version: This indicates the version number of your motherboard.
Utilizing Command Prompt
Command Prompt is a powerful command-line interpreter available in all versions of Windows. It allows you to execute commands to retrieve system information, including motherboard details.
-
Click on the Windows Start Menu, type cmd, and select Run as administrator from the options. Running as administrator ensures you have the necessary permissions.
-
In the Command Prompt window, type the following command and press Enter:
wmic baseboard get product,manufacturer,version,serialnumberThis command uses the Windows Management Instrumentation Command-line (WMIC) tool to query the baseboard (motherboard) information and display the product name, manufacturer, version, and serial number. The output will be displayed directly in the Command Prompt window.
Employing PowerShell
PowerShell is a more advanced command-line shell and scripting language in Windows, offering robust capabilities for system administration, including retrieving detailed hardware information.
-
Click on the Windows Start Menu, type powershell, and select Run as administrator.
-
In the PowerShell window, enter the following command and press Enter:
Get-WmiObject Win32_BaseBoard | Format-Table –Auto Manufacturer,Product,SerialNumber,VersionThis PowerShell command uses the
Get-WmiObjectcmdlet to retrieve information from theWin32_BaseBoardWindows Management Instrumentation (WMI) class, which contains motherboard details. TheFormat-Table –Autocmdlet formats the output into a readable table displaying the Manufacturer, Product, SerialNumber, and Version.
Identifying Your Motherboard on a Mac (Logic Board)
In the macOS world, the motherboard equivalent is called a logic board. While macOS doesn’t directly provide logic board details in the same way Windows does for motherboards, you can still find this information by leveraging your Mac’s serial number.
Finding Your Mac Serial Number
-
Click on the Apple menu in the top-left corner of your screen and select About This Mac.
-
In the “About This Mac” window, you will find your Serial Number listed as part of the system information overview. Make note of this serial number as you’ll need it in the next step.
Using Your Serial Number to Find Logic Board Details
Once you have your Mac’s serial number, you can use online databases maintained by Apple parts and repair specialists to identify your logic board.
- Visit a website like PowerbookMedic, a reputable Apple parts reseller and repair service.
- Enter your Mac’s serial number into the search box provided on their website and press Enter or click the search button.
- The website will then provide details about your Mac model, including information about the logic board used in your specific device and often details like the onboard RAM.
Checking Motherboard Information on Linux
Linux users can easily retrieve motherboard information using the Terminal application and a simple command.
-
Open the Terminal application. You can usually find it in your applications menu or by searching for “Terminal.”
-
Type the following command and press Enter:
sudo dmidecode -t 2This command uses
sudoto execute with administrator privileges, anddmidecode -t 2specifically queries the system’s DMI (Desktop Management Interface) table to retrieve information about the baseboard (motherboard), type 2. -
You may be prompted to enter your password for
sudoaccess. Type your password and press Enter. Your motherboard information will then be displayed in the Terminal window.
Optimize Your System Performance
Knowing how to check your motherboard information is a valuable skill for any computer user. It empowers you to understand your system’s capabilities, plan upgrades effectively, and troubleshoot potential issues. Beyond hardware knowledge, maintaining your system’s software is equally crucial for optimal performance.
Avast Cleanup is a powerful tool designed to optimize your computer’s performance. It can help you remove unnecessary files, identify and uninstall bloatware, manage startup programs, and resolve various system issues that can lead to slowdowns or crashes. By keeping your software environment clean and efficient, you can ensure your motherboard and all your components work together at their best.
Try Avast Cleanup today to experience a smoother, faster, and more efficient computer.
Download Avast Cleanup Free Trial
Get it for PC, Mac, iOS
Get it for PC, Android, Mac
Download Avast Cleanup Free Trial