Is your Safari browser running slower than usual? Or are websites not displaying correctly, even after refreshing the page? The answer might be simpler than you think: clearing your Safari cache. Like all web browsers, Safari stores temporary data – known as cache – to help websites load faster. However, over time, this cache can become cluttered or outdated, leading to performance issues and browsing hiccups.
This guide will walk you through several effective methods to clear your Safari cache on macOS, ensuring your browsing experience is smooth, speedy, and up-to-date.
Why Clear Your Safari Cache?
Before diving into the “how,” let’s understand the “why.” Your browser’s cache is designed to store website data like images, scripts, and HTML files. The next time you visit the same website, Safari can load these elements from the cache instead of downloading them again from the web server. This significantly speeds up page loading times and reduces bandwidth usage.
However, there are situations where clearing your cache becomes necessary:
- Website Display Issues: If a website has been updated, but your browser is loading an older, cached version, you might see layout problems, missing content, or functionality errors. Clearing the cache forces Safari to fetch the latest version of the website.
- Slow Browser Performance: An overly large cache can sometimes slow down your browser. Clearing it can free up space and improve Safari’s responsiveness.
- Privacy Concerns: While cache improves speed, it also stores data about your browsing activity. Clearing it can be a part of your routine privacy maintenance.
- Troubleshooting Website Errors: When encountering persistent errors on a website, clearing the cache is a common troubleshooting step recommended by web developers and IT professionals.
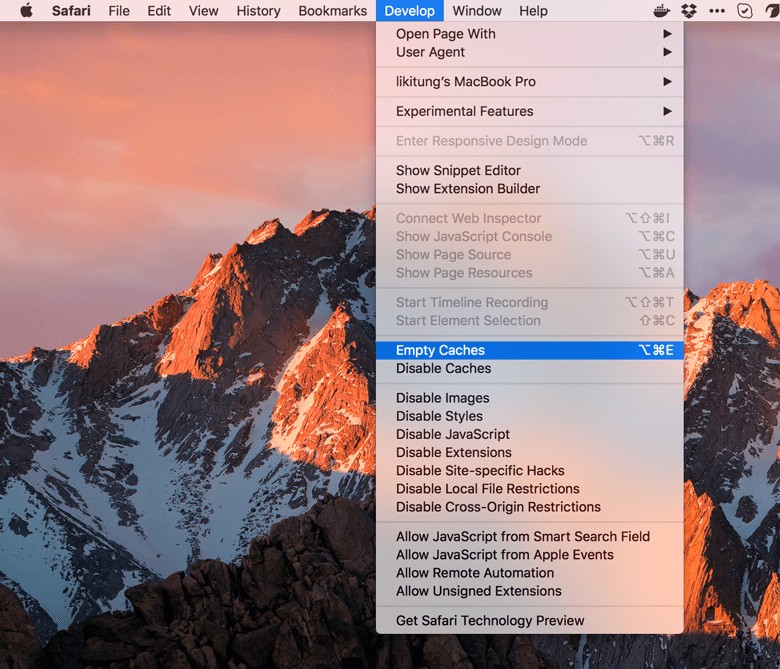
Method 1: Using the Develop Menu to Empty Cache (Quickest Method)
The most direct way to clear just the cache in Safari is through the “Develop” menu. This menu is hidden by default but easily enabled:
-
Open Safari Preferences: In the Safari menu bar, click on “Safari” and then select “Preferences.”
-
Go to the Advanced Tab: In the Preferences window, click on the “Advanced” tab.
-
Enable the Develop Menu: Check the box next to “Show Develop menu in menu bar” at the bottom of the Advanced settings.
-
Empty Caches: Now, you’ll see a “Develop” menu in your Safari menu bar. Click on “Develop” and then select “Empty Caches.”
Safari will instantly clear its cache. This method is quick and doesn’t affect your browsing history, cookies, or other website data.
Method 2: Clearing Cache by Clearing History (Broader Approach)
Another way to clear the cache is by clearing your browsing history. While this method clears more than just the cache, it’s still a straightforward way to remove cached data along with your history.
-
Open History Menu: In the Safari menu bar, click on “History.”
-
Clear History: Select “Clear History…” from the dropdown menu.
-
Choose Time Range: A dialog box will appear asking “Clear history for:”. Choose the desired time range from the dropdown menu. Options include “the last hour,” “today,” “today and yesterday,” or “all history.” To clear the most cache, choose “all history.”
-
Confirm Clearing: Click “Clear History.”
This action will clear your browsing history, cookies, and website data, including the cache, for the selected time range. Be aware that this will also remove your browsing history and might log you out of websites.
Method 3: Manually Deleting the Cache File (Advanced & Not Recommended)
For advanced users, there’s a manual method to delete the cache file directly. However, this method is generally not recommended for most users as it involves navigating system files and could potentially cause issues if done incorrectly.
Warning: Incorrectly deleting system files can lead to unexpected problems. Proceed with caution and only if you are comfortable navigating macOS file system.
-
Open Finder: Open a new Finder window.
-
Go to the Library Folder: In the Finder menu bar, click on “Go,” then select “Go to Folder…” or press Shift + Command + G.
-
Enter the Library Path: In the “Go to Folder” dialog box, type
~/Library/Caches/com.apple.Safariand press “Go.” This will take you directly to Safari’s cache folder. -
Move Cache.db to Trash: Locate the file named “Cache.db” within this folder. Drag this file to the Trash.
-
Restart Safari: Quit and relaunch Safari. The cache file will be automatically recreated when you start browsing again.
This method manually removes the main cache database file. As mentioned, it’s generally not necessary to use this method, and the “Develop” menu option provides a much safer and easier way to clear the cache.
Choosing the Right Method
- For a quick and targeted cache clear without affecting other browsing data, Method 1 (Develop Menu) is the best and most recommended option.
- If you also want to clear your browsing history along with the cache, Method 2 (Clearing History) is a suitable alternative.
- Method 3 (Manual Deletion) should only be considered by advanced users in specific troubleshooting situations and is generally not recommended for regular cache clearing.
Keep Your Safari Running Smoothly
Regularly clearing your Safari cache can help maintain optimal browser performance, resolve website display issues, and contribute to your online privacy. By using one of these easy methods, you can ensure your Safari browser remains fast, efficient, and provides a seamless browsing experience. Choose the method that best suits your needs and enjoy a cleaner, faster Safari.