Split Screen on Mac, also known as Split View, is a fantastic built-in feature designed to boost your productivity. It allows you to work with two applications side-by-side, eliminating the need to constantly switch between windows. If you’re wondering, “How Do I Split Screen On Mac?”, you’ve come to the right place. This guide will walk you through the simple steps to use Split View and master multitasking on your macOS device.
To initiate Split View, follow these straightforward instructions:
-
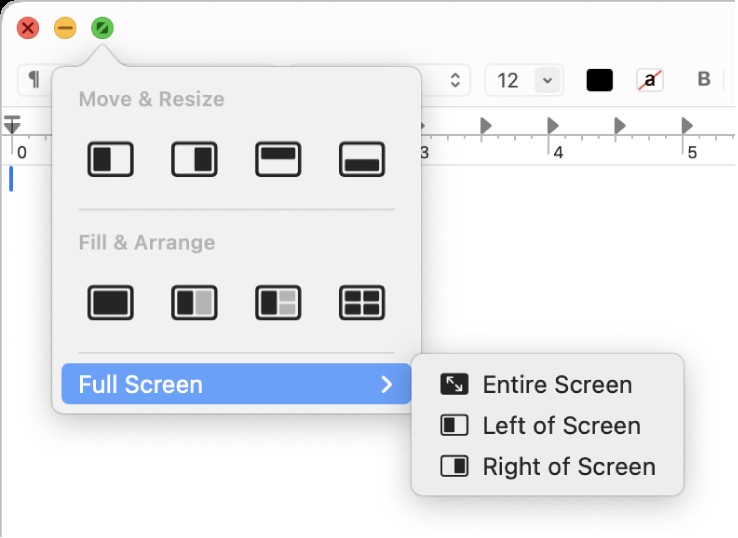
Hover Over the Green Button: In the top-left corner of any app window, you’ll see three buttons: red (close), yellow (minimize), and green (maximize). Hover your mouse pointer over the green button. Don’t click yet!
This image displays the macOS window control menu, highlighting the options to tile the window to either the left or right side of the screen, essential for initiating Split View.
-
Choose Tiling Direction: After hovering, a menu will appear. Select “Tile Window to Left of Screen” or “Tile Window to Right of Screen” based on your preference. Click your chosen option. The current window will automatically snap to occupy exactly half of your screen.
-
Select the Second App: With the first app now positioned on one side, the other half of your screen will display your other open windows as thumbnails. Click on the second application you want to work with in Split View. This app will then expand to fill the remaining half of your screen, perfectly positioned next to your first app.
An example of macOS Split View, showcasing the Numbers app and the Reminders app arranged side by side for enhanced productivity and multitasking.
Once you have successfully set up Split View, macOS offers several ways to customize your experience:
-
Adjusting Window Sizes: Notice the vertical black bar separating the two apps in Split View. You can easily resize the windows by clicking and dragging this separator bar left or right. Dragging it will make one window larger and the other smaller. Double-clicking the bar will revert the windows back to an equal split.
-
Swapping Window Sides: If you decide you want the apps on opposite sides, you can swap them. Simply click on the title bar of the window you want to move, and drag it to the other side of the screen. Release the mouse button, and the windows will exchange positions.
-
Replacing an App in Split View: To replace one of the apps currently in Split View with a different application, click on the window you wish to replace. Hover over the green button in the top-left corner and this time, select “Replace Tiled Window”. You will be presented with your open windows; choose the new app you want to use in Split View.
-
Exiting Split View: To exit Split View for a single app and return it to a full-screen or windowed mode, hover over the green button of that app and select “Move Window to Desktop”. This will move the selected app out of Split View, while the other app will remain in full-screen mode in its own desktop space. Alternatively, choosing “Make Window Full Screen” from the same menu will expand the selected app to full screen, also exiting Split View.
Split View is an incredibly useful tool for anyone looking to improve their workflow on a Mac. Whether you’re comparing documents, multitasking between different projects, or simply want to have two applications visible at once, understanding “how to split screen on mac” is a skill that will undoubtedly enhance your macOS experience and boost your efficiency. Embrace Split View and unlock a more productive way to work.