In today’s digital world, managing and sharing files efficiently is crucial. One of the most effective ways to do this is by zipping or compressing files. Whether you need to send large documents via email, save storage space, or organize your files, knowing How Do I Zip A File is a valuable skill. This guide will walk you through the simple steps to zip files on both Windows and Mac operating systems.
Zipping Files on Windows: Step-by-Step
Windows makes it incredibly easy to compress files and folders directly from your file explorer. Here’s how to create a zip file in just a few clicks:
-
Locate Your Files: First, find the file or folder you wish to zip. This could be on your desktop, in your documents, or any other location on your PC.
-
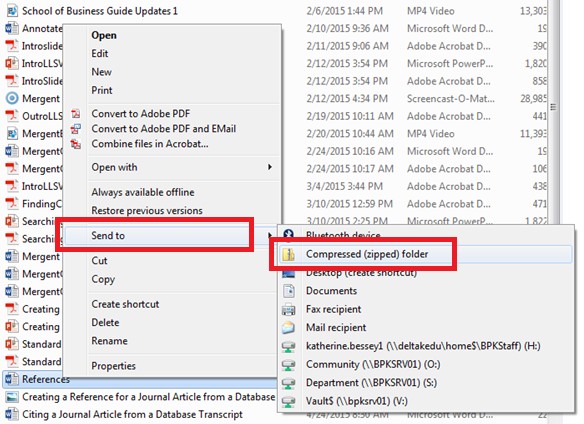
Select and Right-Click: Click on the file or folder. To select multiple files, hold down the
Ctrlkey and click on each file you want to include in the zip archive. Once you’ve selected everything, right-click on your selection. -
Send to Compressed Folder: In the context menu that appears, hover over “Send to” and then click on “Compressed (zipped) folder”.
Windows will then create a new zip file in the same location as your original file or folder. The zip file will have the same name as the original folder, or “Archive.zip” if you zipped individual files.
Renaming Your Zip File
You can easily rename your newly created zip file. Simply right-click on the zip folder, select “Rename,” and type in your desired name.
Adding More Files to a Zip File
Need to add more files to your zip archive? It’s as simple as dragging and dropping. Open the zip file by double-clicking it, and then drag any additional files or folders into the zip file window. They will be automatically added to the compressed archive.
Zipping Files on Mac: A Simple Guide
Mac users can also zip files quickly using the built-in compression utility. Here’s how to zip a file on macOS:
-
Find Your File: Locate the file or folder you intend to compress on your Mac.
-
Right-Click or Control-Click: Right-click (or Control-click) on the file or folder. To select multiple items, you can Command-click on each item.
-
Compress Option: In the context menu, select “Compress [Item Name]” or “Compress Items” if you’ve selected multiple files.
macOS will create a zip file in the same directory. If you compressed a single item, the zip file will have the same name as the original file. If you compressed multiple items, the zip file will be named “Archive.zip” (or “Archive [number].zip” if you already have a file with that name).
Understanding Mac Zip File Naming
Mac automatically names your zip files. For single files, it retains the original name. For multiple files compressed together, it defaults to “Archive.zip” and increments the number if necessary to avoid name conflicts.
Why Zip Files? Exploring the Advantages
Zipping files offers several key benefits:
- Reduced File Size: Compression significantly reduces the size of files, making them easier to share and store. This is especially useful for large documents, images, and videos.
- Easier File Sharing: Smaller file sizes are quicker to upload and download, and are ideal for sending via email or cloud services, often bypassing file size limits.
- File Organization: Zipping multiple files into a single archive helps organize related files together, simplifying file management.
- Data Backup: Compressing files can save storage space when backing up important data.
By understanding how do i zip a file on both Windows and Mac, you can streamline your digital file management, enhance file sharing, and save valuable storage space. It’s a simple yet powerful skill for anyone working with computers.