Do you remember the gooey, squishy fun of slime from when you were a kid? That uniquely satisfying, slightly strange substance that was just endlessly entertaining? Well, guess what? You can easily bring that nostalgic joy into your own home and share it with your kids! Making slime is not only a blast, but it’s also a fantastic, simple science project that’s perfect for little hands and curious minds.
If you’ve ever dabbled in the world of DIY science experiments, you probably know the secret weapon: Elmer’s glue and borax. It’s amazing how these two common household items can transform into something so fascinating. Get ready to create your own batch of homemade slime with this easy-to-follow guide. It’s so simple, you’ll feel like a kid again yourself!
Gather Your Slime Supplies
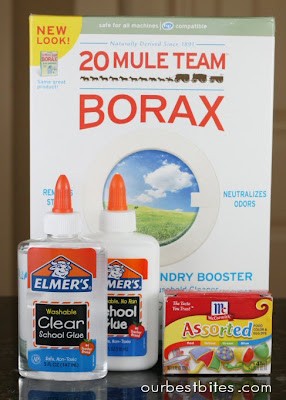
Before we dive in, let’s gather all the ingredients you’ll need. This recipe is straightforward and uses just a few common items:
Ingredients:
- 1 teaspoon borax powder
- 1 ½ cups water, divided (you’ll use 1 cup and then ½ cup separately)
- ½ cup (4 oz) Elmer’s glue, clear or white
- Food coloring (optional, but highly recommended for fun!)
Equipment:
- Mixing bowls (medium size)
- Measuring cups and spoons
- Spoon or stirring utensil
- Ziplock bag or airtight container for storage
Step-by-Step Guide: Making Slime
Now, let’s get to the fun part – making the slime! Follow these simple steps, and you’ll have your own gooey creation in no time.
Step 1: Prepare the Borax Solution
First, we need to activate our slime-making magic with a borax solution.
- Take one cup of water and pour it into a bowl or container.
- Add 1 teaspoon of borax powder to the water.
- Stir the mixture thoroughly until the borax powder is completely dissolved. This is your borax activator solution. Set it aside for now.
Step 2: Mix the Glue and Water
In a separate mixing bowl, we’ll prepare the base of our slime.
- Pour ½ cup (4 oz) of Elmer’s glue into the clean mixing bowl. You can use either clear glue for a see-through slime or white glue for a more opaque version.
- Add ½ cup of water to the glue in the bowl.
- Stir the glue and water together until they are well combined and smooth.
Step 3: Add Food Coloring (Optional)
This step is where you can get creative and personalize your slime!
- If you want to add color to your slime, now is the time. Add a few drops of food coloring to the glue mixture. Green is classic slime color, but feel free to use any color you like!
- Stir the food coloring into the glue mixture until the color is evenly distributed and you achieve your desired shade.
Step 4: Combine and Knead to Form Slime
Now for the exciting part – watching slime form right before your eyes!
- Slowly pour the borax solution (from Step 1) into the glue mixture (from Step 3). You’ll notice almost immediately that the mixture starts to clump and solidify.
- Stir the mixture for a few moments with your spoon or utensil. You’ll see masses of slime forming.
- Once it becomes difficult to stir, get your hands in there! Use your hands to gather the slime mass together. It will feel wet and sticky at first.
- Keep kneading and squishing the slime with your hands. This is key! As you knead, the slime will become less sticky and more firm.
- Continue kneading until the slime reaches a smooth, less wet consistency and most of the excess liquid is gone. You can discard any remaining liquid in the bowl.
- Initially, the slime might feel very wet, but don’t worry! Just keep kneading. The more you play with it, the firmer and less sticky it will become.
- Once you’re happy with the texture – smooth, stretchy, and not too sticky – your slime is ready to play with!
Tips for Perfect Slime
- Adjust Consistency: If your slime is too sticky, you can add a tiny bit more borax solution (just a drop or two at a time) and knead it in. Be careful not to add too much borax, or your slime can become too stiff and rubbery. If it becomes too stiff, adding a little bit of water while kneading can sometimes help soften it again.
- Experiment with Glue: Try both clear and white glue to see which texture you prefer. Some people find white glue slime has a slightly different feel.
- Get Creative with Add-ins: Once you’ve mastered the basic slime recipe, you can experiment with adding glitter, small beads, or even essential oils (for scent – ensure they are skin-safe) to your slime for extra sensory fun.
Slime Safety and Storage
- Adult Supervision: Always supervise young children when making and playing with slime.
- Not for Consumption: Slime is definitely not edible! Make sure children understand that it’s for play only and not for eating.
- Wash Hands: Wash hands thoroughly after playing with slime, especially before eating.
- Storage: Store your slime in an airtight container or ziplock bag to prevent it from drying out. When stored properly, slime can last for quite a while.
Making slime is a fantastic activity to do with kids. They can help with measuring, stirring, and of course, the best part – mixing it all together with their hands! Just be prepared for some giggles and maybe a little bit of “ewww, it’s slimy!” But trust us, they’ll love it. And you might just find yourself enjoying playing with it too!
So, are you ready to dive into the gooey world of slime? Gather your ingredients, follow these simple steps, and get ready for hours of squishy, stretchy fun with your homemade slime!