Screenshots have become an indispensable part of our digital lives. Whether you’re capturing a funny meme, saving important information, or documenting an error message, knowing how to take a screenshot on your computer is a fundamental skill. This guide will walk you through various methods to screenshot on both Windows and Mac computers, ensuring you never miss capturing what’s on your screen.
What is a Screenshot?
A screenshot, also known as a screen capture or screen grab, is simply a digital image of your computer screen. It’s like taking a photograph of whatever is displayed on your monitor. This image is then saved as a file, allowing you to share, edit, or store it for later use. Screenshots are incredibly versatile and useful in countless situations.
Why Take Screenshots on a Computer?
While the original article highlights the importance of screenshots for cyberbullying evidence, their utility extends far beyond that. Here are just a few reasons why knowing how to screenshot on your computer is essential:
- Capturing Information: Quickly save recipes, online articles, social media posts, or any information you find online without having to copy and paste text.
- Technical Support: Easily show technical support teams exactly what you are seeing on your screen when troubleshooting software or hardware issues.
- Creating Tutorials and Guides: Illustrate steps in a process for how-to guides, presentations, or educational materials.
- Saving Online Receipts and Confirmations: Keep records of online purchases, bookings, or important online transactions.
- Preserving Ephemeral Content: Capture disappearing messages or stories on social media platforms (while being mindful of privacy and ethical considerations).
- Documenting Errors and Issues: Record error messages, software glitches, or website problems for reporting or personal records.
- Creative Purposes: Capture inspiration, design elements, or interesting visuals for mood boards or creative projects.
How to Screenshot on a Windows Computer
Windows offers several built-in tools and keyboard shortcuts to take screenshots. Here are some of the most common and effective methods:
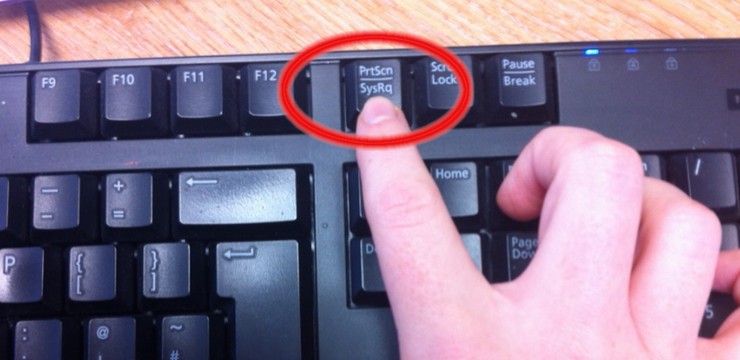
1. Using the Print Screen (PrtScn) Key for Full Screen Capture
The simplest and most universal method is using the Print Screen (PrtScn) key, usually located in the upper-right corner of your keyboard.
- Action: Press the PrtScn key.
- Result: This captures an image of your entire screen and copies it to your clipboard.
- Next Steps: To view and save the screenshot, you need to paste it into an image editing program like Paint, Paint 3D, or even a document program like Microsoft Word.
- Open Paint (search for “Paint” in the Windows search bar).
- Press Ctrl + V or right-click and select Paste to paste the screenshot.
- You can then edit, crop, and save the image from Paint in your desired format (e.g., PNG, JPG).
2. Alt + PrtScn for Active Window Screenshot
If you only want to capture the currently active window (the window you are currently working in), use the Alt + PrtScn shortcut.
- Action: Press and hold the Alt key, then press the PrtScn key.
- Result: This captures only the active window and copies it to the clipboard.
- Next Steps: Paste the screenshot into an image editor (like Paint) or a document to view, edit, and save it, just like with the full-screen Print Screen method.
3. Windows Key + PrtScn to Save Screenshot Directly as a File
For a quicker way to save screenshots without needing to paste, use the Windows Key + PrtScn shortcut.
- Action: Press and hold the Windows Key (the key with the Windows logo), then press the PrtScn key.
- Result: This captures a screenshot of your entire screen and automatically saves it as a PNG file in the “Screenshots” folder within your “Pictures” library. You’ll notice the screen dim briefly when the screenshot is taken.
- Location: Find your screenshots in: Pictures > Screenshots.
4. Using the Snipping Tool for Flexible Screenshots
For more control over what you capture, Windows provides the Snipping Tool. This versatile tool allows you to capture different types of screenshots:
- Rectangular Snip: Drag a rectangle to select and capture a specific area of your screen.
- Free-form Snip: Draw a freehand shape around the area you want to capture.
- Window Snip: Select a specific window to capture.
- Full-screen Snip: Capture the entire screen (same as the PrtScn key).
How to use Snipping Tool:
- Open Snipping Tool: Search for “Snipping Tool” in the Windows search bar and open the application.
- Choose a Snip Type: Click the “Mode” dropdown menu to select the type of screenshot you want to take (Rectangular, Free-form, Window, or Full-screen).
- Take the Screenshot:
- Rectangular/Free-form/Window Snip: Click “New” and then drag your cursor to select the area or window you want to capture.
- Full-screen Snip: Click “New” to immediately capture the entire screen.
- Edit and Save: The screenshot will open in the Snipping Tool window. You can use the pen and highlighter tools to annotate the screenshot. Click the “Save Snip” button (disk icon) to save the screenshot as a file.
5. Using Snip & Sketch (Newer Windows Versions)
In newer versions of Windows 10 and Windows 11, Snip & Sketch is the modern replacement for the Snipping Tool, offering similar functionality with an updated interface.
How to use Snip & Sketch:
- Open Snip & Sketch: Search for “Snip & Sketch” in the Windows search bar or use the shortcut Windows Key + Shift + S.
- Screen Dim and Snip Menu: Your screen will dim, and a small menu will appear at the top center of your screen, offering options for Rectangular Snip, Free-form Snip, Window Snip, and Full-screen Snip.
- Choose a Snip Type and Capture: Click on your desired snip type and then capture your screenshot.
- Annotation and Saving: The screenshot will appear in a Snip & Sketch window where you can annotate it with pens, pencils, highlighters, and cropping tools. Click the “Save” icon to save your screenshot.
How to Screenshot on a Mac Computer
Mac computers also provide easy and efficient ways to take screenshots using keyboard shortcuts and a built-in utility.
1. Command + Shift + 3 for Full Screen Capture
The quickest way to screenshot your entire Mac screen is using the Command + Shift + 3 shortcut.
- Action: Press and hold the Command (⌘) + Shift + 3 keys simultaneously.
- Result: This captures a screenshot of your entire screen and automatically saves it as a PNG file on your desktop. You’ll hear a camera shutter sound when the screenshot is taken.
2. Command + Shift + 4 for Selected Area Screenshot
To capture a specific portion of your screen, use the Command + Shift + 4 shortcut.
- Action: Press and hold the Command (⌘) + Shift + 4 keys simultaneously.
- Result: Your cursor will change to a crosshair. Click and drag to select the area you want to screenshot. Once you release the mouse button, the screenshot will be saved as a PNG file on your desktop.
3. Command + Shift + 4 + Space Bar for Window Screenshot
To screenshot a specific window on your Mac, combine the previous shortcut with the Space Bar.
- Action: Press and hold Command (⌘) + Shift + 4 keys, then press the Space Bar.
- Result: The crosshair cursor will change to a camera icon. Move the camera icon over the window you want to capture (it will be highlighted). Click on the window to take the screenshot. The screenshot of the selected window will be saved as a PNG file on your desktop.
4. Using the Grab Utility (Older macOS) / Screenshot Utility (Newer macOS)
For more advanced screenshot options, macOS includes the Grab utility (on older macOS versions) and the Screenshot utility (on newer macOS versions), which can be accessed through the Utilities folder within Applications. The Screenshot utility can also be quickly accessed using the shortcut Command + Shift + 5.
Using the Screenshot Utility (Command + Shift + 5):
- Open Screenshot Utility: Press Command (⌘) + Shift + 5.
- Screenshot Options Bar: A toolbar will appear at the bottom of your screen with various screenshot and screen recording options:
- Capture Entire Screen
- Capture Selected Window
- Capture Selected Portion
- Record Entire Screen
- Record Selected Portion
- Choose an Option and Capture: Click on your desired option and follow the on-screen instructions to take your screenshot.
- Options Menu: The “Options” menu in the toolbar allows you to choose where to save your screenshots (Desktop, Documents, Clipboard, etc.) and set a timer for delayed screenshots.
Tips for Taking Better Screenshots
- Clean Up Your Desktop: Before taking a screenshot, especially of the full screen, close unnecessary windows and tidy up your desktop to avoid distractions in your capture.
- Highlight Important Areas: Use annotation tools in Snipping Tool/Snip & Sketch or other image editors to highlight or draw attention to specific parts of your screenshot.
- Consider Screen Resolution: Higher screen resolution results in larger and more detailed screenshots.
- File Format: PNG is generally preferred for screenshots due to its lossless compression and good quality for images with text and graphics. JPG is more suitable for photographs or images with gradients but can lose quality with repeated editing and saving.
Conclusion
Mastering the art of taking screenshots on your computer is a valuable skill that boosts your productivity and communication in the digital world. Whether you are a Windows or Mac user, the methods outlined in this guide provide you with all the tools you need to capture your screen effectively. Experiment with different techniques to find the ones that best suit your needs and make screenshots a seamless part of your daily computer usage.