A simple misstep can lead to a rolled ankle, or ankle sprain, a very common injury affecting people of all activity levels. Whether you’re an athlete or someone who enjoys leisurely walks, understanding how long a rolled ankle takes to heal is crucial for a smooth recovery. An ankle sprain occurs when the ligaments supporting your ankle are stretched or torn, resulting in pain, swelling, and difficulty in putting weight on your foot. While some might try to ignore the pain, seeking proper care is essential, especially for more than minor sprains. Without appropriate treatment and rehabilitation, a significant ankle sprain can lead to long-term issues like reduced mobility, instability, and repeated injuries. So, How Long Does A Rolled Ankle Take To Heal? Let’s delve into the factors influencing recovery and what you can expect on your healing journey.
Understanding Ankle Sprains: Anatomy and Severity
To understand the healing process, it’s helpful to know the anatomy of an ankle sprain. The most frequent type is an inversion injury, also known as a lateral ankle sprain. This happens when your foot rolls inward, damaging the ligaments on the outer side of your ankle. These key ligaments include the anterior talofibular ligament, the calcaneofibular ligament, and the posterior talofibular ligament. Ligaments are strong bands of tissue that connect bones together, providing stability to the joint.
|
Ankle ligaments
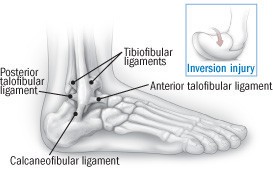 Diagram of ankle ligaments showing anterior talofibular ligament, calcaneofibular ligament, and posterior talofibular ligament Diagram of ankle ligaments showing anterior talofibular ligament, calcaneofibular ligament, and posterior talofibular ligament |
|---|
Less common types of ankle sprains include medial ankle sprains, affecting the inner ankle ligaments, and syndesmotic sprains. Syndesmotic sprains involve the ligaments above the ankle that connect the tibia and fibula, the two bones in your lower leg. These are more frequent in contact sports and have a higher risk of causing ongoing ankle instability and future sprains.
The severity of an ankle sprain, and consequently the healing time for a rolled ankle, is categorized by grades based on the extent of ligament damage and joint instability.
|
Grades of ankle sprain severity
|—|
| Severity | Damage to ligaments | Symptoms | Recovery time |
| Grade 1 | Minimal stretching, no tearing | Mild pain, swelling, and tenderness. Usually no bruising. No joint instability. No difficulty bearing weight. | 1–3 weeks |
| Grade 2 | Partial tear | Moderate pain, swelling, and tenderness. Possible bruising. Mild to moderate joint instability. Some loss of range of motion and function. Pain with weight bearing and walking. | 3–6 weeks |
| Grade 3 | Full tear or rupture | Severe pain, swelling, tenderness, and bruising. Considerable instability, loss of function and range of motion. Unable to bear weight or walk. | Up to several months |
| Source: Adapted from Maughan KL, “Ankle Sprain,” UpToDate, version 14.3, and Ivins D, “Acute Ankle Sprain: An Update,” American Family Physician (Nov. 15, 2006), Vol. 74, No. 10, pp. 1714–20. |
Factors Affecting Ankle Sprain Healing Time
Several factors influence how long a rolled ankle takes to heal. The grade of your sprain is the most significant determinant. A Grade 1 sprain, involving minor ligament stretching, will naturally heal faster than a Grade 3 sprain with a complete ligament tear.
- Severity of the Sprain: As detailed in the table above, the grade of the sprain directly correlates with recovery time. Grade 1 sprains typically heal within a few weeks, Grade 2 sprains may take 4-6 weeks, and Grade 3 sprains can require several months for full recovery.
- Age and Overall Health: Younger individuals generally heal faster than older adults. Underlying health conditions, such as diabetes or conditions that affect circulation, can also slow down the healing process.
- Adherence to Treatment Recommendations: Following the recommended treatment plan, including rest, ice, compression, elevation (RICE), and rehabilitation exercises, is crucial. Consistent adherence can significantly impact healing time. Ignoring your doctor’s advice or returning to activity too soon can prolong recovery and risk re-injury.
- Rehabilitation and Physical Therapy: Proper rehabilitation exercises are essential for regaining strength, range of motion, and stability in your ankle. Physical therapy may be recommended for more severe sprains to guide you through a structured recovery program.
- Complications: In some cases, complications like re-injury, chronic ankle instability, or delayed treatment can extend the healing time. It’s important to address any persistent pain or instability to prevent long-term problems.
Ankle Sprain Recovery Timeline: Week by Week
While individual healing times can vary, here’s a general week-by-week outlook for ankle sprain recovery, aligning with the different grades of severity.
For a Grade 1 Ankle Sprain (1-3 weeks):
- First Few Days: Expect pain, swelling, and tenderness. Focus on the RICE protocol – Rest, Ice, Compression, and Elevation. Limit weight-bearing as much as possible.
- Week 1-2: Pain and swelling should start to decrease. You can begin gentle range-of-motion exercises, like moving your ankle up and down and in circles, as pain allows. Weight-bearing should gradually become more comfortable.
- Week 2-3: You should be able to walk with minimal pain. Continue range-of-motion exercises and start incorporating gentle strengthening exercises. By the end of this period, you may be able to return to light activities, but avoid strenuous activities.
For a Grade 2 Ankle Sprain (3-6 weeks):
- First Week: Similar to Grade 1, focus on RICE to manage pain and swelling. Weight-bearing will be difficult initially.
- Week 2-4: Pain and swelling will gradually reduce. Begin range-of-motion and light strengthening exercises as guided by your pain level. Partial weight-bearing exercises can be introduced.
- Week 4-6: You should be able to walk more comfortably, possibly with a brace for support. Continue strengthening exercises, gradually increasing intensity. Balance exercises can be incorporated. Towards the end of this period, you may start to resume some moderate activities, but listen to your body and avoid pushing too hard.
For a Grade 3 Ankle Sprain (Several Months):
- First Few Weeks: Severe pain, swelling, and bruising are expected. RICE is critical. You will likely need crutches and will be unable to bear weight. Medical intervention, such as immobilization or even surgery in rare cases, might be necessary.
- Weeks 4-8 (and beyond): Swelling and pain will slowly subside. Physical therapy is crucial to regain range of motion, strength, and stability. Weight-bearing will be gradually reintroduced under the guidance of a physical therapist.
- Months 2-6 (or longer): Rehabilitation will continue to focus on strengthening, balance, and proprioception (your body’s awareness of its position in space). Return to activities will be gradual and guided by your physical therapist. Full recovery for a Grade 3 sprain can take several months and sometimes up to a year.
Treatment and Recovery Strategies to Speed Up Healing
While the natural healing process takes time, you can actively support your body and potentially speed up recovery by following these strategies:
-
RICE (Rest, Ice, Compression, Elevation): This is the cornerstone of initial ankle sprain treatment.
- Rest: Avoid activities that aggravate your ankle. Limit weight-bearing and give your ligaments time to heal.
- Ice: Apply ice packs for 15-20 minutes at a time, several times a day, especially in the first 24-48 hours. Always use a towel between the ice and your skin. Ice helps reduce pain and swelling.
- Compression: Use an elastic bandage or ankle brace to provide support and reduce swelling. Ensure it’s snug but not too tight, which could impede circulation.
- Elevation: Keep your ankle elevated above your heart as much as possible, especially when resting. This helps drain fluid and reduce swelling.
-
Early Motion and Exercises: While rest is important initially, prolonged immobilization can hinder recovery. Gentle range-of-motion exercises should be started as soon as pain allows, typically within 48-72 hours. These exercises help prevent stiffness and promote blood flow, which aids healing. See examples of exercises below.
-
When to See a Doctor: It’s important to consult a healthcare professional if:
- You have severe pain and swelling.
- You cannot bear weight on your injured ankle.
- Your ankle feels numb or cold.
- Symptoms don’t improve within a few days of home treatment.
- Your doctor can properly diagnose the severity of your sprain and rule out fractures or other injuries. They can also recommend the best course of treatment, which may include physical therapy.
-
Functional Treatment vs. Immobilization: Current approaches favor functional treatment over rigid immobilization (like plaster casts) for most ankle sprains. Functional treatment emphasizes early motion, weight-bearing as tolerated, and exercises to restore ankle function. Splints, braces, or elastic bandages may be used for support while allowing movement. Studies have shown that functional treatment leads to faster recovery and quicker return to activities compared to immobilization.
Exercises for Ankle Sprain Recovery and Strengthening
Rehabilitation exercises are crucial for restoring full function after an ankle sprain and preventing future injuries. Start these exercises as soon as pain allows, and gradually increase intensity as you heal.
|
Exercises to help restore function and prevent injury
Range-of-motion, stretching, and ankle strengthening: First 1–2 weeks
|—|
| Flexes. Rest the heel of the injured foot on the floor. Pull your toes and foot toward your body as far as possible. Release. Then point them away from the body as far as possible. Release. Repeat as often as possible in the first week. |
| Ankle alphabet. With the heel on the floor, write all the capital letters of the alphabet with your big toe, making the letters as large as you can. |
| Press down, pull back. Loop an elasticized band or tubing around the foot, holding it gently taut (A). Press your toes away and down. Hold for a few seconds. Repeat 30 times. Tie one end of the band to a table or chair leg (B). Loop the other end around your foot. Slowly pull the foot toward you. Hold for a few seconds. Repeat 30 times. |
| Ankle eversion. Seated on the floor, with an elasticized band or tubing tied around the injured foot and anchored around your uninjured foot, slowly turn the injured foot outward. Repeat 30 times. |
| Ankle inversion. Seated on the floor, cross your legs with your injured foot underneath. With an elasticized band or tubing around the injured foot and anchored around your uninjured foot, slowly turn the injured foot inward. Repeat 30 times. |
| Stretching and strengthening: Weeks 3–4 |
| Standing stretch. Stand one arm’s length from the wall. Place the injured foot behind the other foot, toes facing forward. Keep your heels down and the back knee straight. Slowly bend the front knee until you feel the calf stretch in the back leg. Hold for 15–20 seconds. Repeat 3–5 times. |
| Seated stretch. Loop an elasticized band or tubing around the ball of the foot. Keeping the knee straight, slowly pull back on the band until you feel the upper calf stretch. Hold for 15 seconds. Repeat 15–20 times. |
| Rises. Stand facing a wall with your hands on the wall for balance. Rise up on your toes. Hold for 1 second, then lower yourself slowly to the starting position. Repeat 20–30 times. As you become stronger, do this exercise keeping your weight on just the injured side as you lower yourself down. |
| Stretches. Stand with your toes and the ball of the affected foot on a book or the edge of a stair. Your heel should be off the ground. Use a wall, chair, or rail for balance. Hold your other foot off the ground behind you, with knee slightly bent. Slowly lower the heel. Hold the position for 1 second. Return to the starting position. Repeat up to 15 times, several times a day. This exercise can place a lot of stress on the ankle, so get your clinician’s go-ahead before trying it. |
Preventing Future Ankle Sprains
Once your rolled ankle has healed, taking preventative measures is key to avoid re-injury.
- Continue Strengthening Exercises: Make ankle strengthening exercises a regular part of your fitness routine. Strong ankle muscles and ligaments are more resilient to stress.
- Wear Proper Footwear: Choose shoes that provide good support and stability, especially for activities that involve uneven surfaces or quick changes in direction.
- Balance Training: Incorporate balance exercises, such as standing on one leg, into your routine. Good balance helps prevent ankle rolls.
- Be Mindful of Surfaces and Activities: Pay attention to uneven terrain and be cautious during activities that put you at risk for ankle sprains. Warm up properly before exercise to prepare your muscles and ligaments.
Conclusion
So, how long does a rolled ankle take to heal? The answer is variable and depends significantly on the severity of your sprain. Grade 1 sprains may heal in just a few weeks, while Grade 3 sprains can take several months. Regardless of the grade, proper treatment, consistent rehabilitation, and preventative measures are crucial for a successful recovery and to minimize the risk of future ankle problems. If you suspect you have an ankle sprain, especially if the pain is significant or you cannot bear weight, seek medical advice for proper diagnosis and guidance on your path to recovery.
About the Reviewer
Robert H. Shmerling, MD, Senior Faculty Editor, Harvard Health Publishing; Editorial Advisory Board Member, Harvard Health Publishing
Dr. Robert H. Shmerling is the former clinical chief of the division of rheumatology at Beth Israel Deaconess Medical Center (BIDMC), and is a current member of the corresponding faculty in medicine at Harvard Medical School. … See Full Bio
View all posts by Robert H. Shmerling, MD
Disclaimer:
As a service to our readers, Harvard Health Publishing provides access to our library of archived content. Please note the date of last review or update on all articles.
No content on this site, regardless of date, should ever be used as a substitute for direct medical advice from your doctor or other qualified clinician.