Baking chicken breasts is a kitchen staple for many home cooks. It’s a healthy, versatile protein that can be the star of countless meals. However, the quest for perfectly baked chicken breasts – juicy, tender, and flavorful – can sometimes feel elusive. Too often, home cooks are faced with dry, rubbery, and bland results. But fear not! Achieving oven-baked chicken breast perfection is absolutely within your reach.
This guide will walk you through a simple, foolproof method to bake chicken breasts that are consistently delicious. We’ll dive into the crucial factors that determine baking time, including thickness, oven temperature, and the importance of using a meat thermometer. Get ready to master the art of baking chicken breasts and say goodbye to dry, disappointing dinners forever.
The Secret to Perfectly Baked Chicken Breasts: It’s All About Technique
Baking chicken breasts isn’t just about throwing them in the oven and hoping for the best. It’s about understanding a few key techniques that work together to guarantee juicy and flavorful results every time. This method revolves around five essential steps, easily remembered with the acronym B.B.R.R.R.:
- Brine: This is non-negotiable for maximum juiciness.
- Brush: Adds flavor and helps with browning.
- Rub: Season generously for delicious flavor.
- Roast: Bake at the right temperature for the right time.
- Rest: Crucial for locking in juices.
Let’s break down each step to ensure your chicken breasts are baked to absolute perfection.
Step 1: Brining – The Foundation of Juicy Chicken
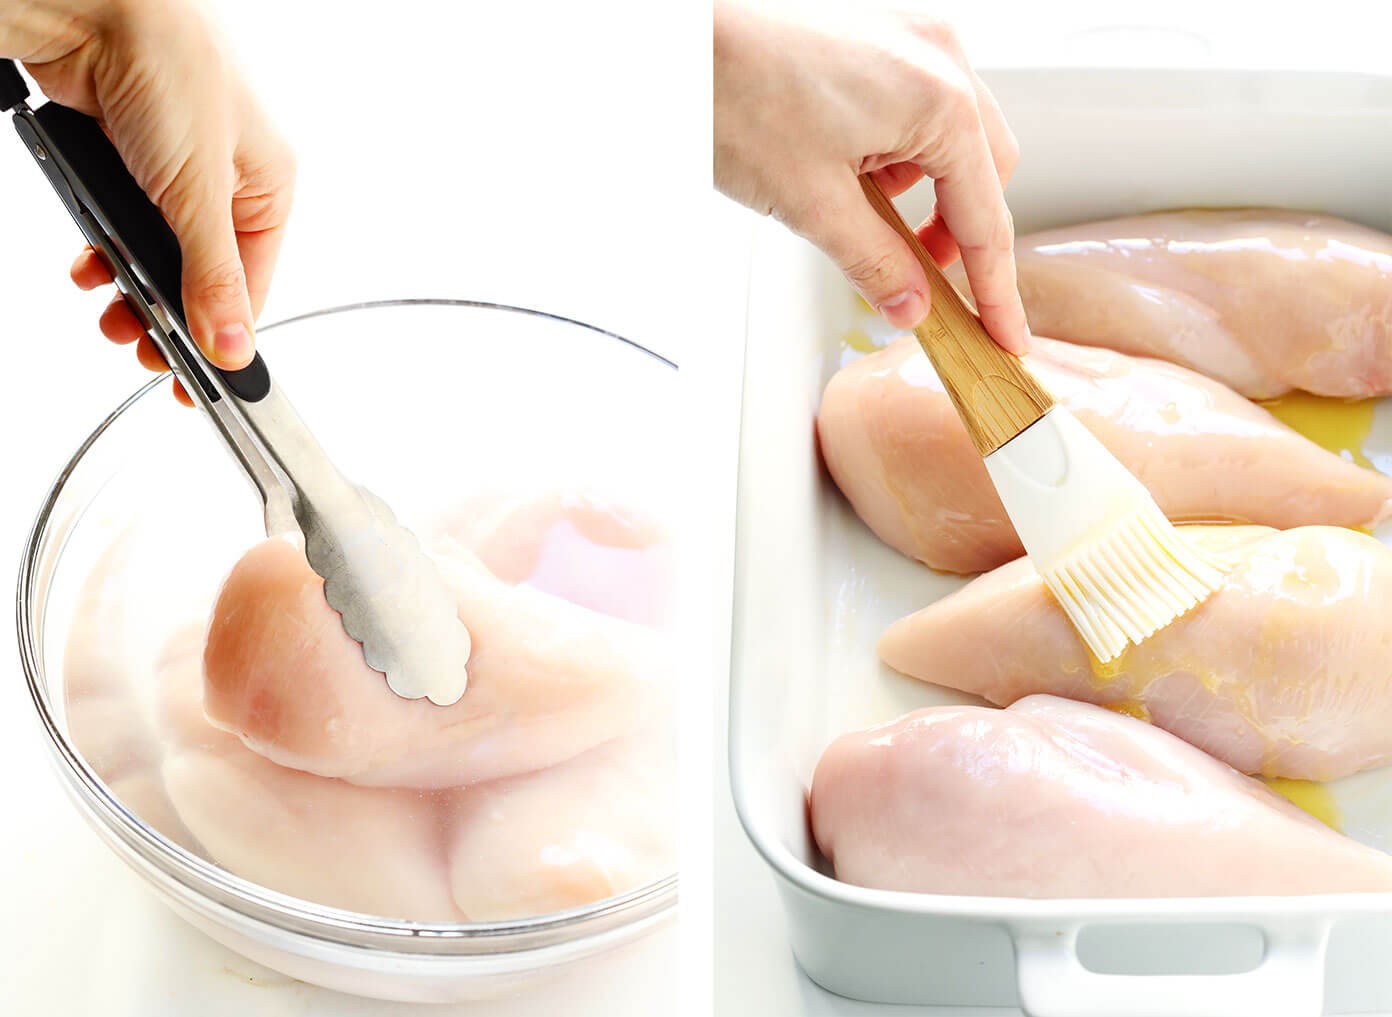
Brining is the game-changer when it comes to baking chicken breasts. It’s a simple process of soaking the chicken in a saltwater solution, and it makes a world of difference in the final texture. Brining works by allowing the chicken to absorb extra moisture, which it retains during cooking, resulting in incredibly juicy meat.
How to Brine Chicken Breasts:
- Prepare the Saltwater Solution: In a large bowl, combine 2 cups of lukewarm water with ¼ cup of kosher salt. Stir until the salt is mostly dissolved.
- Cool the Brine: Add 2 cups of cold water or a handful of ice cubes to quickly cool the brine. It’s important to start with cool water when adding the chicken to prevent bacterial growth.
- Submerge the Chicken: Place the chicken breasts in the saltwater solution, ensuring they are fully submerged.
- Brine Time: Let the chicken brine for at least 15 minutes, or up to 6 hours in the refrigerator. Don’t brine for longer than 6 hours, as it can make the chicken too salty and alter the texture negatively.
- Rinse and Dry: After brining, remove the chicken from the solution and rinse it thoroughly under cold water to remove excess salt. Pat the chicken breasts completely dry with paper towels. This dryness is key for good browning in the oven.
Quick Note: Some chicken breasts are sold pre-brined in a sodium solution. Check the packaging – if yours is pre-brined, skip this brining step and move directly to brushing.
Step 2: Brushing – Flavor and Browning Booster
Brushing chicken breasts with melted butter or olive oil before baking serves two important purposes: it adds flavor and promotes beautiful browning.
Butter vs. Olive Oil:
- Butter: Butter adds richness and a wonderful flavor that complements chicken perfectly. It also contributes to a golden-brown crust.
- Olive Oil: Olive oil is a healthier option and still provides great flavor and browning. It’s a good choice if you prefer a lighter taste or are dairy-free.
How to Brush:
- Melt Butter (if using): Melt butter in the microwave or on the stovetop.
- Brush Liberally: Using a pastry brush, generously brush melted butter or olive oil all over both sides of the chicken breasts. Make sure to coat every part of the surface.
- Prepare for Seasoning: After brushing, place the chicken breasts in a baking dish or on a baking sheet lined with parchment paper. This prevents sticking and makes cleanup easier.
Step 3: Rubbing – Layering on Flavor
Now it’s time to season your chicken breasts! While salt and pepper are essential, a flavorful rub elevates baked chicken from basic to extraordinary. Don’t be shy about seasoning – chicken breasts can handle a good amount of flavor.
Simple & Delicious Chicken Seasoning Rub:
- 1 teaspoon kosher salt
- ½ teaspoon black pepper
- ½ teaspoon garlic powder
- ½ teaspoon smoked paprika
Instructions:
- Combine Seasonings: In a small bowl, whisk together all the seasoning ingredients until well combined.
- Season Generously: Sprinkle the seasoning mixture evenly over both sides of the buttered or oiled chicken breasts. Gently rub the seasoning into the chicken to ensure it adheres well.
Get Creative with Seasonings: Feel free to customize your seasoning rub based on your taste preferences and the meal you’re preparing. Consider these variations:
- Italian Herbs: Dried oregano, basil, rosemary, thyme, garlic powder, onion powder.
- Lemon Pepper: Lemon zest, black pepper, garlic powder, onion powder.
- Cajun Spice: Paprika, cayenne pepper, garlic powder, onion powder, oregano, thyme.
- BBQ Rub: Brown sugar, paprika, chili powder, garlic powder, onion powder, cumin.
Step 4: Roasting – The Crucial Question: How Long to Bake Chicken Breasts?
This is the million-dollar question! How Long To Bake Chicken Breasts depends on several factors, primarily the thickness of the breasts and the oven temperature. We recommend a high-heat roasting method for optimal results: baking at 450°F (232°C).
Why High Heat?
High-heat roasting at 450°F for a shorter time offers several advantages:
- Juicier Chicken: It cooks the chicken quickly, minimizing moisture loss and resulting in juicier breasts.
- Crispy Exterior: High heat helps to create a slightly crispy and flavorful “crust” on the outside of the chicken.
- Faster Cooking: Saves time in the kitchen, perfect for weeknight meals.
Baking Time Guidelines (at 450°F):
- Thin Chicken Breasts (½ inch thick): 12-15 minutes
- Medium Chicken Breasts (¾ inch thick): 15-18 minutes
- Thick Chicken Breasts (1 inch thick or more): 18-25 minutes
The Ultimate Tool: A Meat Thermometer
Forget guessing! The most accurate way to determine when chicken breasts are cooked through is by using a meat thermometer. The FDA recommends cooking chicken to an internal temperature of 165°F (74°C).
How to Use a Meat Thermometer:
- Insert into Thickest Part: Insert the probe of your meat thermometer into the thickest part of a chicken breast, avoiding the bone (if bone-in) or any fatty areas.
- Check Temperature: Wait a few seconds for the temperature reading to stabilize.
- Remove from Oven: Once the thermometer reads 165°F (74°C), remove the chicken from the oven immediately.
Broiling for Extra Browning (Optional):
If you desire even more browning and crispiness, you can broil the chicken for the last 2-3 minutes of cooking time. Turn your oven broiler to high and watch the chicken closely to prevent burning. Broiling can quickly take chicken from perfectly browned to burnt, so keep a vigilant eye on it.
Step 5: Resting – The Final Touch for Tenderness
Resting is as crucial as brining! After baking, allow your chicken breasts to rest for 5-10 minutes before slicing or serving. This resting period allows the juices to redistribute throughout the meat, resulting in more tender and flavorful chicken. If you cut into the chicken immediately, those juices will run out, leaving you with drier meat.
How to Rest Chicken:
- Remove from Oven and Cover: Transfer the baked chicken breasts to a clean plate or cutting board.
- Tent with Foil: Loosely tent the chicken with aluminum foil. This helps to keep the chicken warm while it rests.
- Rest Time: Let the chicken rest for 5-10 minutes.
Serving Suggestions for Baked Chicken Breasts
Perfectly baked chicken breasts are incredibly versatile. Enjoy them in countless ways:
- Classic Main Course: Serve whole or sliced with your favorite side dishes like roasted vegetables, mashed potatoes, salads, or rice.
- Sliced in Salads: Add slices of baked chicken to salads for a protein boost.
- Shredded in Tacos or Wraps: Shredded baked chicken is fantastic in tacos, burritos, wraps, and sandwiches.
- Diced in Casseroles or Soups: Dice baked chicken and add it to casseroles, soups, stews, and pasta dishes.
- Meal Prep Superstar: Baked chicken breasts are ideal for meal prepping. Cook a batch on the weekend and use them throughout the week in various meals.
Storing Leftover Baked Chicken Breasts
Store leftover baked chicken breasts in an airtight container in the refrigerator for up to 3 days or in the freezer for up to 3 months. For freezing, it’s helpful to slice, shred, or dice the chicken before freezing for easier use later.
Side Dish Inspiration
Looking for delicious side dishes to pair with your baked chicken breasts? Here are a few ideas:
- Roasted vegetables (broccoli, carrots, Brussels sprouts, asparagus)
- Mashed potatoes or sweet potatoes
- Quinoa or rice
- Salad (garden salad, Caesar salad, spinach salad)
- Steamed green beans or peas
- Corn on the cob
- Mac and cheese
Mastering Baked Chicken Breasts: A Rewarding Skill
Baking juicy and flavorful chicken breasts is a fundamental cooking skill that will serve you well in the kitchen. By following these simple steps – Brining, Brushing, Rubbing, Roasting, and Resting – and paying attention to cooking time and temperature, you’ll be able to bake chicken breasts that are consistently perfect every time. Say goodbye to dry chicken and hello to delicious, healthy meals!
Recipe Card
Baked Chicken Breasts Recipe
Description: Learn how to bake juicy, tender, delicious chicken breasts with this simple 5-step method.
Ingredients:
- 4 boneless, skinless chicken breasts, pounded to even thickness (about ¾ inch thick for best results)
- 1 tablespoon melted butter or olive oil
- 1 teaspoon kosher salt
- ½ teaspoon freshly ground black pepper
- ½ teaspoon garlic powder
- ½ teaspoon smoked paprika
Instructions:
- Brine the chicken: (Skip this step if your chicken is pre-brined). In a large bowl, dissolve ¼ cup kosher salt in 2 cups lukewarm water. Add 2 cups cold water (or ice) to cool. Submerge chicken and brine for 15 minutes to 6 hours in the refrigerator. Rinse and pat dry.
- Preheat oven to 450°F (232°C).
- Season the chicken: Place chicken in a baking dish. Brush both sides with melted butter or olive oil. In a small bowl, mix salt, pepper, garlic powder, and paprika. Season chicken generously on both sides with the spice mixture.
- Bake: Bake for 15-18 minutes for ¾ inch thick breasts, or until a meat thermometer inserted into the thickest part registers 165°F (74°C). Adjust baking time based on thickness. For extra browning, broil for the last 2-3 minutes, watching carefully.
- Rest the chicken: Remove from oven, transfer to a plate, and tent loosely with foil. Rest for 5-10 minutes before serving.
- Serve: Enjoy warm!
Equipment:
- 9×13 inch baking dish or baking sheet
- Instant-read meat thermometer
- Mixing bowls
Notes:
- Baking Dish: Avoid glass dishes at 450°F if your dish has a lower maximum temperature rating. Use metal baking sheet instead if concerned.
- Chicken Thickness: Pounding chicken breasts to an even thickness ensures even cooking.
- Storage: Store cooked chicken in an airtight container in the refrigerator for up to 3 days or freeze for up to 3 months.