Remember the gooey, squishy, and oh-so-satisfying substance that captivated everyone? We’re talking about slime! This classic concoction is not only a fantastic sensory experience but also a surprisingly simple science experiment you can do right in your kitchen. If you’re wondering how to make slime that’s perfect every time, you’ve come to the right place. This guide will walk you through the easiest method for creating homemade slime using just a few household ingredients. Get ready for some fun and get ready to learn how to make slime like a pro!
What You’ll Need: Ingredients and Supplies for Perfect Slime
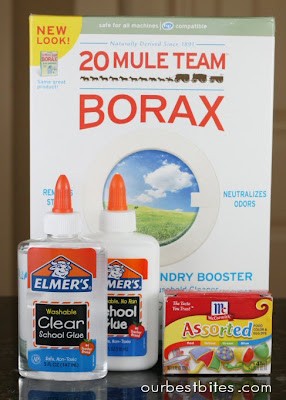
Before we dive into the step-by-step instructions on how to make slime, let’s gather all the necessary ingredients and supplies. This recipe focuses on creating slime using borax, a common household cleaner that acts as our activator. Here’s what you’ll need:
Ingredients:
- Borax Powder: 1 teaspoon – This is the magic ingredient that will transform glue into slime.
- Water (Divided): 1 ½ cups – We’ll use water to dissolve the borax and to mix with the glue.
- Elmer’s Glue: 4 oz (½ cup) – You can use clear glue for a translucent slime or white glue for a classic opaque version.
- Food Coloring: A few drops – Choose your favorite color to make your slime vibrant and exciting.
Supplies:
- Mixing Bowls: You’ll need two bowls – one for the borax solution and one for the glue mixture.
- Measuring Spoons and Cups: For accurate measurements, especially for the borax.
- Spoon or Stirring Utensil: To mix the ingredients.
- Ziplock Bag or Airtight Container: For storing your slime to keep it fresh and gooey.
Once you have everything ready, let’s move on to the exciting part: learning how to make slime!
Step-by-Step Instructions: How to Make Borax Slime
Follow these simple steps to create your very own homemade slime. This method is easy to follow, making it perfect for beginners and kids (with adult supervision, of course!).
Step 1: Prepare the Borax Solution
In one of your mixing bowls, combine 1 teaspoon of borax powder with 1 cup of warm water. Stir the mixture thoroughly until the borax powder is completely dissolved. Set this borax solution aside. This is your activator that will transform the glue into slime.
Step 2: Mix the Glue and Water
Take your second mixing bowl and pour in ½ cup (4 oz) of Elmer’s glue. Add ½ cup of water to the glue in the bowl. Stir these two ingredients together until they are well combined, creating a smooth glue solution.
Step 3: Add Food Coloring (Optional)
Now it’s time to get creative with color! Add a few drops of your chosen food coloring to the glue and water mixture. Stir well until the color is evenly distributed throughout the solution and you achieve your desired shade. Green is a classic slime color, but feel free to experiment!
Step 4: Combine the Mixtures and Watch Slime Form!
This is the exciting part! Slowly pour the borax solution into the bowl with the colored glue mixture. As you pour, you’ll immediately notice solids starting to form. Keep stirring the mixture with your spoon. It might look a bit like something from a science fiction movie, but it’s just the magic of science!
Step 5: Knead and Mix Until Perfect Slime Texture
Once the slime starts to clump together, it’s time to get your hands in there! Take the slime out of the bowl and start kneading it with your hands. It will feel wet and sticky at first, but don’t worry. Just keep kneading and mixing. Pour out any excess liquid that remains in the bowl. As you continue to knead, the slime will become firmer, smoother, and less sticky. This process might take a few minutes, but be patient.
Step 6: Enjoy Your Homemade Slime!
Congratulations! You’ve successfully learned how to make slime! You should now have a fantastic blob of slime that’s ready for stretching, squishing, and hours of fun. The more you play with your slime, the firmer and less sticky it will become.
Tips for Perfect Slime Every Time
- Measure Accurately: Especially when it comes to borax, precise measurements are important for the right slime consistency. Too much borax can make your slime too hard, while too little might make it too sticky.
- Knead Well: Don’t give up too soon! Kneading is crucial for getting the slime to the right texture. Keep working the slime until it’s smooth and no longer sticky.
- Storage is Key: To keep your slime from drying out, store it in an airtight container or ziplock bag when not in use. Properly stored slime can last for a long time!
- Experiment with Glue Types: Try making slime with both clear and white glue to see which texture you prefer. Clear glue often results in a more translucent and jiggly slime, while white glue makes a classic opaque slime.
Safety Precautions When Making Slime
While making slime is a fun and engaging activity, it’s important to take a few safety precautions, especially when making slime with children:
- Adult Supervision: Always supervise children when making and playing with slime, particularly when using borax.
- Not for Consumption: Slime is not edible. Make sure children understand that slime is for play only and should not be put in the mouth.
- Borax Safety: Borax is a household cleaner and should be handled with care. Avoid direct contact with skin and eyes. Ensure the borax powder is fully dissolved in water before mixing with glue. Wash hands thoroughly after making and playing with slime.
The Science Behind the Slime
Ever wondered what makes slime so… slimy? It’s all thanks to polymer chains in the glue and the borax activator! Glue contains long, chain-like molecules called polymers. When you add the borax solution, it acts as a cross-linker, connecting these polymer chains together. This cross-linking creates a new substance that is no longer a liquid but not quite a solid either – it’s slime! This simple activity is a great way to introduce basic chemistry concepts in a fun and tangible way.
Now that you know how to make slime, gather your ingredients and get ready for a fantastic, gooey experience. Perfect for kids’ activities, science projects, or just plain fun, homemade slime is sure to be a hit. So, why wait? Start making your own slime masterpiece today!