Checkboxes in Microsoft Word are a fantastic way to enhance the interactivity and clarity of your documents. Whether you’re creating digital forms or printable to-do lists, checkboxes make it easy for users to select options and track progress. This guide will walk you through two effective methods for adding checkboxes in Word, ensuring your documents are both functional and user-friendly.
There are primarily two scenarios where you might need to insert checkboxes:
- Interactive Checkboxes for Digital Forms: Ideal for online surveys, digital questionnaires, or fillable forms where users will directly interact with the document on their computers.
- Printable Checkboxes for Physical Documents: Perfect for checklists, printed surveys, or to-do lists where the document will be printed and filled out manually.
Let’s explore both methods in detail to help you choose the best approach for your needs.
Option 1: Inserting Interactive Checkboxes Using Word’s Developer Tab
For documents intended to be filled out digitally, interactive checkboxes are the way to go. These checkboxes are clickable within the Word document, allowing users to check and uncheck options directly on screen. To utilize this feature, you’ll need to enable the Developer tab in your Word ribbon. Here’s how:
-
Access Word Options: With your Word document open, navigate to the “File” menu located in the top left corner of the Word window. Click on “Options” at the bottom of the dropdown menu.
-
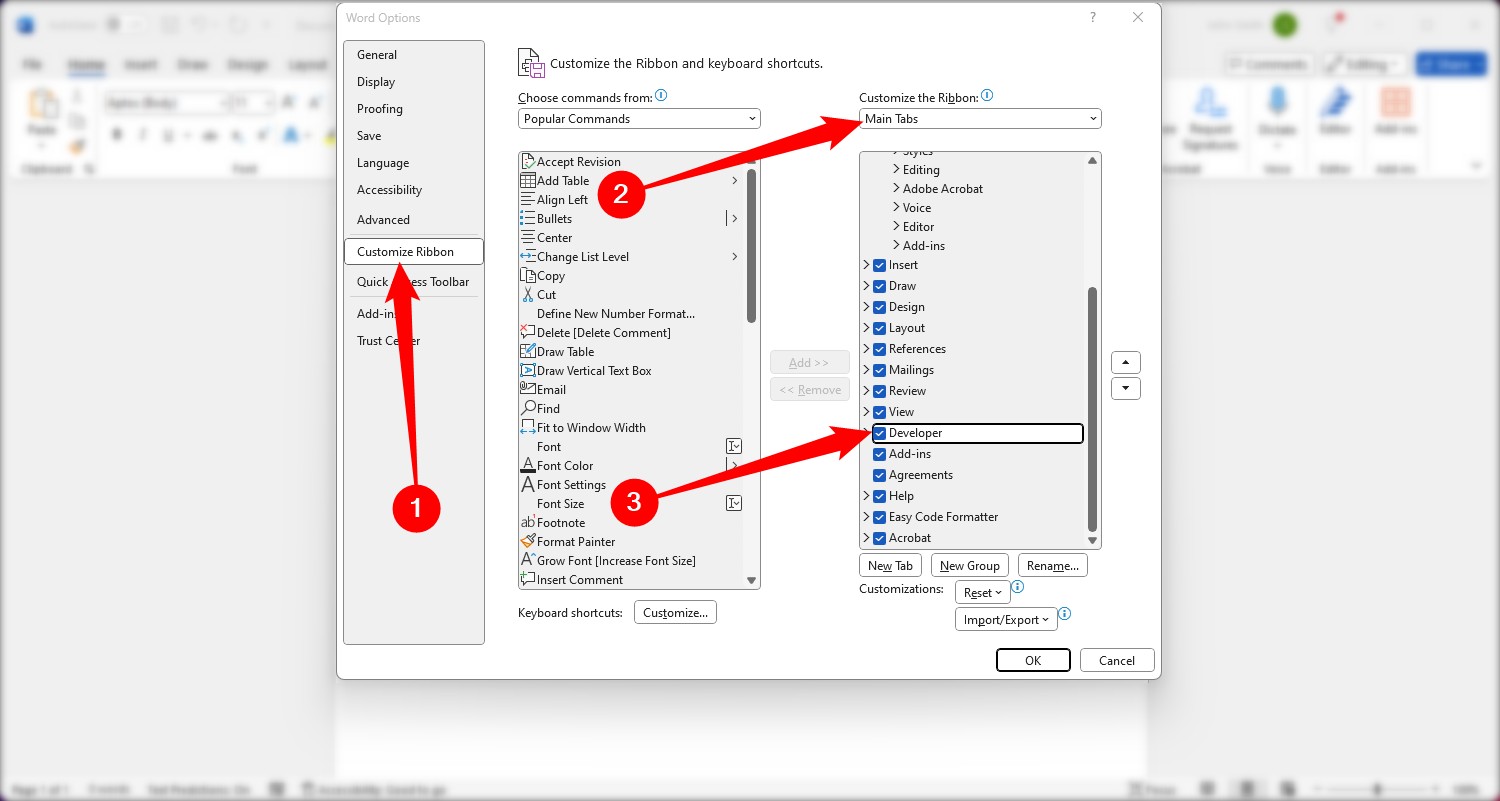
Customize the Ribbon: In the “Word Options” dialog box, select “Customize Ribbon” from the left-hand sidebar.
-
Enable the Developer Tab: On the right side, under the “Customize the Ribbon” section, ensure the dropdown menu is set to “Main Tabs.” Scroll down the list of main tabs and check the box next to “Developer.” Click “OK” to close the options window.
-
Insert Checkbox Content Control: Now that the “Developer” tab is visible in your ribbon, position your cursor where you want to insert a checkbox in your document. Switch to the “Developer” tab and locate the “Controls” group. Within this group, click on the “Check Box Content Control” button.
A checkbox will instantly appear at your cursor’s location. You can now place these interactive checkboxes next to your options in lists, forms, or surveys.
These checkboxes are fully interactive; simply click on a box to mark it with an “X” or click again to unmark it. You can also select the entire content control box to move, format, or copy the checkbox as needed. This method is excellent for creating dynamic and user-friendly digital forms within Word.
Option 2: Creating Printable Checkboxes by Customizing Bullet Points
If your goal is to create documents for printing, such as to-do lists, questionnaires for manual completion, or physical surveys, using custom bullet points as checkboxes is a simpler and more direct approach. This method doesn’t require the Developer tab and allows you to quickly create lists with checkbox symbols. Here’s how to convert bullets to printable checkboxes:
-
Start a Bulleted List: In your Word document, go to the “Home” tab on the ribbon. In the “Paragraph” group, find the “Bullets” button. Click the small arrow next to it to open the bullet library.
-
Define New Bullet: From the dropdown menu, select “Define New Bullet…” This will open the “Define New Bullet” dialog window.
-
Choose Symbol: In the “Define New Bullet” window, click the “Symbol…” button to access the Symbol library.
-
Select Wingdings 2 Font: In the “Symbol” window, find the “Font” dropdown list and choose “Wingdings 2.” This font contains a variety of symbols, including square checkboxes.
-
Locate the Checkbox Symbol: You can either scroll through the symbols in Wingdings 2 to find an empty square resembling a checkbox, or quickly type the character code 163 in the “Character code” box. This will automatically select the square checkbox symbol. Alternatively, symbol code 153 gives you an open circle, which can also serve as a checkbox. Choose the symbol that best suits your document.
-
Confirm Selection: Once you’ve selected your desired checkbox symbol, click “OK” to close the “Symbol” window, and then click “OK” again to close the “Define New Bullet” window.
-
Type Your List: You can now start typing your bulleted list in your Word document. Instead of standard bullet points, you will see checkbox symbols preceding each line.
Your bullet list will now display checkboxes, perfect for printing and manual completion.
-
Reuse Checkbox Bullet: For future lists, you won’t need to repeat the entire process. Simply click the arrow next to the “Bullets” button on the “Home” tab, and you will find your custom checkbox bullet listed under the “Recently Used Bullets” section for quick access.
Remember, these customized bullet point checkboxes are designed for printed documents and are not interactive within Word itself. They are visually represented as checkboxes, ready to be marked on paper.
Conclusion
Adding checkboxes to your Word documents can significantly improve their functionality and user experience, whether for digital interaction or printed materials. By using the “Developer” tab for interactive checkboxes or customizing bullet points for printable checkboxes, you can effectively create forms, checklists, and surveys tailored to your specific needs. Choose the method that best aligns with how your audience will use the document, and enhance your Word documents with these simple yet powerful checkbox techniques.
If you’re working across different Microsoft Office applications, you might also be interested in learning how to add checkboxes in Excel for spreadsheets or how to insert check marks or checkboxes in PowerPoint for presentations, further expanding your document creation toolkit.