Adding a signature to your Word documents can bring a touch of professionalism and authenticity. Whether you need to sign contracts, formal letters, or any official document, Microsoft Word offers several straightforward methods to insert your signature. This guide will walk you through the process of adding a signature in Word, ensuring your documents are both personalized and legally sound.
Method 1: Inserting a Scanned Image of Your Handwritten Signature
This method is perfect for those who prefer the traditional look of a handwritten signature. By scanning your signature and saving it as an image, you can easily insert it into any Word document. Here’s how:
-
Write Your Signature: On a clean piece of white paper, write your signature clearly using a black pen.
-
Scan Your Signature: Use a scanner to scan the paper. Save the scanned image to your computer in a common image format such as .jpg, .png, or .bmp. Ensure the scan is clear and captures your entire signature. If you are using a smartphone, you can take a picture and transfer it to your computer.
-
Open the Image in Word: Although optional, opening the image in Word allows for quick cropping. Go to Insert tab, then Pictures, and select Picture from File to open your scanned signature image in a Word document.
-
Crop the Image (Optional but Recommended): To remove any unnecessary white space around your signature, select the image. This will activate the Picture Format tab. Click on Crop and use the cropping handles to trim the image closely around your signature. This ensures your signature looks neat and appropriately sized in your documents.
-
Save the Cropped Signature as a Picture: Right-click on the cropped image and select Save as Picture. Choose a location on your computer and save it as a separate image file. This step is useful for reusing your signature in multiple documents without repeating the cropping process.
-
Insert Your Signature into a Word Document: Now, to add your signature to any Word document, place your cursor where you want the signature to appear. Go to the Insert tab and click on Pictures, then Picture from File. Locate the saved signature image file and click Insert. Your signature will now appear in the document.
Alt text: Inserting a picture from file using the Pictures command on the Insert tab in Microsoft Word.
Method 2: Creating a Reusable Signature Block with AutoText
For those who frequently need to add signatures along with additional information like job titles or contact details, creating an AutoText signature block can save significant time. This method allows you to save your signature and accompanying text as a reusable block.
-
Insert Your Signature Image: Follow steps 1-6 from Method 1 to insert your scanned signature image into your Word document.
-
Add Accompanying Text: Directly below the inserted signature image, type any text you want to include as part of your signature block, such as your job title, company name, phone number, or email address. Format the text as desired.
-
Select Signature Block: Select both the signature image and the text you just typed. Make sure both elements are fully selected.
-
Save to Quick Parts Gallery (AutoText): Go to the Insert tab, then click on Quick Parts in the Text group. Select Save Selection to Quick Part Gallery. This will open the Create New Building Block dialog box.
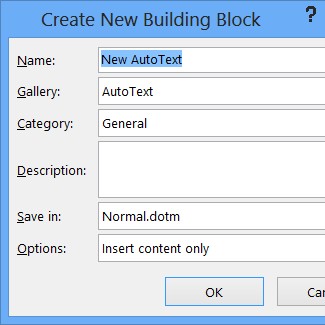 Create New Building Block dialog box
 -
Configure Your Signature Block: In the Create New Building Block dialog box:
- Name: Enter a descriptive name for your signature block (e.g., “My Formal Signature”).
- Gallery: Choose AutoText from the dropdown menu. This is crucial for easy access later.
- Optionally, you can add a description and further configure other settings.
- Click OK to save your signature block.
-
Insert Your Reusable Signature Block: To use your saved signature block in any document, place your cursor where you want to insert it. Go to the Insert tab, click on Quick Parts, then AutoText. You will see the name you gave to your signature block listed. Click on it to insert your complete signature block into the document.
Method 3: Inserting a Signature Line
If you need to indicate where a signature should be signed, especially in printed documents, Word’s Signature Line feature is very useful. It inserts a line with an “X” to clearly mark the signature location.
-
Place Cursor: Click in your Word document where you want to insert the signature line.
-
Insert Signature Line: Go to the Insert tab and click on Signature Line in the Text group. Select Microsoft Office Signature Line from the dropdown options.
-
Signature Setup: The Signature Setup dialog box will appear. Here, you can customize the signature line:
- Suggested signer: Type the name of the person who should sign (e.g., your name or the name of the signatory).
- Suggested signer title: Enter the suggested signer’s title (e.g., “Manager,” “Director,” etc.). This is optional.
- You can also add a suggested signer email address and instructions to the signer if needed by checking the relevant boxes.
-
Insert the Signature Line: Click OK in the Signature Setup box. A signature line will be inserted into your document, complete with an “X” and fields for the suggested signer and title, if you added them.
Alt text: Example of a signature line in Microsoft Word, featuring an X to indicate the space for a signature.
Conclusion
Adding a signature in Word is a simple yet essential skill for creating professional and official documents. Whether you opt for inserting a scanned handwritten signature, creating a reusable signature block, or using the signature line feature, Word provides flexible options to suit your needs. By following these step-by-step instructions, you can efficiently manage and insert signatures in your Word documents, enhancing their credibility and personal touch.