AirDrop stands as Apple’s proprietary ad-hoc service, enabling seamless file sharing between supported Mac computers and iOS devices without relying on mail or mass storage devices. This guide provides a detailed walkthrough on how to use AirDrop effectively to share photos, documents, and much more between iPhones, iPads, and Macs, ensuring a smooth and efficient experience.
Prerequisites for Using AirDrop
Before you begin using AirDrop, it’s essential to ensure that your devices meet certain requirements and settings are correctly configured. Here’s a checklist to prepare your devices for AirDrop:
- Proximity and Range: AirDrop relies on Bluetooth and Wi-Fi to establish a connection. Ensure that the device you intend to share with is physically nearby, ideally within a 30-foot (9-meter) range, and that both devices have Bluetooth and Wi-Fi enabled.
- Wi-Fi and Bluetooth Activation: Both Wi-Fi and Bluetooth must be turned on for AirDrop to function. You don’t need to be connected to a specific Wi-Fi network, but Wi-Fi needs to be active. Verify that both are enabled in your device’s settings or Control Center.
- Personal Hotspot Deactivation: Personal Hotspot, when activated, can interfere with AirDrop. If either you or the recipient has Personal Hotspot turned on, disable it temporarily for a smooth AirDrop experience.
- Recipient’s AirDrop Settings: The recipient’s AirDrop receiving settings are crucial. If they have set their AirDrop to “Contacts Only,” you must be listed in their Contacts app, and they must have your Apple ID email address or mobile number associated with your contact card.
- “Everyone” Setting for Non-Contacts: If you are not in the recipient’s contacts, they need to adjust their AirDrop receiving setting to “Everyone” temporarily to receive files from you. This setting allows any nearby Apple device to discover theirs for AirDrop purposes.
You can manage your AirDrop receiving preferences at any time, choosing between “Contacts Only” or “Receiving Off” to control device visibility and prevent unwanted content sharing.
Step-by-Step Guide: How to AirDrop Files
Sharing files using AirDrop is a straightforward process. Follow these steps to send items from your iPhone or iPad:
-
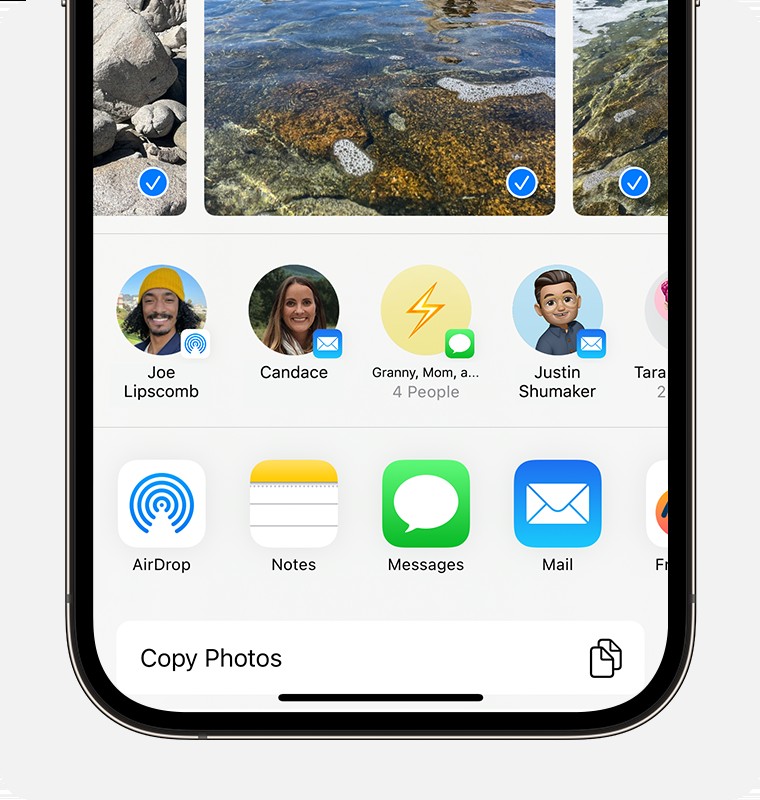
Initiate Sharing: Begin by opening the app containing the content you wish to share. This could be Photos for images, Files for documents, Safari for web pages, or any app with the share functionality. Look for the Share icon or the word “Share” within the app’s interface. For sharing photos from the Photos app, you have the option to select multiple images by swiping left or right.
-
Access AirDrop Options: Tap the Share button. This action will reveal the share sheet, presenting various sharing methods. Locate and tap the AirDrop button, typically represented by a stylized fan icon.
-
Select Recipient: After tapping the AirDrop button, your device will scan for nearby AirDrop-enabled devices. A list of available AirDrop users will appear. Tap the name of the intended recipient to initiate the file transfer. You can also AirDrop files between your own Apple devices using the same method.
If both you and the recipient are using iPhones with iOS 17 and are within close proximity, you can initiate sharing by simply bringing your iPhones together. This proximity-based sharing simplifies the process even further.
Note: When sharing with someone in your Contacts, their name will appear with an associated image if available. If they are not in your contacts, only their name will be displayed.
Accepting an AirDrop Transfer
When someone shares content with you via AirDrop, your device will display an alert notification. You will have two options: “Accept” or “Decline.”
-
Accepting Files: Tapping “Accept” will initiate the file transfer. The received content will typically open within the originating app. For instance, photos will appear in the Photos app, web links will open in Safari, and app links will direct you to the App Store for download or purchase.
-
Automatic Acceptance for Personal Devices: If you AirDrop content between your own devices logged in with the same Apple ID, such as from your iPhone to your Mac, the transfer will occur automatically without prompting you to “Accept” or “Decline.” Ensure both devices are signed in with the same Apple ID for this seamless transfer.
Customizing AirDrop Settings
Controlling who can discover your device and send you content via AirDrop is easily managed through your device settings. Here’s how to adjust your AirDrop preferences:
-
Access AirDrop Settings: Open the Settings app on your iPhone or iPad. Scroll down and tap “General.”
-
Navigate to AirDrop: Within the General settings, find and tap “AirDrop.”
-
Choose Your Receiving Option: On the AirDrop settings screen, you will see three options to choose from:
- Receiving Off: Selecting “Receiving Off” disables AirDrop, and you will not receive any AirDrop requests.
- Contacts Only: “Contacts Only” allows only people in your Contacts app to see your device and send you content. This is a more secure option for everyday use.
- Everyone: “Everyone” makes your device discoverable to all nearby Apple devices using AirDrop. While convenient, it’s generally recommended to use this setting temporarily when needed and switch back to “Contacts Only” or “Receiving Off” for security and privacy. In iOS 16.2 and later, selecting “Everyone” will revert to “Contacts Only” after 10 minutes as a security enhancement.
You can also quickly adjust AirDrop settings from the Control Center:
- Open Control Center: On iPhone X or later and iPads with iOS 12 or later or iPadOS, swipe down from the upper-right corner of the screen to access Control Center. On iPhone 8 or earlier, swipe up from the bottom of the screen.
- Access Network Settings: In Control Center, locate the network settings card, typically in the upper-left corner, and press firmly or touch and hold it to expand.
- Adjust AirDrop Settings: Touch and hold the AirDrop button within the expanded network settings. This will present the same three AirDrop receiving options (“Receiving Off,” “Contacts Only,” “Everyone”) for you to choose from.
If you find that the AirDrop option is set to “Receiving Off” and is grayed out, preventing you from changing it, check your Screen Time settings:
- Screen Time Settings: Go to Settings and tap “Screen Time.”
- Content & Privacy Restrictions: Tap “Content & Privacy Restrictions.”
- Allowed Apps: Tap “Allowed Apps” and ensure that “AirDrop” is toggled on.
Note: The “Contacts Only” option is available on devices running iOS 10 and later, iPadOS, or macOS Sierra 10.12 and later. If your device is running an earlier software version and AirDrop is set to “Contacts Only,” you may need to switch to “Everyone” to receive files from devices not in your contacts.
By understanding and utilizing these steps and settings, you can effectively use AirDrop to streamline file sharing across your Apple ecosystem, enhancing productivity and convenience in your daily digital interactions.