Allocating more RAM to Minecraft can significantly enhance your gaming experience, especially when running modded versions or dealing with resource-intensive tasks. This guide, brought to you by HOW.EDU.VN, provides detailed instructions on increasing RAM allocation for various Minecraft launchers, ensuring smoother gameplay and preventing crashes. Optimizing your Minecraft experience involves understanding Java Virtual Machine (JVM) arguments and memory management, ultimately leading to improved game performance.
1. Understanding RAM Allocation in Minecraft
Before diving into the specifics, it’s crucial to understand why allocating more RAM to Minecraft is essential. Minecraft, being a Java-based game, relies on the Java Virtual Machine (JVM) to run. The JVM uses RAM to store game data, textures, and mod information. Insufficient RAM can lead to lag, stuttering, and even game crashes, particularly when running modpacks or high-resolution texture packs. Properly managing Minecraft memory allocation ensures a smoother and more enjoyable gaming experience.
1.1. Why Allocate More RAM?
- Improved Performance: More RAM allows Minecraft to load and process game data faster, reducing lag and improving overall performance.
- Enhanced Modding Experience: Modpacks often require significant amounts of RAM. Allocating more RAM ensures that these mods run smoothly without causing crashes.
- Smoother Gameplay: With sufficient RAM, the game can handle complex calculations and render high-resolution textures without significant performance drops.
1.2. How Much RAM Do You Need?
The amount of RAM you need depends on several factors, including the version of Minecraft you are playing, the number of mods you are using, and the resolution of your textures. Here’s a general guideline:
- Vanilla Minecraft: 2-4GB of RAM
- Modded Minecraft (Light Modpacks): 4-6GB of RAM
- Modded Minecraft (Heavy Modpacks): 6-12GB of RAM or more
Remember to never allocate more RAM than your system has available, as this can lead to system instability. Always leave some RAM for your operating system and other applications.
2. Allocating More RAM to Minecraft: General Steps
The general process for allocating more RAM to Minecraft involves modifying the JVM arguments in your launcher settings. Here’s a broad overview:
- Open Your Minecraft Launcher: Whether it’s the official Minecraft Launcher or a third-party launcher like CurseForge or ATLauncher, start by opening the application.
- Access Installation or Profile Settings: Navigate to the section where you can edit your installation or profile settings.
- Find JVM Arguments: Look for a field labeled “JVM Arguments” or “Java Settings.”
- Modify the -Xmx Value: The
-Xmxargument specifies the maximum amount of RAM that the JVM can use. Change the value to your desired amount. For example,-Xmx4Gallocates 4GB of RAM. - Save Your Changes: Ensure you save the changes to apply the new RAM allocation.
Now, let’s delve into the specific instructions for different launchers.
3. Allocating RAM in the Official Minecraft Launcher
The official Minecraft Launcher is the primary way to play vanilla Minecraft and is widely used. Here’s how to allocate more RAM:
3.1. Step-by-Step Guide
-
Open the Minecraft Launcher: Launch the official Minecraft Launcher.
-
Navigate to Installations: Click on the “Installations” tab.
-
Edit Installation: Hover over the installation you want to modify and click the three-dot menu, then select “Edit.”
-
More Options: In the edit screen, click on “More Options” at the bottom.
-
Modify JVM Arguments: Locate the “JVM Arguments” field. Look for the
-Xmxparameter. The default value is usually-Xmx2G(2GB of RAM). Change this value to your desired amount. For example, to allocate 6GB of RAM, change it to-Xmx6G. -
Save Changes: Click “Save” at the bottom of the screen.
-
Launch Minecraft: Start Minecraft using the modified installation.
3.2. Understanding JVM Arguments
The JVM Arguments field contains various parameters that control how the Java Virtual Machine runs. The most important one for RAM allocation is -Xmx.
-Xmx: Specifies the maximum heap size for the JVM. This is the maximum amount of RAM that the JVM can use.-Xms: Specifies the initial heap size for the JVM. It’s generally recommended to set-Xmsto the same value as-Xmxto avoid performance hiccups as the JVM dynamically adjusts the heap size.
3.3. Best Practices for the Official Launcher
- Use the Latest Java Version: Ensure you are using the latest version of Java, as it often includes performance improvements and bug fixes.
- Monitor Performance: Use the F3 debug screen in Minecraft to monitor your RAM usage and ensure that the game is utilizing the allocated memory effectively.
4. Allocating RAM in ATLauncher
ATLauncher is a popular third-party launcher known for its ease of use and modpack support. Here’s how to allocate more RAM:
4.1. Setting Default RAM Allocation for All Instances
-
Open ATLauncher: Launch the ATLauncher application.
-
Go to Settings: Click on “Settings” in the sidebar.
-
Select Java/Minecraft Tab: Click on the “Java/Minecraft” tab.
-
Change Maximum Memory/RAM: Find the “Maximum Memory/RAM” option and adjust the slider to your desired amount. Note that the value is in megabytes (MB), so 1GB = 1024MB, 4GB = 4096MB, etc.
-
Save Changes: Click “Save” at the bottom of the settings window.
4.2. Allocating RAM to an Individual Instance
-
Open ATLauncher: Launch the ATLauncher application.
-
Go to Instances: Click on “Instances” in the sidebar.
-
Edit Instance Settings: Right-click on the instance you want to modify and select “Edit Instance.”
-
Java Settings Tab: Click on the “Java Settings” tab.
-
Change Maximum Memory/RAM: Adjust the “Maximum Memory/RAM” slider to your desired amount.
-
Save Changes: Click “Save” at the bottom of the settings window.
4.3. ATLauncher Tips
- Monitor Performance: Use the in-game debug screen (F3) to monitor RAM usage.
- Java Version: Ensure you are using the recommended Java version for your modpack.
5. Allocating RAM in CurseForge App
The CurseForge App, managed by Overwolf, is another popular launcher, especially for modded Minecraft. Here’s how to allocate more RAM:
5.1. Allocating RAM in General Settings
-
Open CurseForge App: Launch the CurseForge App.
-
Go to Settings: Click the gear icon in the lower-left corner to open the settings menu.
-
Select Minecraft: In the settings menu, click on “Minecraft” under “Game Specific Settings.”
-
Adjust Allocated Memory Slider: Scroll down to find the “Allocated Memory” slider under “Java Settings.” Move the slider to your desired amount. Remember that the slider is in megabytes (MB).
-
Close Settings: The changes are saved automatically.
5.2. Allocating RAM to a Specific Profile
-
Open CurseForge App: Launch the CurseForge App.
-
Go to My Modpacks: Navigate to the “My Modpacks” section.
-
Select Profile: Click anywhere on the profile tile you want to select (except the play button).
-
Open Profile Options: Click on the three-dot options menu next to the play button and select “Profile Options.”
-
Uncheck Use System Memory Settings: Uncheck the “Use system memory settings” box.
-
Adjust Allocated Memory Slider: Move the slider to allocate RAM.
-
Close Settings: The changes are saved automatically.
5.3. CurseForge App Tips
- Profile-Specific Settings: Using profile-specific settings allows you to tailor RAM allocation to each modpack’s needs.
- Monitor Overwolf Resource Usage: Be mindful of Overwolf’s resource usage, as it can impact game performance.
6. Allocating RAM in FTB App
The FTB (Feed the Beast) App is a launcher specifically designed for FTB modpacks. Here’s how to allocate more RAM:
6.1. Step-by-Step Guide
-
Open FTB App: Launch the FTB App.
-
Go to Library: Navigate to the “Library” section.
-
Select Installation: Hover over the installation you want to modify and click anywhere on that installation except the play button.
-
Open Settings: On the following screen, click on “Settings.”
-
Adjust RAM Slider: Move the slider to allocate RAM.
-
Save Changes: The changes are saved automatically.
6.2. FTB App Tips
- Optimized for FTB Modpacks: The FTB App is optimized for FTB modpacks, ensuring a smooth experience with pre-configured settings.
- Regular Updates: Keep the FTB App updated for the latest features and performance improvements.
7. Allocating RAM in Technic Launcher
The Technic Launcher is another popular option for playing modded Minecraft. Here’s how to allocate more RAM:
7.1. Step-by-Step Guide
-
Open Technic Launcher: Launch the Technic Launcher.
-
Go to Launcher Options: In the top-right corner, click on “Launcher Options.”
-
Select Java Settings: Click on “Java Settings.”
-
Choose Memory Allocation: Use the “Memory” dropdown to select how much RAM to allocate.
-
Save Changes: The changes are saved automatically.
7.2. Technic Launcher Tips
- Simple Interface: The Technic Launcher offers a straightforward interface, making it easy to adjust RAM allocation.
- Modpack Variety: Explore the wide variety of modpacks available on the Technic Launcher.
8. Allocating RAM in MultiMC
MultiMC is an open-source launcher that provides advanced instance management capabilities. Here’s how to allocate more RAM:
8.1. Step-by-Step Guide
-
Open MultiMC: Launch the MultiMC application.
-
Edit Instance: Right-click the instance you want to modify and select “Edit Instance.”
-
Go to Settings: Click on “Settings” in the left sidebar.
-
Enable Memory Override: Check the box next to “Memory.”
-
Change Maximum Memory Allocation: Change the value for “Maximum Memory Allocation” to allocate more RAM.
-
Save Changes: Close the settings window.
8.2. MultiMC Tips
- Instance Management: MultiMC allows for easy creation and management of multiple Minecraft instances, each with its own settings.
- Advanced Configuration: Offers advanced configuration options for experienced users.
9. Allocating RAM in Void Launcher
Void Launcher is another launcher option that simplifies modded Minecraft experiences. Here’s how to allocate more RAM:
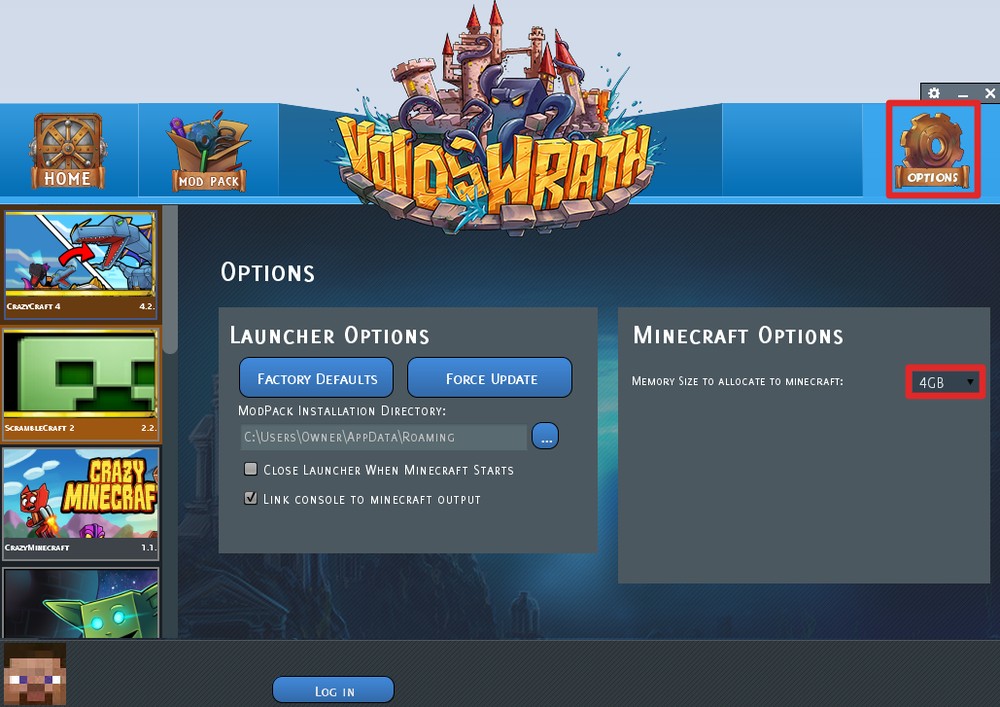
9.1. Step-by-Step Guide
-
Open Void Launcher: Launch the Void Launcher.
-
Go to Options: Click the options icon in the top-right corner.
-
Allocate Memory: Use the “Memory Size to Allocate To Minecraft” dropdown to allocate more RAM.
-
Save Changes: The changes are saved automatically.
9.2. Void Launcher Tips
- User-Friendly: Void Launcher is known for its user-friendly interface and ease of use.
- Modpack Selection: Explore the curated modpacks available on the Void Launcher.
10. Advanced Tips for Optimizing Minecraft Performance
Beyond allocating more RAM, there are several advanced techniques you can use to optimize Minecraft performance:
10.1. Using OptiFine
OptiFine is a Minecraft optimization mod that can significantly improve performance by optimizing textures, reducing lag, and adding advanced graphical settings.
- Install OptiFine: Download OptiFine from the official website and install it by running the downloaded JAR file.
- Configure Settings: In Minecraft, go to “Options” > “Video Settings” and adjust the settings to optimize performance. Reduce graphical settings like render distance, clouds, and particles.
10.2. Garbage Collection Settings
Java’s garbage collection (GC) process can sometimes cause lag spikes in Minecraft. Adjusting GC settings can help mitigate these issues.
-
G1GC Garbage Collector: The G1GC garbage collector is designed for large heaps and can provide better performance than the default garbage collector. To enable it, add the following JVM argument:
-XX:+UseG1GC -
Other GC Flags: Other useful GC flags include:
-XX:+UnlockExperimentalVMOptions-XX:G1NewSizePercent=20-XX:G1ReservePercent=20-XX:MaxGCPauseMillis=50-XX:G1HeapRegionSize=32M
10.3. Monitoring RAM Usage
Regularly monitoring RAM usage can help you identify potential issues and fine-tune your RAM allocation.
- In-Game Debug Screen: Press F3 in Minecraft to display the debug screen, which shows RAM usage, CPU usage, and other performance metrics.
- Task Manager: Use the Task Manager (Windows) or Activity Monitor (macOS) to monitor system-wide RAM usage and identify any processes that may be consuming excessive resources.
11. Troubleshooting Common Issues
Even with proper RAM allocation, you may encounter performance issues. Here are some common problems and their solutions:
11.1. Game Crashes Due to Insufficient RAM
- Increase RAM Allocation: If you consistently encounter crashes related to insufficient RAM, increase the amount of allocated RAM.
- Reduce Mod Count: If increasing RAM allocation doesn’t solve the problem, consider reducing the number of mods you are using.
11.2. Lag Spikes
- Optimize Graphics Settings: Reduce graphical settings like render distance, clouds, and particles.
- Update Java: Ensure you are using the latest version of Java.
- Check for Conflicting Mods: Some mods may conflict with each other, causing lag spikes. Try removing mods one by one to identify the culprit.
11.3. Game Freezes
- Adjust Garbage Collection Settings: Experiment with different garbage collection settings to find the optimal configuration for your system.
- Update Drivers: Ensure your graphics drivers are up to date.
12. The Expertise of HOW.EDU.VN: Your Partner in Gaming Optimization
Optimizing Minecraft performance can be complex, but with the right knowledge and tools, you can significantly enhance your gaming experience. At HOW.EDU.VN, we connect you with leading experts who can provide personalized advice and solutions for your specific needs.
12.1. Why Choose HOW.EDU.VN?
- Access to Top Experts: Our network includes PhDs and professionals with extensive experience in software optimization and game performance.
- Personalized Solutions: We provide tailored advice based on your specific hardware, software, and gaming preferences.
- Time and Cost Savings: Avoid the frustration of trial and error by getting expert guidance from the start.
- Confidentiality and Trust: We ensure that your information is kept secure and confidential.
12.2. How HOW.EDU.VN Can Help
- Custom RAM Allocation Strategies: Our experts can help you determine the optimal RAM allocation for your Minecraft setup.
- Advanced Optimization Techniques: We offer guidance on advanced optimization techniques, including garbage collection settings and mod configuration.
- Troubleshooting Support: We provide troubleshooting support to help you resolve any performance issues you may encounter.
13. Connect with Our Experts Today
Don’t let performance issues ruin your Minecraft experience. Contact HOW.EDU.VN today and connect with our team of PhDs and experts. We’re here to help you optimize your game and enjoy a smoother, more immersive gaming experience.
Are you struggling with lag, crashes, or poor performance in Minecraft? Do you want to unlock the full potential of your game and enjoy a seamless gaming experience? At HOW.EDU.VN, we understand the challenges gamers face and offer expert guidance to help you optimize your Minecraft setup.
13.1. Immediate Assistance
Connect with our team of PhDs and experts now for immediate assistance. Let us help you fine-tune your RAM allocation, optimize your graphics settings, and troubleshoot any performance issues you may be experiencing.
13.2. Personalized Advice
Receive personalized advice tailored to your specific hardware, software, and gaming preferences. Our experts will analyze your setup and provide actionable recommendations to improve your Minecraft performance.
13.3. Contact Information
Address: 456 Expertise Plaza, Consult City, CA 90210, United States
WhatsApp: +1 (310) 555-1212
Website: HOW.EDU.VN
14. FAQ: Allocating More RAM to Minecraft
14.1. Why is Minecraft using so little RAM?
Minecraft may not be using the allocated RAM if the JVM arguments are not set correctly, or if the game doesn’t need it. Monitor RAM usage using the F3 debug screen to confirm.
14.2. How do I check how much RAM Minecraft is using?
Press F3 in-game to display the debug screen. Look for the “Memory” section to see the current RAM usage.
14.3. Can I allocate too much RAM to Minecraft?
Yes, allocating too much RAM can lead to performance issues. Never allocate more RAM than your system has available, and leave some RAM for your operating system and other applications.
14.4. Will allocating more RAM fix all my Minecraft performance issues?
Allocating more RAM can improve performance, but it may not fix all issues. Other factors, such as graphics settings, mods, and Java version, can also impact performance.
14.5. What is the best way to allocate RAM in CurseForge?
The best way to allocate RAM in CurseForge is to set the default RAM in the general settings and then customize the allocation for individual profiles as needed.
14.6. How do I update Java for Minecraft?
Download the latest version of Java from the official Oracle website and install it. Ensure that your Minecraft launcher is configured to use the new Java version.
14.7. What are JVM arguments and why are they important?
JVM arguments are parameters that control how the Java Virtual Machine runs. They are important because they allow you to customize the JVM’s behavior, including RAM allocation, garbage collection, and other performance settings.
14.8. How do I find the JVM arguments in my Minecraft launcher?
The location of JVM arguments varies depending on the launcher. Look for a field labeled “JVM Arguments” or “Java Settings” in the installation or profile settings.
14.9. Should I use the same amount of RAM for -Xms and -Xmx?
It’s generally recommended to set -Xms to the same value as -Xmx to avoid performance hiccups as the JVM dynamically adjusts the heap size.
14.10. What is OptiFine and how does it improve Minecraft performance?
OptiFine is a Minecraft optimization mod that improves performance by optimizing textures, reducing lag, and adding advanced graphical settings. It can significantly enhance the gaming experience, especially on lower-end hardware.
By following this comprehensive guide and leveraging the expertise of how.edu.vn, you can optimize your Minecraft experience and enjoy smoother, more immersive gameplay. Don’t hesitate to reach out for personalized advice and solutions tailored to your specific needs.