Baking chicken breast in the oven is a fantastic way to prepare a healthy, versatile protein for countless meals. But let’s be honest, dry, rubbery chicken is a common kitchen mishap. This guide will walk you through a foolproof method to bake chicken breasts that are consistently juicy, tender, and full of flavor. Say goodbye to dry chicken forever!
Many home cooks seek reliable methods for baking proteins like chicken. There are countless stories of cooking fails, from dried-out chicken to tough steaks. Learning to bake chicken breast perfectly is a valuable skill, transforming this lean protein into a delicious and easy meal option. This recipe and technique are designed to be your go-to guide, ensuring perfectly baked chicken every time.
Over the years, requests for easy and flavorful chicken breast recipes have been constant. Chicken breasts are incredibly versatile but can be tricky to bake correctly. Cook them improperly, and you’re left with a dry, tasteless disappointment. However, when baked just right, oven-baked chicken breasts become incredibly juicy, tender, and delicious – a true kitchen win!
The secret to amazing baked chicken breast lies in a simple 5-step method that’s easy to remember and even easier to execute. This method is customizable with your favorite seasonings, making it perfect for any meal. Countless readers have already discovered the magic of this technique, reporting that it’s a game-changer in their chicken cooking. Ready to join them? Let’s learn how to bake the perfect chicken breast in the oven.
Mastering Baked Chicken Breast: The 1-Minute Method Overview
Before diving into the details, here’s a quick video overview of the baking process. This will give you a visual guide to complement the written steps.
[Video Placeholder – Ideally, embed a short video here demonstrating the 5 steps, if creating a video is within scope. Otherwise, remove this section]
Essential Ingredients for Oven Baked Chicken Breast
To bake juicy and flavorful chicken breasts, you’ll need just a few key ingredients:
- Boneless, Skinless Chicken Breasts: Opt for fresh chicken breasts for the best results. Frozen chicken breasts work too, but ensure they are fully thawed before cooking. Some chicken is pre-brined; if yours is, you can skip the brining step.
- Butter or Olive Oil: Butter adds a richer flavor, while olive oil is a healthier alternative. Both work effectively to keep the chicken moist and help seasonings adhere.
- Kosher Salt: Crucial for the brining process and for seasoning. Kosher salt enhances flavor and helps retain moisture.
- Your Favorite Seasonings: A simple blend of smoked paprika, garlic powder, salt, and black pepper is incredibly versatile. Feel free to experiment with your preferred dry seasoning blends to match your meal.
For consistent results, especially when baking chicken, a cooking thermometer is highly recommended. It eliminates guesswork and ensures your chicken is cooked to a safe and juicy internal temperature. A reliable instant-read thermometer is an invaluable tool for any home cook.
The 5-Step B.B.R.R.R. Method for Perfect Baked Chicken Breast
The secret to consistently juicy and tender baked chicken breast is the 5-step B.B.R.R.R. method. Each step is crucial and contributes to the final delicious result.
-
Brine: This step is non-negotiable for oven-baked chicken breasts. Brining is incredibly simple and makes a significant difference in juiciness. It only takes 15 minutes and is well worth the minimal effort.
To brine, take a large bowl and fill it halfway with lukewarm water. Dissolve a generous amount of kosher salt in the water. Add ice cubes or cold water to cool the mixture down. Submerge the chicken breasts in the saltwater brine for at least 15 minutes. For longer brining, you can refrigerate the chicken in the brine for up to 6 hours. Avoid brining for longer periods, as it can affect the chicken’s texture.
After brining, remove the chicken and rinse it thoroughly under cold water to remove excess salt. Pat the chicken completely dry with paper towels. Brining is a game-changer – don’t skip it!
Note: Always check the packaging of your chicken. Some brands are pre-brined in a sodium solution. If your chicken is pre-brined, skip this brining step and move directly to step two.
-
Brush: Brush the chicken breasts generously with melted butter or olive oil. Butter adds fantastic flavor and promotes a beautiful golden-brown crust. Olive oil is a great substitute if you prefer or want a dairy-free option.
Ensure you brush both sides of the chicken breasts liberally. This prevents sticking to the baking dish and helps the seasonings adhere evenly. Place the brushed chicken breasts in a large baking dish or roasting pan.
-
Rub: Seasoning is key to flavorful chicken. While simple salt and pepper work, a more robust seasoning blend elevates the taste significantly. For a basic yet delicious flavor, use the recommended blend of salt, pepper, garlic powder, and paprika.
Feel free to customize your seasoning based on your preference or the recipe you’re using the chicken for. Italian herbs, Cajun spices, or a simple lemon-pepper blend are all excellent options.
-
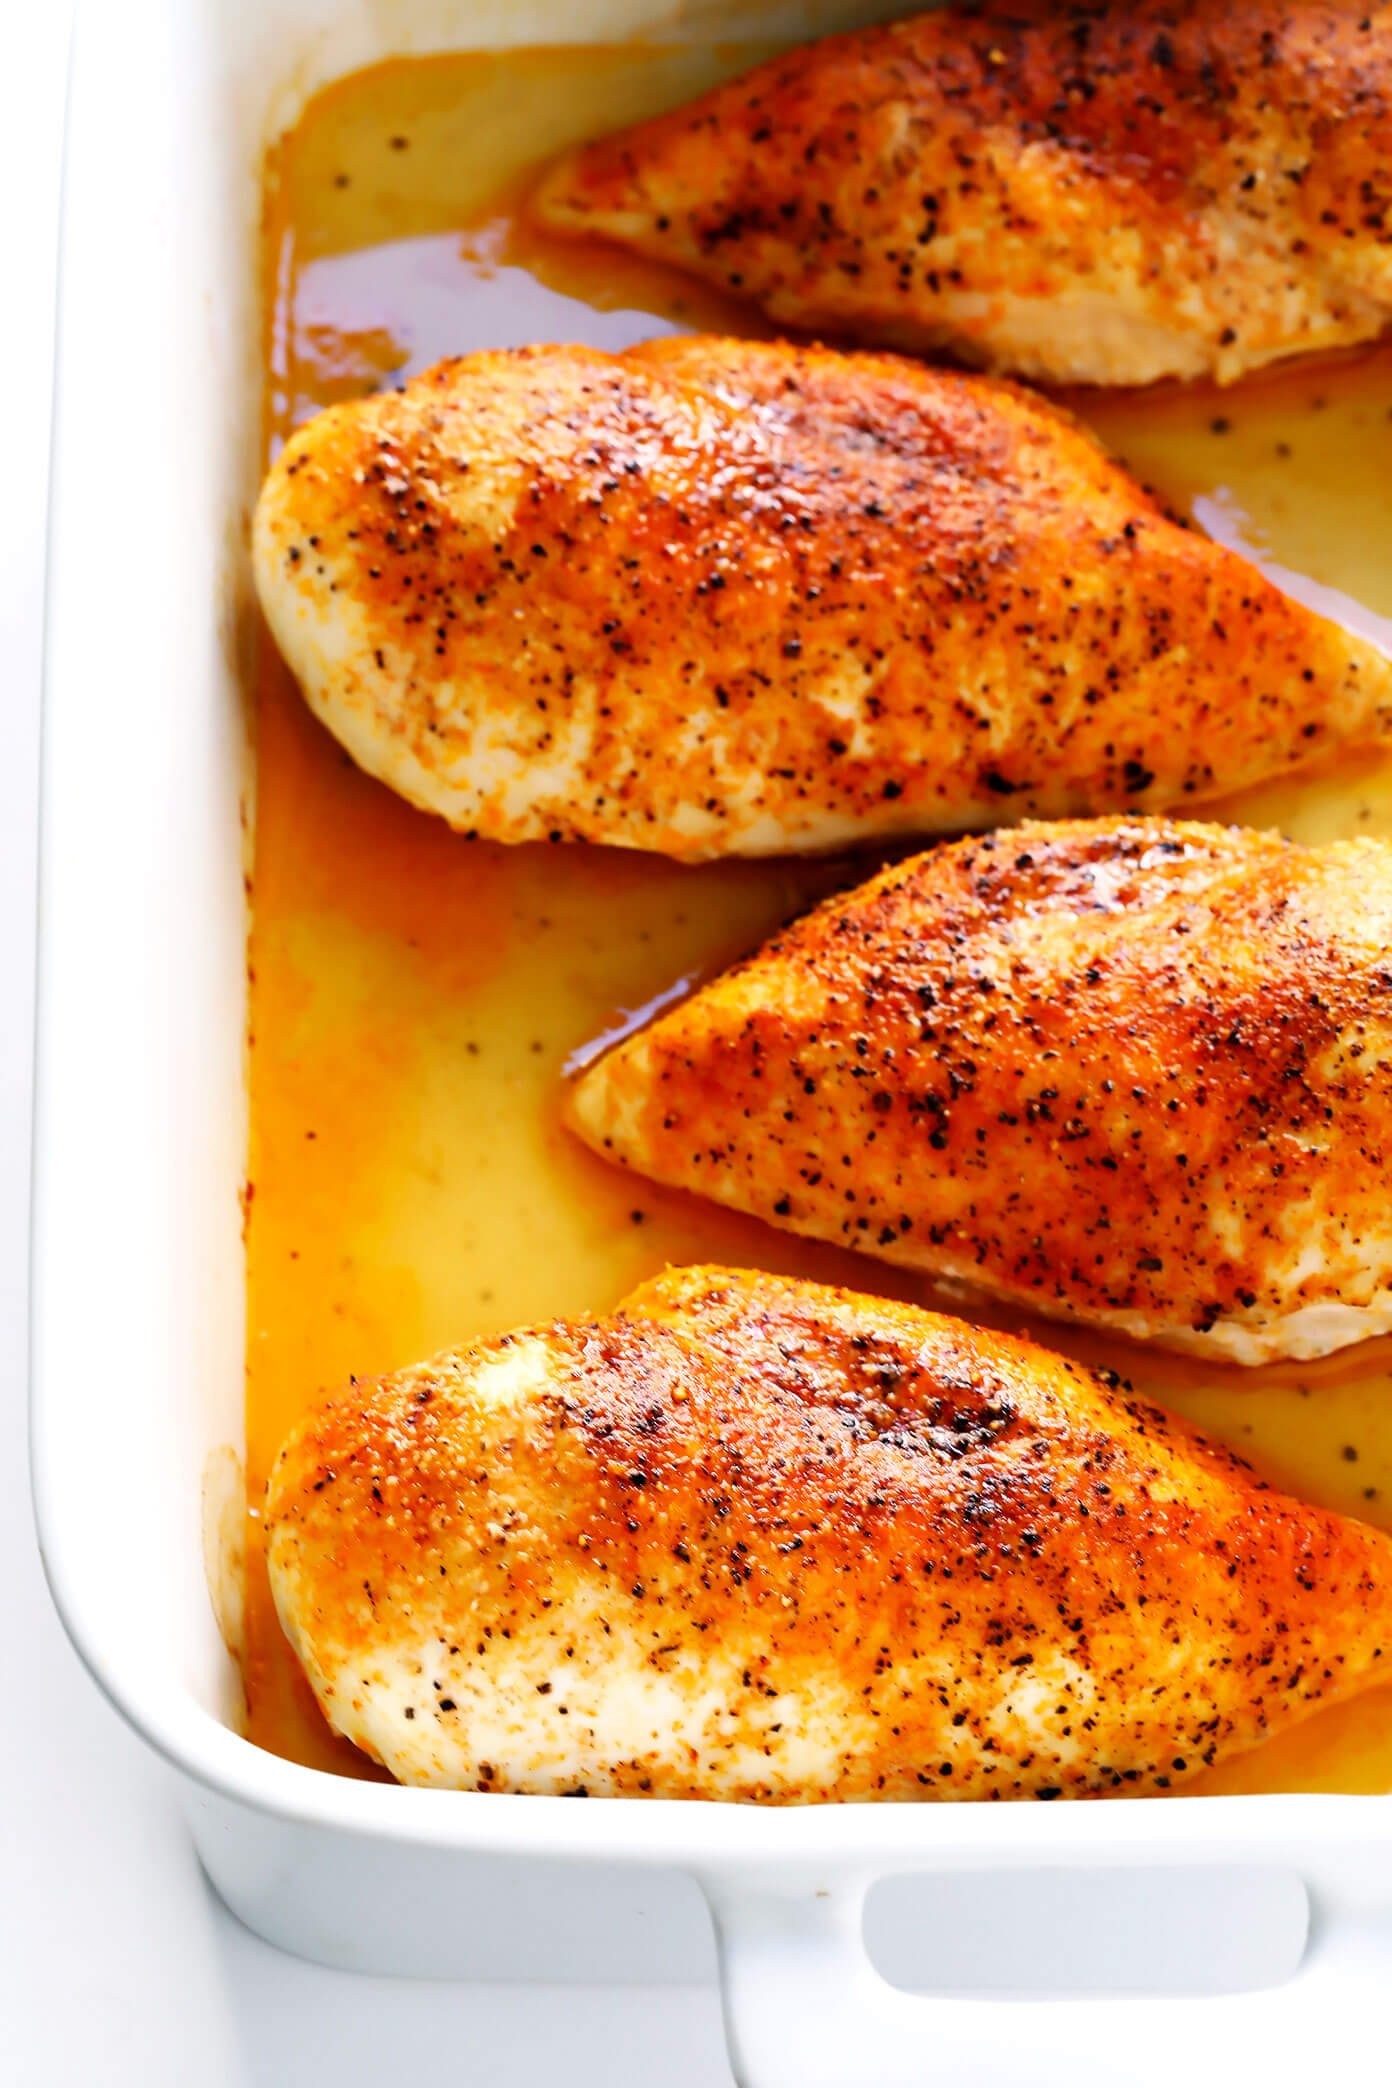
Roast: The roasting step is where many cooks have questions. What’s the best oven temperature and cooking time for chicken breasts? Should you bake chicken low and slow or hot and fast? Extensive testing reveals that roasting chicken breasts at a high temperature yields the best results.
Bake chicken breasts at 450°F (232°C). Depending on the thickness of your chicken breasts, the cooking time will range from 15 to 18 minutes. High-heat roasting quickly creates a flavorful, slightly crispy exterior while locking in the juices, resulting in tender chicken inside.
To ensure perfect doneness, use a cooking thermometer. The FDA recommends an internal temperature of 165°F (74°C) for cooked chicken to be safe. Insert the thermometer into the thickest part of the breast to get an accurate reading. Avoid cutting into the chicken to check for doneness, as this releases valuable juices. An instant-read thermometer is the most effective way to check the temperature quickly and accurately.
-
Rest: Resting is absolutely crucial for juicy baked chicken breasts. Just like with any meat, resting allows the juices to redistribute throughout the chicken, resulting in maximum tenderness and flavor.
Once the chicken is cooked, remove it from the oven and let it rest for 5 to 10 minutes before cutting or serving. Tent a piece of aluminum foil loosely over the baking dish to keep the chicken warm during the resting period. This resting time is essential for achieving the juiciest possible chicken breast.
After resting, your perfectly baked chicken breasts are ready to slice, shred, or serve whole. Enjoy the deliciousness!
Seasoning Variations for Baked Chicken Breast
While the paprika-garlic-pepper seasoning blend is a classic, feel free to explore different flavor profiles. Here are a few seasoning ideas to inspire you:
- Italian Herb: Combine dried oregano, basil, rosemary, thyme, garlic powder, and red pepper flakes for an Italian-inspired chicken breast.
- Lemon Pepper: Lemon zest, black pepper, garlic powder, and a pinch of salt create a bright and zesty flavor.
- Cajun Spice: Cajun seasoning blend, onion powder, and paprika deliver a warm and spicy kick.
- BBQ Rub: Brown sugar, paprika, chili powder, garlic powder, onion powder, and cumin create a sweet and smoky BBQ flavor.
- Herbs de Provence: A blend of lavender, thyme, rosemary, savory, and marjoram offers a sophisticated and aromatic seasoning.
Experiment and find your favorite seasoning combinations to make baked chicken breast that suits any cuisine.
Serving Suggestions for Baked Chicken Breast
Oven-baked chicken breasts are incredibly versatile and can be served in countless ways.
- Main Course: Serve freshly baked chicken breasts as a main course with your favorite side dishes like roasted vegetables, mashed potatoes, salad, or rice.
- Sliced or Diced: Slice or dice baked chicken breast to add to salads, sandwiches, wraps, pasta dishes, tacos, or casseroles.
- Shredded Chicken: Shred baked chicken for soups, stews, enchiladas, chicken salad, or BBQ chicken sandwiches.
Storing and Reheating Baked Chicken Breast
Leftover baked chicken breast is perfect for meal prepping.
- Storage: Store cooked chicken breasts in an airtight container in the refrigerator for up to 3 days. For longer storage, freeze for up to 3 months. It’s recommended to slice, dice, or shred the chicken before freezing for easier use later.
- Reheating: Reheat baked chicken breast in the microwave, oven, or skillet. Add a little moisture (water or broth) when reheating to prevent drying out.
Side Dish Ideas for Baked Chicken Breast
Looking for delicious side dishes to pair with your baked chicken breast? Here are a few suggestions:
- Roasted Asparagus
- Mashed Sweet Potatoes
- Quinoa Salad
- Garlic Green Beans
- Caesar Salad
- Roasted Brussels Sprouts
- Creamy Polenta
Explore More Baked Protein Recipes
Expand your oven-baking skills with these other protein tutorials:
[Links to other baked protein recipes on how.edu.vn – If applicable, add links to related articles here.]
Enjoy mastering the art of baking chicken breast in the oven! With this simple 5-step method, you’ll be creating juicy, tender, and flavorful chicken every time.
### Description

Learn how to bake juicy, tender, delicious baked chicken breasts with this simple 5-step method.

### Ingredients

Scale

- 4 boneless skinless chicken breasts, pounded to even thickness
- 1 tablespoon melted butter or olive oil
- 1 teaspoon kosher salt
- 1/2 teaspoon freshly-ground black pepper
- 1/2 teaspoon garlic powder
- 1/2 teaspoon smoked paprika

### Instructions

1. **Brine the chicken.** (Check the label of your chicken breasts. If they have already been pre-brined in a sodium solution, please skip this step.) Fill a [large mixing bowl](https://amzn.to/3Nxs2ks) with 2 cups of lukewarm water and 1/4 cup kosher salt. Stir to combine until most of the salt is absorbed. Add 2 cups of cold water (or a few ice cubes) to lower the temperature of the water so that it is cool to the touch. Add the chicken breasts and let them sit in the mixture to brine for 15 minutes, or you can also also cover the bowl and refrigerate for up to 6 hours. Remove the chicken breasts from the brine, rinse them with cold water, then pat them dry with paper towels.
2. **Heat the oven.** Preheat oven to 450°F.
3. **Season the chicken.** Place the chicken breasts in a single layer in a [large baking dish](https://amzn.to/3Yb7TG4)*. Brush on both sides (turning once) evenly with the melted butter or olive oil. In a separate small bowl, whisk the salt, pepper, garlic powder and paprika until combined. Sprinkle the seasoning mixture evenly over the chicken on both sides.
4. **Bake.** Bake for 15-18* minutes, or until the chicken is cooked through and no longer pink. Cooking time will depend on the thickness of the chicken breasts, so I recommend using a [cooking thermometer](https://amzn.to/4eNOh1K) to know exactly when the chicken is fully cooked. The thickest part of the breast should measure 165°F. *(If you want the chicken to be a little bit browned and crispier on top, you can turn the broiler on high for the final 3-5 minutes of the cooking time and broil the chicken until it is cooked through and golden on top. Keep a close eye on the chicken, however, so that it does not overcook and/or burn.)*
5. **Rest the chicken.** Once the chicken is cooked, remove the pan from the oven, transfer the chicken to a clean plate, and loosely tent the plate with aluminum foil. Let the chicken rest for at least 5-10 minutes.
6. **Serve.** Serve warm and enjoy!

### Equipment

[9×13″ Baking Dish](https://amzn.to/3Yb7TG4)
[Buy Now →](https://amzn.to/3Yb7TG4)   [](https://amzn.to/3ND46fz)[Instant-Read Thermometer](https://amzn.to/3ND46fz)
[Buy Now →](https://amzn.to/3ND46fz)  [Mixing Bowls](https://amzn.to/4eUHgfB)
[Buy Now →](https://amzn.to/4eUHgfB)

### Notes

**Baking Dish:** Please double-check the maximum temperature of your baking dish for this recipe. Glass dishes (such as Pyrex) usually have a maximum recommended temperature of 425°F, so we do not recommend using a glass dish for this recipe. You can also cook this recipe on a thick metal baking sheet.

**Storage instructions:** Cooked chicken can be stored in a sealed container and refrigerated for up to 3 days or frozen for up to 3 months.