Unwanted calls and messages can be more than just a nuisance; they can be disruptive and even intrusive. Whether it’s spam calls, unwanted texts, or emails from persistent senders, taking control of your communication is essential. Fortunately, Apple provides straightforward tools to help you manage who can contact you on your iPhone or iPad. This guide will walk you through exactly how to block a number on your iPhone or iPad, ensuring a more peaceful and focused mobile experience.
Blocking a Number, Contact, or Email: Multiple Methods
Apple offers several convenient ways to block phone numbers, contacts, and email addresses directly from various apps on your device. This flexibility ensures you can block unwanted communication no matter where it originates.
Blocking a Number from the Phone App
If you’ve recently received a call from a number you wish to block, the Phone app is the quickest route:
-
Open the Phone app on your iPhone or iPad.
-
Tap Recents to view your call history.
-
Locate the number you want to block and tap the Info button (i) next to it.
-
Scroll down to the bottom of the contact details.
-
Tap Block Caller.
Image showing the info button (i) next to a recent call in the Phone app, used to access contact details and block options.
Blocking a Number or Email in FaceTime
Unwanted FaceTime calls? You can block callers directly within the FaceTime app:
- Launch the FaceTime app.
- Find the number, contact, or email address you wish to block in your call history.
- Tap the Info button ! Info button next to the entry.
- Scroll down and tap Block Caller.
Blocking a Contact from Messages
For unwanted SMS or iMessages, blocking through the Messages app is simple:
- Open the Messages app and select the conversation with the contact you want to block.
- Tap the contact’s name or number at the top of the conversation thread.
- Tap Info button.
- Scroll down and tap Block Caller.
Blocking an Email Address from Mail
Tired of unwanted emails? Block senders directly from the Mail app:
- Open the Mail app and find an email from the sender you want to block.
- Tap the sender’s name or email address at the top of the email.
- Tap Block this Contact.
Adding Numbers or Emails Directly to the Blocked List in Settings
For proactive blocking, or to block a number or email not readily available in your recent history, you can manually add them to your blocked contacts list in the Settings app. This method requires you to first add the number or email to your contacts.
- Add the number or email address to your Contacts app if it’s not already there.
- For phone numbers, navigate to Settings > Phone > Blocked Contacts > Add New. For email addresses, go to Settings > Mail > Blocked > Add New.
- Select the contact you wish to block from your contacts list.
What Happens When You Block a Number or Email?
When you block a phone number or contact:
- They can still leave a voicemail, but you will not receive a notification for it.
- Text messages sent from the blocked number will not be delivered to your device.
- The blocked contact will not receive any indication that their calls or messages have been blocked.
When you block an email address in Mail:
- Emails from the blocked address will automatically be moved to your trash folder.
- Email blocking is synced across all your Apple devices logged in with the same Apple ID.
Managing Your Blocked Numbers, Contacts, and Emails List
Keeping track of who you’ve blocked is easy. You can access and manage your blocked lists within the Settings app for each communication method.
Accessing the Blocked Numbers List for Phone
- Go to Settings > Phone.
- Tap Blocked Contacts to view a complete list of blocked phone numbers and contacts.
Accessing the Blocked List for FaceTime
- Navigate to Settings > FaceTime.
- Under the “Calls” section, tap Blocked Contacts.
Accessing the Blocked List for Messages
- Go to Settings > Messages.
- Tap Blocked Contacts to see the list of blocked numbers and contacts for messaging.
Accessing the Blocked List for Mail
- Open Settings > Mail.
- Under the “Threading” section, tap Blocked.
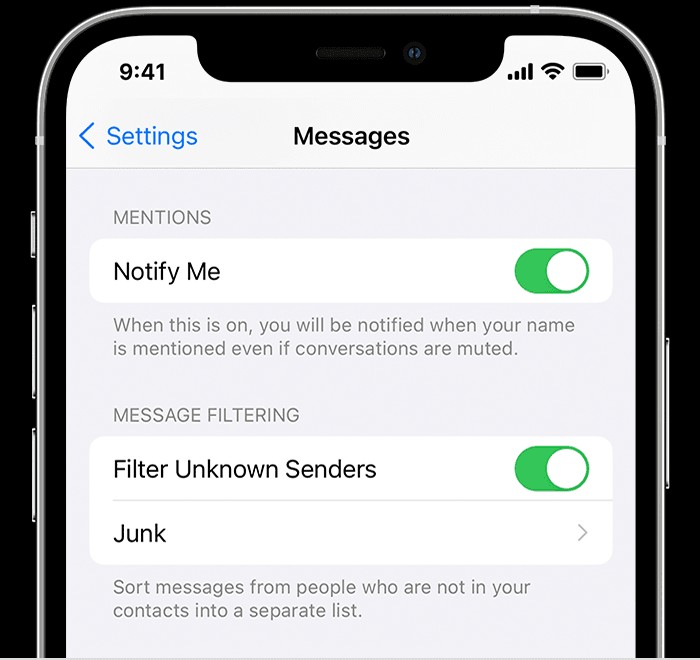
Filtering Messages from Unknown Senders
Beyond blocking specific numbers, you can also filter messages from senders who are not in your contacts. This is a helpful feature to reduce clutter from unsolicited messages.
- Go to Settings > Messages.
- Scroll down and toggle on Filter Unknown Senders.
When “Filter Unknown Senders” is enabled:
- In the Messages app, tap Filters at the bottom left corner.
- Select Unknown Senders to view filtered messages separately.
- You will not receive notifications for messages filtered into the “Unknown Senders” list.
Reporting Spam or Junk Messages
Apple also provides a way to report iMessages that appear to be spam or junk. This helps Apple identify and address spam messaging.
- If you receive an iMessage from a sender not in your contacts, a Report Junk link will appear below the message.
- Tap Report Junk, then tap Delete and Report Junk to confirm.
- This action forwards the sender’s information and the message content to Apple and deletes the message from your device.
Important Note: Reporting junk does not automatically block the sender. If you wish to prevent future messages from the same sender, you must also block their contact information using the methods described earlier. For SMS and MMS spam messages, you should contact your mobile carrier to report them.
By utilizing these comprehensive blocking and filtering tools on your iPhone and iPad, you can effectively manage unwanted communication and maintain a more controlled and peaceful digital environment.