Do you keep receiving annoying calls or messages from unwanted numbers on your iPhone? Whether it’s spam calls, persistent telemarketers, or simply someone you’d rather not hear from, your iPhone offers straightforward ways to block numbers. This comprehensive guide will walk you through various methods to effectively block a number on your iPhone, ensuring a more peaceful and focused mobile experience.
Blocking a phone number on your iPhone is a simple yet powerful way to manage unwanted communication. You can initiate blocking from several apps, including the Phone app, FaceTime, Messages, and even Mail for email addresses associated with unwanted callers. Let’s explore each method in detail.
Blocking a Number Directly from the Phone App
The Phone app is the most direct route to block a number, especially after receiving a recent call. Here’s how to do it:
-
Open the Phone App: Locate and tap the green Phone icon on your iPhone’s home screen.
-
Go to Recents: Tap on the “Recents” tab at the bottom of the screen to view your call history.
-
Find the Number to Block: Scroll through your recent calls and locate the number you wish to block.
-
Tap the Info Button: Next to the number you want to block, you’ll see a small “i” icon inside a circle (the Info button). Tap this button.
iPhone info button next to a phone number in recents, indicating where to tap to access contact details and block options.
-
Scroll Down and Block: On the Contact screen, scroll down to the bottom. You will find the “Block Caller” option in red text. Tap “Block Caller”.
-
Confirm Blocking: A confirmation pop-up will appear asking “Block Contact?”. Tap “Block Contact” to confirm your decision. The number is now blocked.
Blocking a Number from FaceTime
If you’ve received an unwanted FaceTime call, you can block the number or email directly from the FaceTime app:
-
Open the FaceTime App: Find and open the FaceTime app on your iPhone.
-
Find the Number or Contact: Locate the number, contact, or email address you wish to block in your FaceTime call history.
-
Tap the Info Button: Similar to the Phone app, tap the “i” (Info) button next to the number or contact.
The info button in the FaceTime app, allowing users to access contact details and block unwanted callers or email addresses.
-
Scroll Down and Block: Scroll down on the Contact screen until you see “Block Caller” at the bottom. Tap “Block Caller”.
-
Confirm Blocking: Confirm your action by tapping “Block Contact” when the confirmation prompt appears.
Blocking a Number from Messages
Unwanted text messages can be just as disruptive as calls. You can block a number directly from the Messages app:
- Open the Messages App: Open the Messages app and select the message thread from the number you want to block.
- Tap the Contact at the Top: At the top of the conversation, tap on the contact name or number.
- Tap the Info Button: Tap the “i” (Info) button next to the name or number.
- Scroll Down and Block: Scroll down to the bottom of the Details screen and tap “Block Caller”.
- Confirm Blocking: Confirm by tapping “Block Contact” on the pop-up.
Blocking an Email Address from Mail
While this article primarily focuses on phone numbers, you can also block email addresses associated with unwanted communications through the Mail app:
- Open the Mail App: Open the Mail app and find an email from the sender you want to block.
- Tap the Contact at the Top: Tap on the sender’s name or email address at the top of the email.
- Tap “Block this Contact”: In the contact details that appear, tap “Block this Contact”.
- Confirm Blocking: Confirm your action when prompted.
Adding Numbers Directly to Your Blocked Contacts List in Settings
For proactive blocking or to block numbers not in recent history, you can directly add them to your blocked contacts list within the Settings app. Note that you may need to first add the number to your Contacts if it’s not already saved.
-
Go to Settings: Open the Settings app on your iPhone (the grey gear icon).
-
Navigate to Phone Settings: Scroll down and tap “Phone”.
-
Tap Blocked Contacts: In the Phone settings, tap “Blocked Contacts”.
-
Add New Contact: Scroll to the bottom and tap “Add New…”.
-
Select Contact to Block: Your contact list will appear. Select the contact you wish to block. If the number isn’t saved as a contact, you’ll need to add it to your contacts first and then return to these steps.
For email addresses, instead of going to Phone settings, you would navigate to Settings > Mail > Blocked > Add New.
What Happens When You Block a Number?
When you block a phone number or contact on your iPhone, here’s what to expect:
- Phone Calls: Blocked callers can still leave a voicemail, but you will not receive a notification about it.
- Messages (SMS/iMessage): Messages from blocked numbers will not be delivered to your device.
- Notifications: You will not receive any notifications for calls or messages from blocked numbers.
- No Notification to Blocked Contact: The person you blocked will not be notified that their number has been blocked.
- Email (Mail App): When you block an email address, emails from that address will automatically go to your Trash folder. This blocking is consistent across all your Apple devices logged into the same iCloud account.
Managing Your Blocked Numbers, Contacts, and Emails
You can easily review and manage your blocked lists for Phone, FaceTime, Messages, and Mail within the Settings app.
- For Phone: Go to Settings > Phone > Blocked Contacts.
- For FaceTime: Go to Settings > FaceTime > Blocked Contacts (under the “Calls” section).
- For Messages: Go to Settings > Messages > Blocked Contacts (under the “Message Filtering” section).
- For Mail: Go to Settings > Mail > Blocked (under the “Threading” section).
In each of these settings, you can view your blocked list and unblock contacts by swiping left on a contact and tapping “Unblock”.
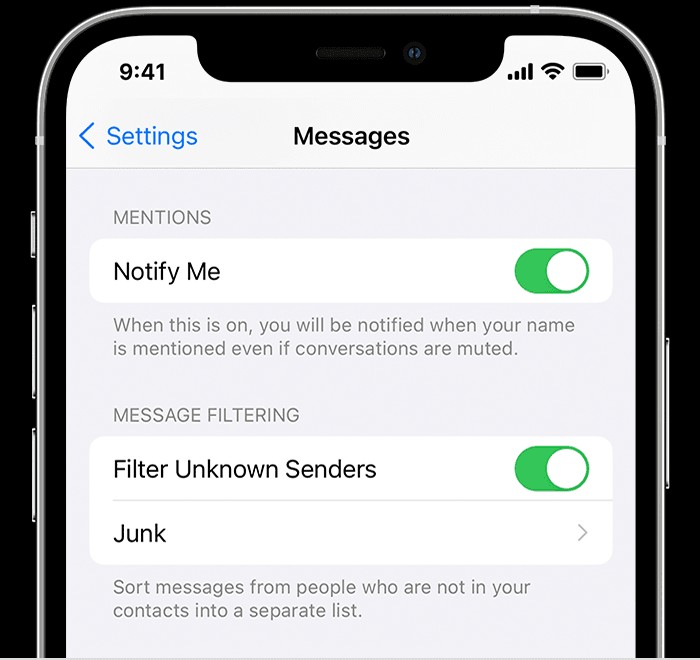
Filtering Messages from Unknown Senders
To further minimize disruptions from unknown numbers, you can filter messages from senders who are not in your contacts. This feature sends messages from unknown senders to a separate “Unknown Senders” tab in the Messages app and you won’t receive notifications for them.
-
Go to Settings > Messages: In the Settings app, tap on “Messages”.
-
Scroll Down and Enable “Filter Unknown Senders”: Scroll down to the “Message Filtering” section and toggle the “Filter Unknown Senders” switch to the green “on” position.
-
Access Filtered Messages: In the Messages app, tap “Filters” in the top left corner, and then tap “Unknown Senders” to view filtered messages.
Reporting Spam or Junk in the Messages App
Apple also provides a way to report iMessages that appear to be spam or junk. This helps Apple identify and combat spam messaging.
-
Identify a Potential Spam Message: If you receive an iMessage from someone not in your contacts, you will see a “Report Junk” link below the message.
-
Tap “Report Junk”: Tap the “Report Junk” link.
-
Confirm and Report: Tap “Delete and Report Junk” in the confirmation prompt. This will forward the sender’s information and the message to Apple and delete the message from your device.
Remember that reporting junk does not automatically block the sender. If you wish to stop receiving messages from that sender entirely, you should also block their contact using the methods described earlier.
By utilizing these methods, you can effectively manage unwanted communication on your iPhone, block numbers, filter unknown senders, and report spam, leading to a more controlled and less intrusive mobile experience.