Encountering issues with your Windows PC can be frustrating. Sometimes, your computer might run slowly, applications crash unexpectedly, or you might even face the dreaded blue screen of death. In many of these situations, booting into Safe Mode can be a crucial first step in diagnosing and resolving the problem. Safe Mode starts Windows in a basic state, using a limited set of files and drivers, which can help you identify whether default settings or basic device drivers are the root cause of your issues.
This guide will walk you through the process of How To Boot Into Safe Mode on Windows, explaining each step in detail and outlining the various Safe Mode options available to you. Whether you’re troubleshooting software conflicts, removing malware, or simply trying to understand why your system is misbehaving, mastering Safe Mode is an essential skill for any Windows user.
Accessing Startup Settings to Enter Safe Mode
To boot into Safe Mode, you’ll first need to access the Startup Settings menu within the Windows Recovery Environment (WinRE). Here’s how to do it:
-
Enter the Windows Recovery Environment (WinRE): The most common way to access WinRE is by restarting your computer from the sign-in screen or the Start Menu.
- If Windows starts normally: Click on the Start button, then the Power button. Hold down the Shift key and click Restart. Keep holding the Shift key until you see the “Choose an option” screen.
- If Windows doesn’t start normally: If your PC repeatedly fails to start, it should automatically boot into WinRE after a couple of failed attempts. If not, you may need to interrupt the normal boot process three times to force WinRE to start. As soon as you see the Windows logo during boot, press and hold the power button to shut down your device. Repeat this process two more times, and on the third startup, Windows should enter WinRE.
-
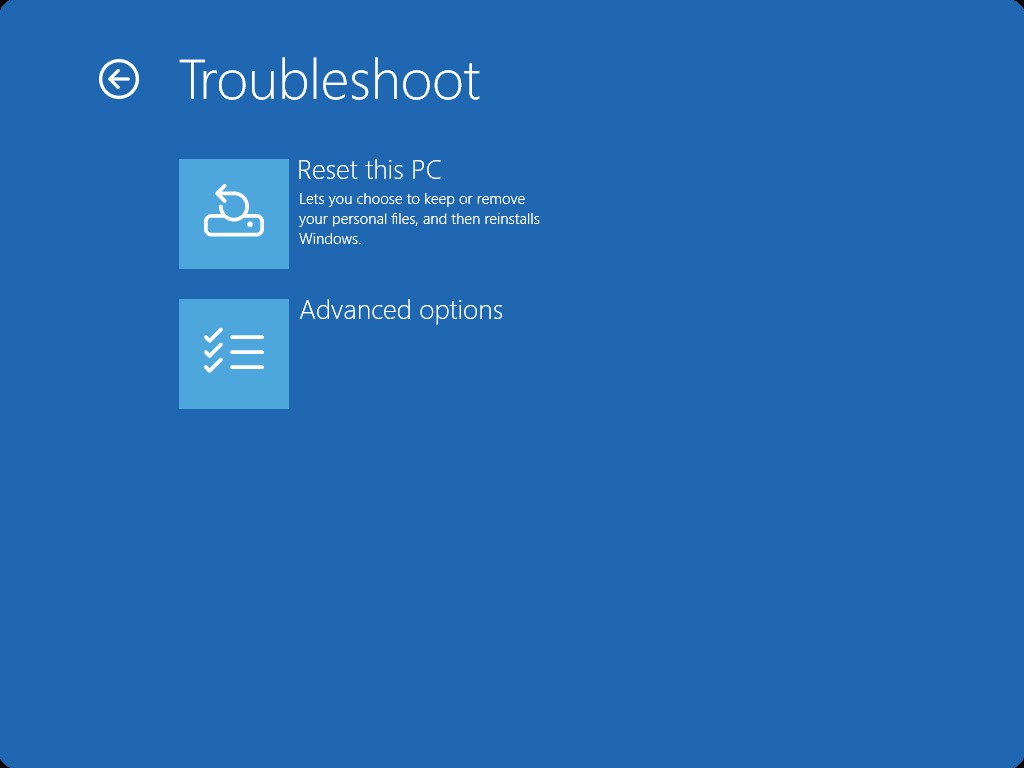
Navigate to Startup Settings: Once you are in the “Choose an option” screen in WinRE, follow these steps:
- Select Troubleshoot.
- Go to Advanced options.
- Choose Startup Settings.
-
Restart to Access Startup Settings Menu: After selecting “Startup Settings”, click on the Restart button. Your computer will reboot and take you to the Startup Settings menu.
Understanding the Startup Settings Options
Once your device restarts, you will be presented with the Startup Settings menu. Here, you can choose from various boot options, including different Safe Mode variations. You can use the number keys (1-9) or function keys (F1-F9) to select an option.
Here’s a breakdown of the available Startup Settings options, with a focus on Safe Mode:
-
Enable Debugging: This option starts Windows in an advanced troubleshooting mode intended for IT professionals and system administrators. It allows for remote debugging of the system. This is generally not needed for typical home users troubleshooting their PCs.
-
Enable Boot Logging: Selecting this option creates a file named
ntbtlog.txtin your Windows directory. This file lists all the drivers that were installed during the startup process. It can be incredibly helpful for advanced troubleshooting, allowing you to pinpoint drivers that might be causing boot issues. -
Enable low-resolution video: This mode starts Windows using your current video driver but with a low resolution (640×480) and refresh rate. This is useful if you are experiencing display issues after changing your display settings. Booting in low resolution allows you to reset your display configurations to a working state.
-
Enable Safe Mode: This is the most common and essential option for troubleshooting. Safe Mode starts Windows with a minimal set of drivers and services. If your computer runs correctly in Safe Mode, it indicates that the problem is likely caused by third-party software, drivers, or settings. Safe Mode is invaluable for diagnosing and resolving a wide range of Windows issues.
-
Safe Mode with Networking: This option is an extension of Safe Mode, adding network drivers and services. If you need to access the internet or your local network while in Safe Mode – for example, to download updated drivers or run online diagnostics – choose Safe Mode with Networking.
-
Safe Mode with Command Prompt: Instead of the usual graphical Windows interface, this option starts Windows in Safe Mode with only a Command Prompt window. This mode is useful for advanced users and IT professionals who need to perform command-line based troubleshooting or system recovery operations.
-
Disable Driver Signature Enforcement: Windows normally requires drivers to have a digital signature to ensure their integrity and compatibility. This option temporarily disables this requirement, allowing the installation of drivers that may not be properly signed. This should be used with caution and primarily for testing purposes.
-
Disable early launch anti-malware protection: Early Launch Anti-Malware (ELAM) is a security feature that starts anti-malware software before other third-party components during boot-up. This ensures that the system is protected from malicious boot drivers. Selecting this option temporarily disables ELAM, which might be necessary in specific troubleshooting scenarios, but generally, it’s recommended to keep ELAM enabled for security.
-
Disable automatic restart on system failure: By default, Windows automatically restarts if it encounters a system failure (like a Blue Screen of Death). Selecting this option prevents automatic restarts. This is helpful if you need to see error messages or gather information during a system crash, as it stops the system from automatically rebooting and potentially hiding crucial error details.
After you’ve selected your desired option, Windows will start in the chosen mode. If you are troubleshooting, Option 4: Enable Safe Mode is usually the best starting point.
Exiting Safe Mode: Returning to Normal Boot
Usually, simply restarting your computer will boot it back into normal mode. However, if your system persistently boots into Safe Mode, you may need to manually disable Safe Boot in System Configuration. Here’s how:
- Open System Configuration: Press the Windows key + R to open the Run dialog box.
- Type
msconfigand press Enter or click OK. This will open the System Configuration utility. - Go to the Boot tab.
- Uncheck “Safe boot” under Boot options.
- Click Apply and then OK.
- Restart your computer when prompted.
By following these steps, you should be able to exit Safe Mode and boot your Windows PC normally.
Conclusion
Booting into Safe Mode is a powerful diagnostic tool for anyone using Windows. By understanding how to access Startup Settings and the different Safe Mode options available, you can effectively troubleshoot a wide range of computer problems. Whether you suspect a driver issue, software conflict, or malware infection, Safe Mode provides a clean environment to diagnose and resolve these issues, helping you keep your system running smoothly and efficiently.