Braiding garlic is not only a charming way to store your harvest, but it’s also a practical method that allows for long-term preservation and easy access throughout the year. If you’ve successfully grown softneck garlic and are looking for an attractive storage solution, learning How To Braid garlic is a rewarding skill. This guide will walk you through the process, ensuring your garlic braids are both durable and visually appealing.
Before we dive into the braiding process, let’s ensure you’ve taken the necessary steps after harvesting your garlic. Proper curing is crucial. After harvesting around July, your garlic bulbs need to be cured for about 3-5 weeks in a cool, dark, and well-ventilated place. Curing is essential for long-term storage and braidability. Avoid trimming the roots before curing, as they aid in the drying process. Once cured, the roots will be shriveled and dry, and the papery wrappers around the bulbs will be crisp – perfect for braiding!
Choosing the Right Garlic for Braiding
Softneck garlic varieties are ideal for braiding due to their pliable necks and excellent storage capabilities. Compared to hardneck garlic, softnecks have softer stems, making them much easier to manipulate into a braid. Varieties like Silverskin garlic are particularly well-suited for braiding. Nootka Rose is a popular Silverskin choice known for its beautiful appearance and flexible stems. If your softneck garlic produces scapes (similar to hardneck varieties), remove these before braiding as they will be too stiff. Store these separately.
Preparing Your Garlic for Braiding
Before you start braiding, preparation is key. Begin by sorting through your cured garlic. Select the largest and healthiest bulbs for planting next season. For an average-sized garden, reserving about 30 large softneck bulbs and 15-20 hardneck bulbs is a good starting point. You can always take more from your braids if needed. Use a marker to label bulbs intended for planting to avoid confusion.
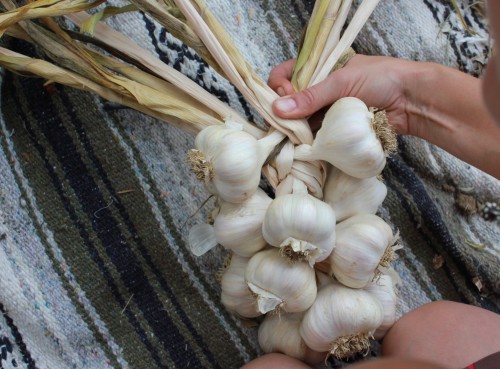
Next, clean the garlic bulbs. Trim the roots close to the bulb using scissors. Gently brush off any dirt with a soft brush. To create a cleaner look and more workable stems, carefully remove the outermost layer or two of papery wrappers. Be cautious not to remove too many layers, as these wrappers protect the bulb and contribute to long-term storage.
To make the stems more pliable and easier to braid, dampen them. Wrap the stems of a few garlic bulbs in a wet towel for a short period while you clean the rest. Alternatively, you can lightly dampen all the stems. Soaking the stems makes them less likely to break during braiding, especially if they’ve become very dry during curing.
Arrange your cleaned and dampened garlic bulbs in order of size, from largest to smallest. You’ll start the braid with the larger bulbs at the base and work your way up to smaller ones. A braid typically uses 13, 16, or 19 bulbs, but you can adjust this based on your preference and bulb size.
Step-by-Step Garlic Braiding Guide
Materials You’ll Need:
- Cured and prepared softneck garlic bulbs
- Twine or string
- Scissors
- Damp towel (optional)
Starting the Braid: The Starting Knot
- Position the first three bulbs: Lay three of the largest garlic bulbs in front of you, positioning them from right to left (or 1, 2, 3).
-
Create the knot: Take the stem of the bulb on the right (bulb 1) and bring it over the stems of the center bulb (bulb 2) and the left bulb (bulb 3). Then, tuck it under itself, and finally bring it back over the stems of bulbs 2 and 3. This creates a simple knot around the base of the stems.
-
Tighten the base: Gently pull bulbs 2 and 3 upwards to tighten the knot and create a secure base for your braid.
-
Add the fourth bulb: Place a fourth bulb in the center, adding its stem to the existing center stems. This bulb, and all subsequent bulbs, will be added to the center.
Continuing the Braid
-
Braiding pattern: After the starting knot and the addition of the fourth bulb, continue adding new bulbs in a “right, left, center” pattern. This means you add a bulb to the right side, then to the left side, then to the center, repeating this sequence.
-
Braiding the stems: As you add each bulb, braid the stems together just as you would braid hair. The key is to always take the outermost (furthest back) stem or group of stems and cross it over the center stems. Alternate braiding from the left and then from the right as you add bulbs in the “right, left, center” sequence.
-
Maintain tightness: Keep the braid snug as you work, pulling gently but firmly on the stems to ensure a tight and durable braid.
-
Repeat: Continue adding bulbs and braiding the stems until you have used all your garlic or reached your desired braid length.
Finishing and Securing Your Garlic Braid
-
Braid the remaining stems: Once you’ve added the last bulb (which should be a center bulb to finish the pattern), continue braiding just the stems for a few more inches.
-
Tie off the braid: Use a length of twine to tie a tight knot around the end of the braided stems to secure them.
-
Create a hanging loop: Fold the remaining stem ends back on themselves, about an inch or two above your first knot. Tie another tight knot with the twine around the folded stems, behind the braid. Double knot this for extra security. Create a loop with the end of the twine for hanging by making a simple knot.
-
Trim excess: Trim any excess twine and stem ends for a cleaner finish.
Storing and Using Your Garlic Braid
When properly cured and braided, garlic braids can last for up to a year if stored in a cool, dark, and dry room. To use a bulb, simply twist it gently to detach it from the braid, starting from the top bulbs first.
Braiding garlic is a satisfying way to preserve your harvest, creating beautiful and functional decorations for your kitchen. These braids also make wonderful, unique gifts for friends and family. Give it a try and enjoy the beauty and practicality of your own homemade garlic braids!
[