Managing subscriptions on your iPhone is essential to avoid unwanted charges and keep track of your spending. Whether it’s a streaming service, a gaming app, or a productivity tool, subscriptions can add up quickly. This guide provides clear, step-by-step instructions on how to cancel subscriptions on your iPhone, ensuring you stay in control of your Apple subscriptions.
Canceling Subscriptions Directly on Your iPhone, iPad, or Apple Vision Pro
The most straightforward way to cancel subscriptions is directly through your iPhone settings. Here’s how:
-
Open the Settings App: Locate and tap the Settings app icon on your iPhone home screen.
-
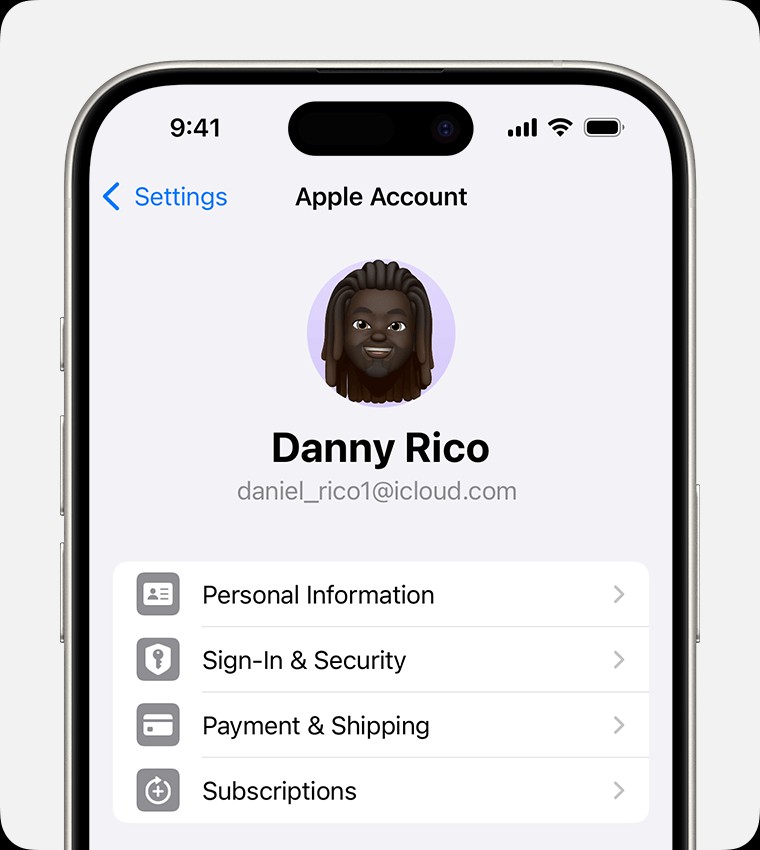
Tap Your Name: At the top of the Settings menu, tap on your name to access your Apple ID account settings.
-
Navigate to Subscriptions: Tap on the “Subscriptions” option. This will take you to a list of all your active and expired subscriptions linked to your Apple ID.
-
Select the Subscription to Cancel: Find the specific subscription you wish to cancel from the list and tap on it.
-
Confirm Cancellation: Tap the “Cancel Subscription” button. You might need to scroll down to see this option. If you don’t see a “Cancel Subscription” button or you see an expiration message in red text, it means the subscription is already canceled and set to expire.
How to Cancel Subscriptions on the Web
You can also manage and cancel your Apple subscriptions through a web browser. This is useful if you are not near your iPhone or prefer managing subscriptions on a larger screen.
-
Go to Apple Account Website: Open your web browser and navigate to account.apple.com.
-
Sign in and Follow Instructions: Log in with your Apple ID and password. Once logged in, follow the on-screen instructions to find and cancel your subscriptions. The website interface is designed to be user-friendly and will guide you through the process.
Canceling Subscriptions on Your Mac
If you are working on your Mac, you can easily cancel subscriptions through the App Store application.
-
Open the App Store App: Launch the App Store application on your Mac.
-
Click Your Name or Sign In: In the bottom-left corner of the App Store window, click your name. If you’re not signed in, click “Sign In” and enter your Apple ID credentials.
-
Go to Account Settings: Click on “Account Settings.” This will open your account information page within the App Store.
-
Manage Subscriptions: Scroll down to the “Subscriptions” section and click “Manage.”
-
Select the Subscription: Find the subscription you want to cancel from the list.
-
Cancel Subscription: Click “Cancel Subscription.” As with the iPhone, if you don’t see the cancel button or see an expiration message, the subscription is already canceled.
Canceling Subscriptions on a Windows PC
You can manage Apple subscriptions on a Windows PC through the Apple Music app, the Apple TV app, or iTunes if you have an older version.
Using Apple Music or Apple TV App for Windows
-
Open Apple Music or Apple TV App: Ensure you have the Apple Music app or Apple TV app installed on your Windows PC. If not, you can learn how to get Apple’s apps for Windows.
-
View My Account: Click your name at the bottom of the sidebar in either app, then select “View My Account.” You might need to sign in with your Apple ID.
-
Manage Subscriptions in Settings: Scroll down to the “Settings” section. Next to “Subscriptions,” click “Manage.”
-
Edit and Cancel: Locate the subscription you wish to cancel and click “Edit.”
-
Confirm Cancellation: Click “Cancel Subscription.” If you don’t see the cancel options, the subscription is already canceled.
Using iTunes for Windows (Older Versions)
-
Open iTunes: Launch iTunes on your Windows PC.
-
View My Account: From the menu bar at the top of iTunes, go to “Account” and then “View My Account.”
-
Manage Subscriptions: Scroll to the “Settings” section and click “Manage” next to “Subscriptions.”
-
Edit and Cancel: Find the subscription and click “Edit,” then “Cancel Subscription” to confirm.
Managing Subscriptions on Your Android Device
Even if you are using an Android device, you can still manage your Apple subscriptions.
-
Go to Apple Account Website: Open a web browser on your Android device and go to account.apple.com.
-
Sign In and Manage: Log in with your Apple ID and follow the on-screen prompts to manage and cancel your subscriptions.
Troubleshooting: Can’t Find the Subscription You Want to Cancel?
If you are having trouble locating the subscription you wish to cancel, here are a few things to check:
-
Check iCloud+ Separately: iCloud+ subscriptions might need to be canceled in your iCloud storage settings directly.
-
Find Your Apple Receipt: Search your email inbox for “receipt from Apple” or “invoice from Apple.”
-
Identify the Apple Account: The receipt will show which Apple ID was used for the subscription. Ensure you are logged in with the correct Apple ID when trying to cancel.
-
Family Sharing: If the receipt shows a family member’s Apple ID, they need to cancel the subscription from their account. You cannot cancel subscriptions for family members.
-
Different Apple Account: You might have used a different Apple ID for the subscription. Sign in with any other Apple IDs you may have and check their subscription lists.
-
Third-Party Subscriptions: If you cannot find a receipt from Apple, the subscription might be billed through a different company. Check your bank or credit card statements to identify the billing company and contact them directly to cancel.
Important Points About Canceling Subscriptions
- Cancel Before Trial Ends: If you signed up for a free or discounted trial and don’t want to continue, cancel at least 24 hours before the trial period ends to avoid being charged.
- Regional Differences: Subscription cancellation processes can vary slightly in some countries and regions. Refer to Apple support for specific details if needed.
By following these steps, you can confidently cancel subscriptions on your iPhone and other devices, ensuring you are only paying for the services you actively use. Managing your subscriptions regularly helps in better financial planning and avoiding unnecessary expenses.