Margins in Google Docs define the blank space around the edges of your page, playing a crucial role in document formatting and readability. Whether you’re aiming for a specific layout for academic papers, professional reports, or creative writing, customizing margins is essential. Google Docs offers straightforward methods to adjust these margins to your exact needs. This guide will walk you through two primary methods: using the Page Setup dialog and utilizing the ruler.
Method 1: Adjusting Margins Using Page Setup
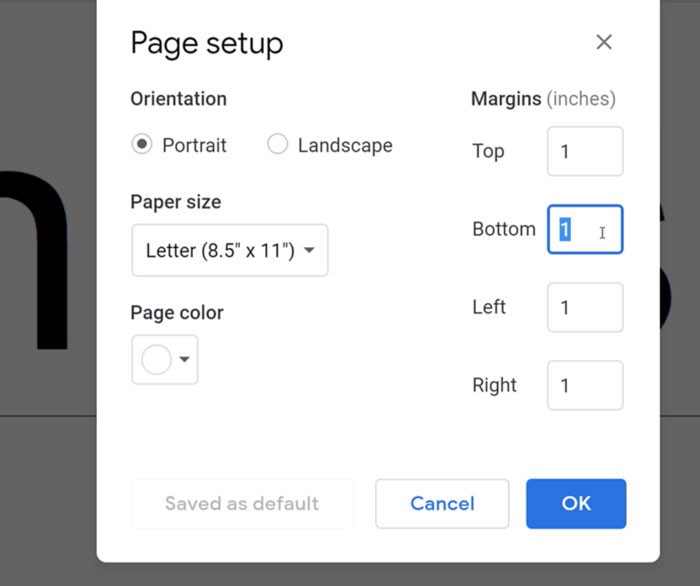
The Page Setup dialog box provides a precise way to define your document’s margins. This method is ideal when you need specific measurements or want to set default margins for all future documents.
-
Access Page Setup: Begin by navigating to the File menu at the top left of your Google Docs window. From the dropdown menu, select Page Setup.
-
Enter Margin Measurements: In the Page Setup dialog box, you’ll see fields for Top, Bottom, Left, and Right margins. Google Docs defaults to inches, but you can type in measurements in other units if needed. Simply click into each box and type your desired margin size. For instance, to set one-inch margins all around, ensure each field reads “1”.
-
Apply Changes: Once you’ve entered your desired measurements, click the OK button at the bottom of the dialog box to apply these changes to your document.
-
Set as Default Margins (Optional): If you want to use these margin settings for all new Google Docs documents you create, click the Set as default button before clicking OK. This can save time and ensure consistency across your documents. Note that this will only affect new documents created after setting the default; existing documents will retain their original margin settings.
Method 2: Adjusting Margins with the Ruler
For a more visual and intuitive approach, Google Docs allows you to adjust margins directly using the ruler. This method offers flexibility and immediate visual feedback as you adjust.
-
Show the Ruler: If the ruler is not visible at the top and left of your document, you need to enable it. Click on the View menu in the toolbar and select Show ruler. This will display the horizontal and vertical rulers.
-
Locate Margin Boundaries on the Ruler: On the horizontal ruler at the top, you’ll notice gray areas at both the left and right ends. These gray areas represent the current left and right margins of your document.
-
Adjust Margins by Dragging: Hover your cursor over the boundary where the white and gray areas meet on either end of the ruler. Your cursor will transform into a double-sided arrow. Click and drag this arrow horizontally to increase or decrease the margin size. Dragging inwards reduces the margin, while dragging outwards increases it.
-
Observe Changes in Real-Time: As you drag the margin markers on the ruler, you’ll see the text in your document reflow in real-time, giving you immediate visual feedback on the new margin settings. This allows for quick and easy adjustments until you achieve the desired look.
Important Considerations
- Document-Wide Margins: Keep in mind that margin adjustments in Google Docs apply to the entire document. Currently, Google Docs does not support different margins for individual pages within the same document.
- Visual vs. Precise Adjustments: The ruler method is excellent for quick, visual adjustments, while the Page Setup dialog is preferable when you need to set margins to specific, measured values.
- Experiment and Customize: Feel free to experiment with both methods to find what works best for your workflow. Customizing margins effectively enhances the presentation and readability of your Google Docs documents, making them suitable for various purposes.
By mastering these techniques, you can effectively control the margins in your Google Docs, ensuring your documents are perfectly formatted for any situation.