Your Apple Watch is more than just a timepiece; it’s a personal expression right on your wrist. One of the best ways to make it truly yours is by customizing the watch face. Whether you want to showcase your style, prioritize essential information at a glance, or simply keep things fresh, changing your Apple Watch face is incredibly easy and versatile. This guide will walk you through everything you need to know about how to change watch faces on your Apple Watch, ensuring you get the most out of this fantastic feature.
Adding a New Watch Face to Your Collection
Think of your Apple Watch faces as a wardrobe for your wrist. You can curate a diverse collection to suit different occasions, moods, or needs. Here’s how to expand your collection with new designs:
-
On Your Apple Watch: If you have your Apple Watch handy, you can directly add new faces. Start by pressing and holding firmly on your current watch face. This will bring up the watch face gallery.
-
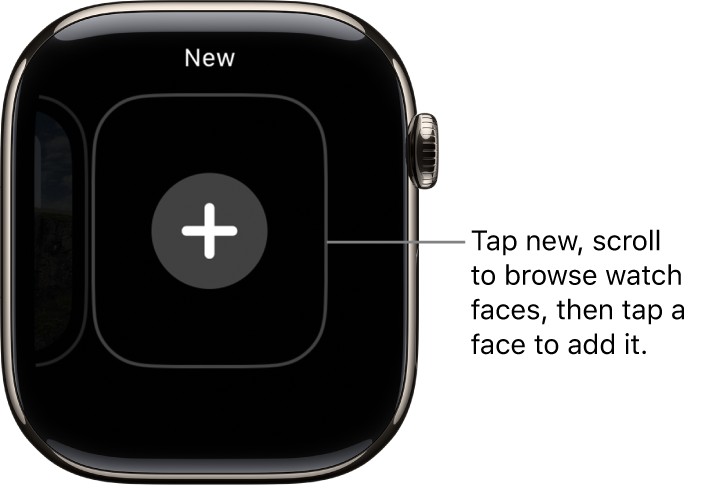
Swipe to the ‘+’ Button: Once in the gallery view, swipe leftward all the way to the end until you reach the ‘+’ button. Tap on this button to add a new face.
-
Browse and Select: Use the Digital Crown to scroll through the available watch face options. You can explore various styles, from minimalist to information-rich designs. To quickly navigate, tap on categories like “New Watch Faces” or “Artists” to filter your choices.
-
Add Your Choice: Once you find a watch face you love, simply tap the “Add” button beneath it. The new face will be added to your collection, ready for customization.
Alt text: Apple Watch interface showing how to add a new watch face by tapping the plus icon.
-
Using the Face Gallery on Your iPhone: For a more visual and expansive browsing experience, the Face Gallery in the Apple Watch app on your iPhone is your go-to resource. Open the Apple Watch app and tap on “Face Gallery” at the bottom.
-
Explore and Customize: Here, you can see all available watch faces beautifully laid out. Tap on any face to see customization options. You can adjust colors, styles, and importantly, add complications, which we’ll discuss later.
-
Add from iPhone: After customizing a face in the Face Gallery, tap “Add” to include it in your Apple Watch collection. It will instantly sync to your watch.
Switching Between Different Watch Faces
Having a collection of watch faces is great, but the real fun is switching between them effortlessly. Here are the simple ways to change your active watch face:
-
Swipe to Switch: The quickest method is to swipe directly on your watch face. If you haven’t enabled this feature yet, you can do so by opening the Settings app on your Apple Watch, tapping “Clock,” and toggling on “Swipe to Switch Watch Face.” Once enabled, simply swipe left or right across your current watch face to cycle through your collection.
-
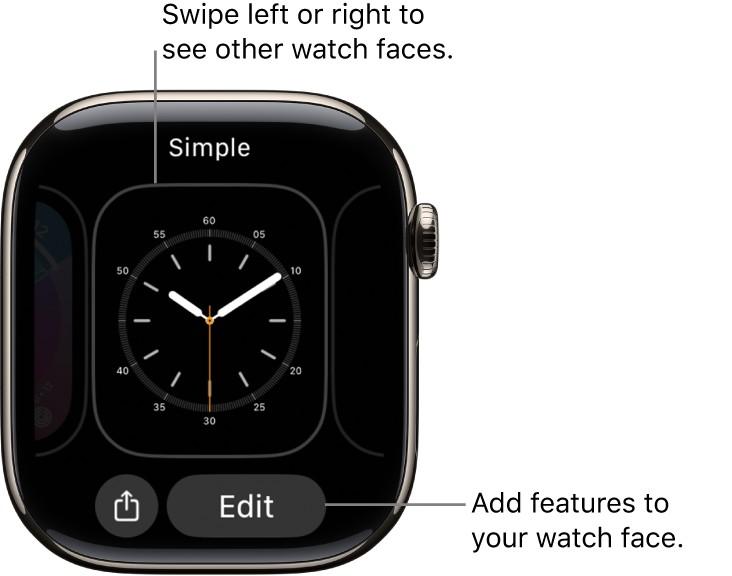
Touch and Hold Method: Another intuitive way is to touch and hold firmly on your current watch face. This will again bring up the watch face gallery view. Then, swipe left or right to browse your collection. When you find the face you want to use, just tap on it to set it as your active watch face.
Alt text: Apple Watch screen demonstrating how to switch watch faces by swiping left or right after a long press.
Adding and Customizing Complications on Your Watch Face
Complications are small, glanceable pieces of information that you can add to many Apple Watch faces. They display data from apps, providing quick access to the information that matters most to you.
-
Enter Edit Mode: To add or customize complications, start by pressing and holding on your current watch face to enter the edit mode. Then, tap “Edit” below the watch face.
-
Swipe to Complications Screen: Swipe left all the way to the end of the customization options. If the watch face supports complications, you’ll see them highlighted on the last screen.
-
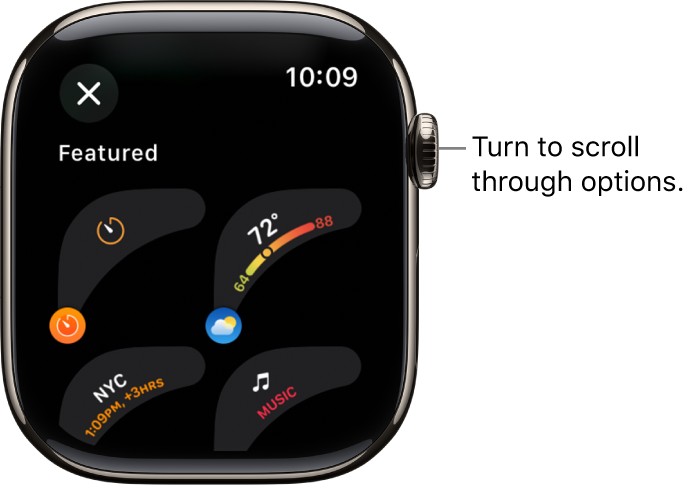
Select and Customize: Tap on a complication area you want to change. Then, use the Digital Crown to scroll through the list of available complications. These can include Activity rings, Weather details, Calendar events, Heart Rate, and much more.
-
Choose Your Complications: Select the complication you want for each available slot. You can choose different complications for various positions on the watch face, tailoring the information to your needs.
-
Save Changes: Once you’ve finished adding and customizing your complications, press the Digital Crown to save your changes. Then, tap the watch face itself to exit edit mode and start using your newly customized face.
Alt text: Apple Watch customization interface for complications, showing how to use the Digital Crown to select different options.
Many apps from the App Store offer their own complications, extending the possibilities for personalization even further.
Popular Complication Options
Here’s a glimpse at some of the apps that offer a variety of complications to enhance your Apple Watch face:
| App | Available Complications |
|---|---|
| Activity | Rings, Timeline |
| Astronomy | Earth, Moon, Solar, Solar System |
| Calendar | Today’s Date, Your Schedule |
| Compass | Compass, Elevation, Level |
| Compass Waypoints | Last Viewed Waypoint, Saved Waypoints, Parked Car Waypoint |
| Depth | Depth, Water Temperature |
| Home | Home, Grid Forecast |
| Maps | Maps, Get Directions |
| Mindfulness | Mindfulness, State of Mind |
| Reminders | Due Today, Reminders |
| Sleep | Data, Data and Schedule, Sleep |
| Stocks | Added Stocks, Last Viewed Stocks |
| Time | Analog Seconds, Analog Time, Digital Seconds, Digital Time |
| Tides | Swell, Tides |
| Timer | Added Timers, Timer |
| Weather | Air Quality, Conditions, Humidity, Rain, Temperature, UV Index, Wind |
| World Clock | Sunrise/Sunset, Added Locations |
Managing Your Watch Face Collection
Keeping your watch face collection organized makes switching faces even smoother. Here’s how to manage your collection:
-
View Collection on iPhone: Open the Apple Watch app on your iPhone. Tap “My Watch” at the bottom. Your watch face collection is displayed under “My Faces.” Swipe through to view them all.
-
Reorder on iPhone: To rearrange the order, tap “Edit” in the “My Faces” section. Then, use the icon next to a watch face to drag and reposition it in your preferred order.
-
Reorder on Apple Watch: You can also reorder directly on your Apple Watch. Touch and hold on the current watch face to enter gallery view. Then, touch and hold again on a watch face in the gallery until it’s selected. Drag it left or right to its new position.
Deleting a Watch Face from Your Collection
If your collection gets too cluttered, or you simply want to remove a face you no longer use, deleting is straightforward:
-
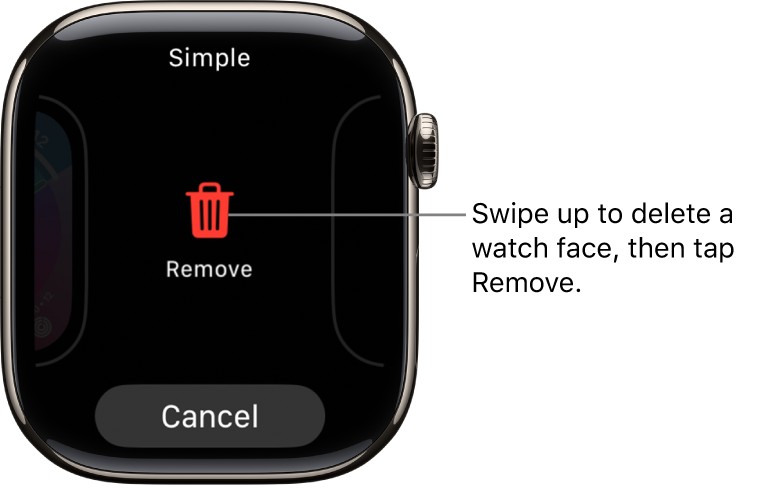
Delete on Apple Watch: From the current watch face, touch and hold to enter gallery view. Swipe to the watch face you wish to remove. Swipe up on the face, and a “Remove” button will appear. Tap “Remove” to delete it.
-
Delete on iPhone: In the Apple Watch app on your iPhone, go to “My Watch” and tap “Edit” in the “My Faces” area. Tap the red delete icon next to the watch faces you want to remove, then tap “Remove” to confirm.
Alt text: Apple Watch interface illustrating how to delete a watch face by swiping up and selecting remove.
You can always re-add any default watch face from the Face Gallery later if you change your mind.
Customizing your Apple Watch face is a key part of personalizing your Apple experience. With a wide array of faces and complications available, you can tailor your watch to perfectly match your day-to-day needs and style. Explore, experiment, and enjoy making your Apple Watch uniquely yours!