AirPods are a fantastic piece of technology for enjoying music, podcasts, and calls on the go. However, daily use means they can easily accumulate earwax, dirt, and grime. Regular cleaning is essential not only for hygiene but also to maintain optimal audio quality and prolong the lifespan of your valuable earbuds. This guide will walk you through the best and safest methods for how to clean your AirPods, keeping them in top condition.
What You’ll Need to Clean Your AirPods
Before you begin, gather these simple supplies. Having everything ready will make the cleaning process smooth and efficient. For cleaning the meshes of your AirPods, especially AirPods 3 and AirPods 4, you will need:
-
For a Deep Clean (Optional but Recommended):
- Micellar water (look for PEG-6 Caprylic/Capric Glycerides in the ingredients, brands like Bioderma or Neutrogena are suitable)
- Distilled water
- A soft-bristled children’s toothbrush
- Two small cups
- Paper towels
-
For General Cleaning:
- Soft, dry, lint-free cloth (microfiber cloths are ideal)
- Cotton swabs or buds
- Isopropyl alcohol (optional, for charging case disinfection)
- Soft-bristled brush (like a clean, dry toothbrush)
Step-by-Step Guide: How to Clean Your AirPods and AirPods Case
Cleaning your AirPods involves a few simple steps for both the earbuds themselves and their charging case. Follow these instructions to ensure a thorough and safe clean.
Cleaning the Meshes on AirPods (Specifically AirPods 3 & 4)
If you notice buildup in the speaker meshes of your AirPods, particularly AirPods 3 and AirPods 4, this method is highly effective.
-
Prepare Micellar Water: Pour a small amount of micellar water into one of your cups.
-
Saturate Toothbrush: Dip the soft-bristled toothbrush into the cup of micellar water, ensuring the bristles are fully wet.
-
Brush the Mesh: Hold your AirPod with the mesh facing upwards. Gently brush the mesh in small circular motions for about 15 seconds.
-
Blot Excess: Turn the AirPod over and lightly blot the mesh on a paper towel to absorb loosened debris and excess moisture.
-
Repeat Cleaning: Repeat steps 2-5 two more times (for a total of three cleaning cycles) for each mesh area you are cleaning. This ensures thorough removal of dirt.
-
Rinse with Distilled Water: To remove any micellar water residue, rinse the toothbrush with distilled water. Then, repeat steps 1-5 using distilled water instead of micellar water for each mesh you cleaned. This step is crucial to prevent any potential irritation from the micellar water.
-
Dry Thoroughly: Allow your AirPods to air dry completely for at least two hours before placing them back in the charging case or using them. This is important to prevent water damage.
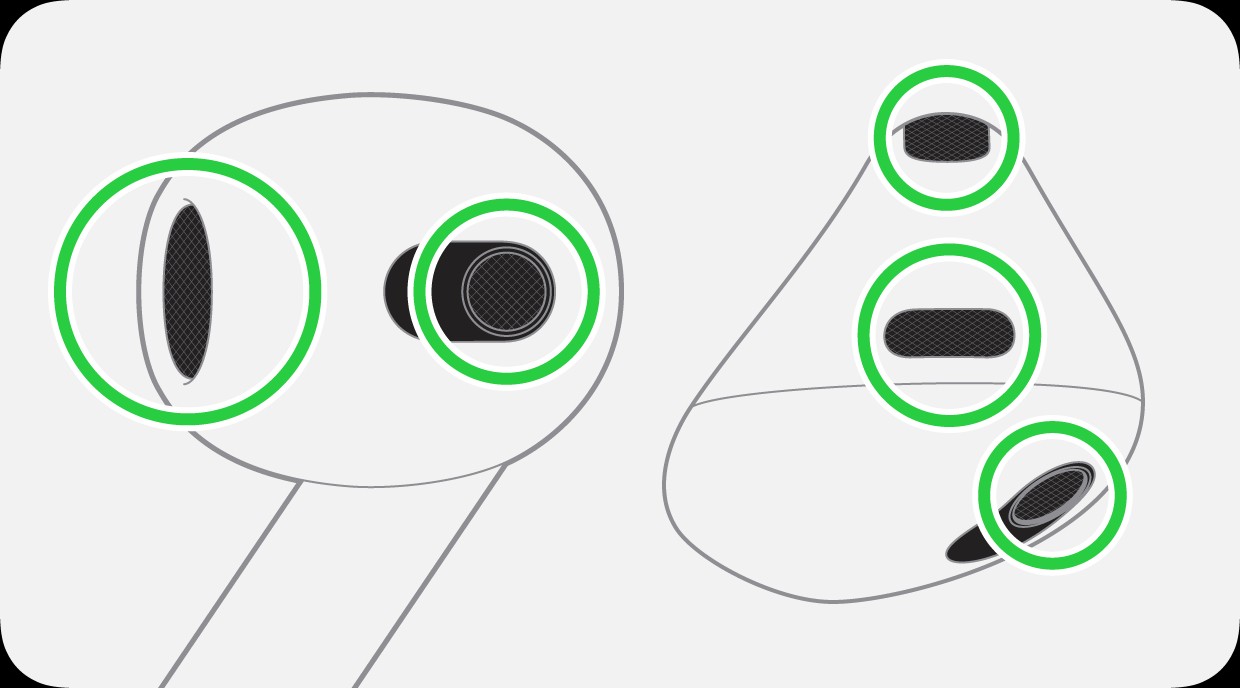 Close-up of AirPods 3 meshes that can be cleaned, including the snorkel mesh, control leak mesh, and top mic.
Image: Visual guide highlighting the specific meshes on AirPods 3 that are safe to clean.
Cleaning the Body of Your AirPods
For general cleaning of the AirPods’ body, follow these simple steps:
- Wipe with a Damp Cloth: Lightly dampen your lint-free cloth with fresh water. Ensure the cloth is just slightly damp, not wet.
- Clean Surfaces: Gently wipe down all external surfaces of your AirPods to remove dirt, earwax, or any residue.
- Dry Thoroughly: Use a separate dry section of your lint-free cloth to completely dry the AirPods. Ensure no moisture remains in any crevices.
- Allow to Air Dry: Let them air dry for at least two hours before use to ensure they are completely moisture-free.
Important Do’s and Don’ts for Cleaning AirPods Body:
- Do: Use a soft, lint-free cloth.
- Do: Dampen the cloth lightly with water if needed.
- Don’t: Run AirPods under water. They are not waterproof.
- Don’t: Use soap, household cleaners, or abrasive materials, as these can damage the finish and internal components.
- Don’t: Use sharp objects that could scratch or damage your AirPods.
Cleaning the AirPods Charging Case
The charging case also needs regular cleaning to prevent grime buildup and maintain hygiene.
- Dry Wipe: Use a soft, dry, lint-free cloth to wipe the exterior and interior of the charging case.
- Remove Debris from Charging Port: Use a clean, dry, soft-bristled brush (like a toothbrush or a small cleaning brush) to gently remove any debris or lint from the charging port.
- Disinfect (Optional): If necessary, you can lightly dampen your cloth with isopropyl alcohol to disinfect the charging case, especially if it’s frequently exposed to germs. Ensure no liquid gets into the charging ports.
- Dry Completely: Allow the charging case to air dry completely before use.
Important Do’s and Don’ts for Cleaning AirPods Charging Case:
- Do: Use a soft, dry, lint-free cloth for general cleaning.
- Do: Use a soft-bristled brush for the charging port.
- Do: Use isopropyl alcohol sparingly on a cloth for disinfection.
- Don’t: Get any liquid inside the charging ports.
- Don’t: Use abrasive materials that could scratch the case.
- Don’t: Put anything metallic or damaging into the charging ports.
Tips to Prevent Skin Irritation and Maintain Your AirPods
Maintaining clean AirPods isn’t just about device longevity; it’s also about hygiene and comfort, especially for sensitive skin.
- Regular Cleaning After Workouts: After exercising or any activity that causes sweating, clean and dry your AirPods to remove sweat and prevent skin irritation and damage to the earbuds.
- Clean After Exposure to Liquids: If your AirPods come into contact with liquids like sweat, soap, shampoo, makeup, sunscreen, or lotions, clean them promptly.
- Check Material Sensitivity: If you have known allergies, review the materials used in AirPods to identify potential irritants.
- Understand Water and Sweat Resistance: Be aware of the sweat and water resistance ratings of your specific AirPods model and take precautions accordingly.
When to Seek Professional Help
If cleaning your AirPods doesn’t resolve issues like muffled sound or charging problems, it might be time to seek professional service.
- AirPods Service: If you suspect internal damage or cleaning doesn’t fix performance issues, consider getting service directly from Apple or an authorized service provider.
- Replacement Options: If your AirPods are damaged beyond repair, explore replacement options, especially if covered under warranty or AppleCare+.
By following these guidelines on how to clean your AirPods, you can ensure they remain hygienic, function optimally, and provide you with the best listening experience for longer. Regular maintenance is key to enjoying your AirPods for years to come.