A well-used oven and stovetop, marked by spills and splatters, are hallmarks of a kitchen full of home-cooked meals. However, the powerful chemical cleaners often marketed for oven and stovetop cleaning can pose unnecessary risks. Regular cleaning is essential, and fortunately, there are safe and straightforward methods to keep your oven and stovetop sparkling without resorting to harsh chemicals. This guide will show you how to clean your oven effectively and safely using natural solutions.
It often happens at the least convenient moment – perhaps just before guests arrive – that you realize the oven’s state. The anticipation of baking cookies to greet them can be quickly overshadowed by the lingering aroma of last night’s dinner because of overlooked splatters. Oven cleaning is often a task that gets postponed. Many oven cleaners promise effortless results, aiming to appeal to our desire for quick and easy solutions.
However, these promises of effortless cleaning often come with a catch. Products that claim to do the hard work for you usually contain intense chemical compounds that carry potential risks. These chemicals may indeed clean effectively, but often at the expense of releasing harmful fumes. Bleach-based cleaners are particularly concerning, as they can negatively impact the health of the person cleaning, as well as anyone else, including pets, in the home. Furthermore, these substances contribute to environmental pollution when they are washed away, entering sewage systems that are not equipped to fully remove non-biodegradable chemicals. Given their ability to break down organic matter, accidental contact or ingestion of these cleaners can cause significant harm.
When a cleaning solution sounds too good to be true, it likely is. Oven cleaners and drain cleaners are two conventional products that are best avoided in households. The risks simply outweigh the convenience. Instead, there are numerous easy and effective oven cleaning options available using natural and gentle cleaners such as heat, lemons, vinegar, baking soda, and trusted products like Dr. Bronner’s Sal Suds and Pure-Castile Soaps. You can choose the method that best suits your needs and preferences.
Before you begin, you’ll need to prepare a versatile cleaning solution.
My DIY All-Purpose Cleaning Spray with Dr. Bronner’s
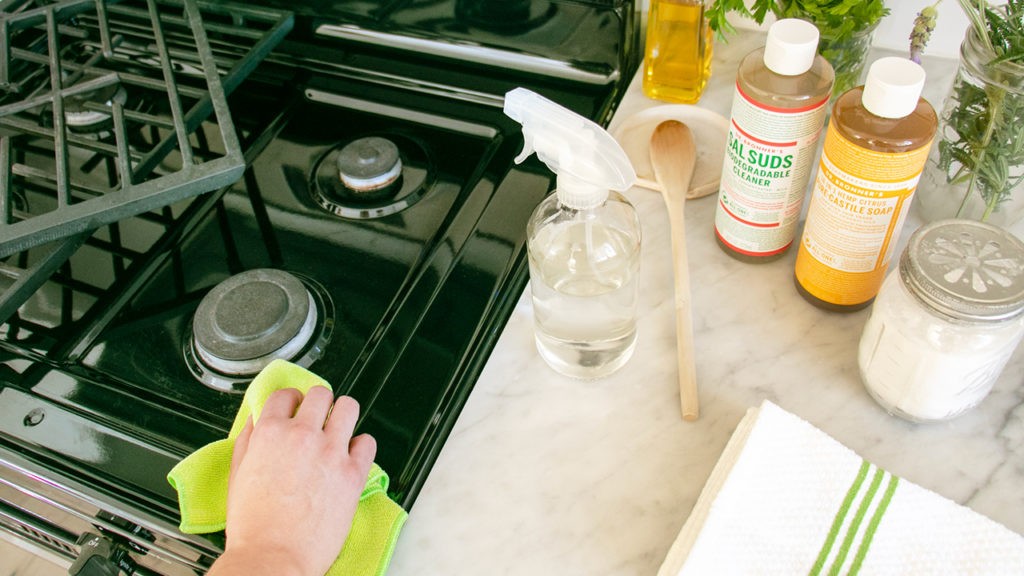
This “Green-It-Yourself” (GIY) All-Purpose Cleaning Spray is a fundamental recipe using Dr. Bronner’s Sal Suds or Pure-Castile Soap. Keeping several bottles of this spray readily available around the house, especially under the kitchen sink, is highly convenient. For a detailed guide on this multipurpose spray, you can refer to the full article. Here’s a quick recipe to get you started:
GIY All-Purpose Cleaning Spray
- 1 quart (1 liter) of water
- ¼ cup (60 mL) Dr. Bronner’s Castile Soap (in your preferred scent) OR 1 tablespoon (15 mL) Sal Suds Biodegradable Cleaner
- 20 drops of tea tree essential oil (optional, for added antibacterial properties and scent)
Step-by-Step Guide: Cleaning Your Oven with Non-Toxic Methods
First, start by removing any loose debris from your oven. This includes crumbs, food particles, or loose ash. You can use a hand broom or the hose attachment of your vacuum cleaner to effectively remove these loose materials.
Next, take out the oven racks. Wash them separately using Sal Suds or Pure-Castile Soap. If your kitchen sink is large enough, you can wash them there. Alternatively, a utility sink or even a bathtub can be used for this purpose.
Once these initial steps are completed, choose one of the following oven cleaning methods:
Option 1: Utilizing the Self-Cleaning Feature
Most modern ovens come equipped with a self-cleaning cycle. This feature offers both advantages and disadvantages. The primary benefit is its convenience – a clean oven at the touch of a button. Furthermore, this method avoids the use of any harsh chemicals.
However, the self-cleaning cycle consumes a significant amount of energy to reach and maintain temperatures above 600°F (315°C) for several hours. Additionally, it can release strong, unpleasant fumes that may be problematic for individuals with respiratory conditions and sensitive pets, particularly birds.
If you opt for the self-cleaning feature, ensure proper ventilation by turning on your range hood, whole-house fan, or opening windows.
After the self-cleaning cycle is finished and the oven has cooled down completely, wipe away the remaining ash with a damp cloth.
Option 2: Steam Cleaning with Lemons or Vinegar
Steam cleaning with lemons is a preferred method for many, as it naturally deodorizes the oven and leaves a fresh scent. For this method, the oven remains off to effectively trap the steam.
Supplies: Lemons and a pot with a lid suitable for both stovetop and oven use (or microwave and oven if preferred).
Remove all but one oven rack.
Fill a four-quart pot with quartered lemons and 1 cup of water. Cover the pot and bring the mixture to a simmer on the stovetop. Allow it to simmer, covered, for about 15 minutes, or until the lemons are softened. Keep the lid on the pot and carefully transfer it to the oven. Remove the lid and immediately close the oven door to trap the steam.
Keep the oven door closed for at least one hour. Then, open the oven and promptly wipe off the loosened grime with a damp cloth. For tougher spots, use the All-Purpose Spray along with wiping. A plastic scraper, held at a shallow angle to prevent scratching, can also be helpful in lifting softened grime.
Vinegar Alternative: If lemons are not available, substitute with equal parts vinegar and water in the pot. Follow the same procedure, bringing it to a simmer on the stovetop, then transferring it to the oven to steam.
Microwave Alternative: Use a microwave-safe and oven-safe casserole dish. Fill it with lemons or vinegar and water and bring to a simmer in the microwave. Carefully transfer the dish to the oven, remove the lid, and close the oven door.
Option 3: Baking Soda Paste Application
This method requires advance planning but is very low-effort once applied. It’s particularly effective for stubborn burnt-on spots or for ovens that are generally clean but have localized baked-on grime.
Supplies: Baking soda, water, and time.
For particularly stubborn burnt spots, or if your oven needs spot cleaning, create a paste from baking soda and water. Add just enough water to baking soda to form a spreadable paste. Mix it well with a fork to eliminate any lumps. Apply this paste to the burnt areas. Let the paste sit overnight, or for as long as possible. The longer it sits, the more effective it becomes.
The next day, scrape off the dried baking soda paste using a plastic scraper, again holding it at a low angle to avoid scratching the oven surface. Dispose of the paste in the trash. Use the All-Purpose Spray to wipe away any remaining residue.
Stovetop Cleaning Techniques
Stovetop spills and messes are common, from splattered grease to overflowing sauces. Cleaning them promptly makes the job easier. Here are some effective methods for cleaning your stovetop and its components.
A helpful tip: Avoid serving food directly from the stovetop. Transfer dishes to the countertop to minimize stovetop messes, as countertops are generally easier to clean.
Supplies for stovetop cleaning: All-Purpose Spray, several damp and dry cloths, hot water, and patience.
For any type of grime, cleaning sooner rather than later is always beneficial.
Begin by ensuring the stovetop is cool enough to touch but still slightly warm. Wipe off any loose food particles or debris.
For light grease and smudges: Spray the affected areas with the All-Purpose Cleaning Spray and wipe with a damp cloth. For a streak-free finish, dry the surface with a soft, dry cloth, preferably microfiber.
For stubborn burnt-on grime: Hot water is an effective cleaner for tough stovetop messes, regardless of the stovetop material. Lay a washcloth over the grime and pour very hot water (being careful to avoid scalding yourself) onto the cloth until it is saturated. Let the hot, damp cloth sit on the grime for about ten minutes, or until it cools down. Then, wipe away the loosened mess.
For persistent burnt spots: Apply the baking soda paste, as used for oven cleaning. For small spots, let it sit for about 15 minutes. For more stubborn spots, leave it on overnight. Wipe off the paste with a damp cloth afterwards. Follow up with the All-Purpose Spray and a damp cloth for a final clean.
Specific Stovetop Surface Cleaning
Ceramic glass or enamel stovetops: In addition to the methods above, manufacturers often recommend using a plastic scraper to carefully lift off any hardened spills. Always use the scraper at a near-horizontal angle to prevent scratches. For a final polish, spray the surface with a DIY Glass Cleaner made from a 1:1 mixture of distilled white vinegar and water. Wipe with a dry, soft microfiber cloth.
Brushed stainless steel stovetops: For stainless steel, always wipe in the direction of the grain to achieve the best finish and avoid streaks.
Porcelain stovetops: Porcelain is particularly sensitive to acidic substances. Clean up spills like tomato sauce or lemon juice immediately to prevent damage or staining.
Knobs, grates, and heating elements: The All-Purpose Spray works effectively on knobs, grates, and heating elements. For tougher grime, try soaking them with the hot water cloth method. Grates can also be effectively cleaned by scrubbing them in a sink filled with hot (not scalding) water and Sal Suds or Castile Soap. Some grates are dishwasher-safe; check the manufacturer’s instructions before placing them in the dishwasher.
What to Avoid When Cleaning Your Stovetop
It’s important to note that baking soda is not recommended for scouring stovetops. Although gentle, baking soda is still abrasive and can dull the finish on glass, porcelain, or brushed stainless steel stovetops. Similarly, avoid abrasive scouring pads, which can scratch the stovetop surface. Finally, steer clear of ammonia, bleach, or other harsh cleaners that can damage the stovetop and are not healthy for you or your home environment.
Conclusion
A clean oven and stovetop can be a source of inspiration in the kitchen, making cooking feel more enjoyable. There’s a certain satisfaction in maintaining a clean and functional cooking space, which in turn encourages more cooking and delicious homemade meals. It’s a rewarding cycle to keep your kitchen clean and ready for your next culinary adventure.
Further reading:
Sal Suds cleaner shows >60% biodegradation after 28 days per ISO 14593.
For more cleaning tips and uses, refer to Soap & Soul: A Practical Guide to Minding Your Home, Your Body, and Your Spirit with Dr. Bronner’s Magic Soaps, available in hardback at DrBronner.com and other booksellers, as well as in eBook and audiobook formats.