You’ve relished the experience of cooking on your brand-new Blackstone griddle, creating delicious meals outdoors. Now, the feast is over, and it’s time for cleanup! Unlike traditional grills, a Blackstone griddle requires a bit of post-cooking care after each use. But with the right techniques, keeping your Blackstone griddle clean is simple and ensures it lasts for years, maintaining its essential non-stick surface. In fact, consistent care will allow your griddle to age like fine wine, enhancing its performance over time.
Follow this straightforward guide, and you’ll have your Blackstone griddle impeccably clean in mere minutes, giving you more time to relax and enjoy the rest of your day!
Why Cleaning Your Blackstone Griddle is Crucial
Why is it so important to clean your Blackstone griddle immediately after cooking? The answer is simple: consistent maintenance is key to longevity and optimal cooking performance. Neglecting your Blackstone griddle after use can lead to food residue hardening and becoming incredibly difficult to remove. This not only makes future cleaning more laborious but can also compromise the griddle’s naturally slick, non-stick surface. Investing just a few minutes in cleaning after each cookout will significantly extend the life of your griddle and ensure it remains a joy to cook on.
Make sure to also check out additional tips on properly seasoning your Blackstone griddle and storing it safely. These proactive steps are invaluable, saving you both time and money in the long run by preventing damage and maintaining your griddle in top condition.
Essential Supplies for Cleaning Your Blackstone Griddle
Having the right tools on hand makes cleaning your Blackstone griddle a quick and efficient task. Here’s a list of essential supplies I always keep ready for a hassle-free cleanup:
- Metal Spatula: For scraping off food scraps and debris.
- Heavy-Duty Scraper: For removing tougher, stuck-on residue.
- Plastic Squirt Bottle: To dispense water for steam cleaning.
- Heavy-Duty Paper Towels: For wiping and drying the griddle surface.
- Cooking Oil or Griddle Conditioner: For seasoning after cleaning. Bacon grease, canola oil, or specialized griddle seasoning oils work well.
Step-by-Step Guide to Cleaning and Seasoning Your Blackstone Griddle
While you can watch a visual demonstration of my griddle cleaning process in the video, here’s a detailed step-by-step guide to achieve a perfectly clean Blackstone griddle effortlessly:
-
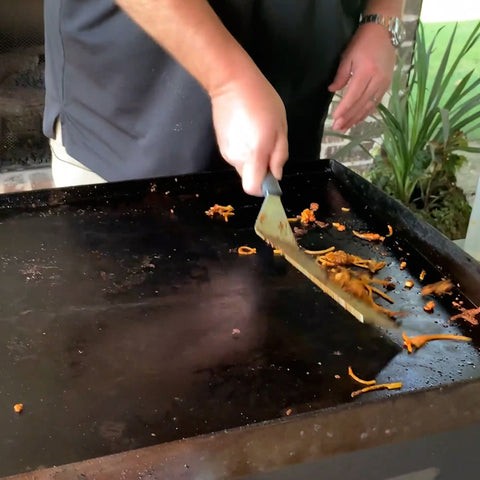
Remove Food Scraps While Griddle is Still Warm. While the griddle is still warm (not scorching hot), use a metal spatula to scrape off any leftover food particles into the grease trap or a disposable container. Doing this while the griddle is warm is crucial as it prevents food from hardening and sticking stubbornly to the surface. Observe in the video how I strategically position a catch-all pan on the Blackstone for easy waste disposal.
-
Scrape Off Stubborn Residue. Once the loose food scraps are removed, switch to a heavy-duty scraper to tackle any remaining residue that’s still adhered to the griddle surface. You’ll be surprised at the amount of cooked-on grime that can accumulate, even after a single cooking session. Apply firm, even pressure to effectively lift this residue.
-
Steam Clean for Deep Cleaning. For particularly stubborn or sticky residue, employ the power of steam. Using a plastic squirt bottle, carefully squirt water onto the warm griddle surface. The resulting steam action will effectively loosen any remaining stuck-on debris. Immediately after steaming, use the heavy-duty scraper again to remove the loosened residue and then use the scraper to push the water and debris towards the grease trap. Repeat this process if necessary for heavily soiled areas.
-
Dry the Griddle Surface Thoroughly. Turn off the griddle and allow it to cool down slightly until it is warm but not hot. Using your scraper and heavy-duty paper towels, wipe the entire surface of the Blackstone griddle until it is completely dry. Ensure no water droplets remain, as moisture can lead to rust.
-
Season the Cooled Griddle. Once the Blackstone griddle has cooled down to a safe temperature, it’s time to re-season it. Apply a thin layer of cooking oil or griddle conditioner, such as bacon grease or a specialized griddle seasoning oil, to the entire surface. Use paper towels to rub the oil into the griddle, ensuring an even, thin coat. The goal is to have a surface that is slick but not greasy to the touch. Seasoning after every cleaning is key to maintaining the griddle’s non-stick properties and protecting it from rust.
The Importance of Seasoning Your Griddle
Many newcomers to flat-top grilling might question the necessity of seasoning their Blackstone griddle, especially since it’s advertised as having a non-stick surface. However, seasoning is absolutely crucial, even with a non-stick griddle. Seasoning creates a natural, enhanced easy-release cooking surface and, most importantly, provides a protective barrier against rust.
Before you use your griddle for the very first time, and crucially, after every single use and cleaning, you must apply a thin protective layer of oil. The oil penetrates the Blackstone’s slightly porous steel surface, filling in microscopic imperfections and creating a smooth cooking area. Over time and with repeated seasoning, the oil polymerizes and essentially bakes onto the griddle, building up a robust, reinforced non-stick coating. This not only makes cooking and cleaning easier but also gradually enhances the flavor of your food as the seasoned surface matures.
The seasoning process is quite similar to caring for cast-iron cookware: after cleaning and while the surface is warm (not hot), apply a thin layer of oil and rub it in thoroughly. You have options for oils – coconut oil, canola oil, olive oil, or my personal favorite for flavor and performance, bacon grease. Specialized griddle conditioners are also available and formulated specifically for this purpose.
Properly Storing Your Griddle
Exposure to the elements, particularly rain, snow, and even prolonged direct sunlight, can be detrimental to your Blackstone griddle over time. Proper storage is therefore vital to protect your investment. Ideally, your Blackstone griddle should be stored in a cool, dry place shielded from moisture. This preventative measure significantly reduces the risk of rust formation and minimizes the maintenance required in the long run.
For those who store their griddle outdoors, investing in a heavy-duty, weatherproof cover is highly recommended. A quality cover will protect your Blackstone from the elements when not in use, whether you’re at home or taking your griddle on the go for camping or tailgating.
Essential Equipment and Tools for Blackstone Griddle Cleaning and Maintenance:
- Blackstone Griddle
- Metal Spatula
- Plastic Squeeze Bottle
- Heavy-Duty Scraper
- Heavy-Duty Paper Towels
- Bacon Up Bacon Grease (or other seasoning oil)
Frequently Asked Questions About Blackstone Griddle Maintenance:
Q: Do I really need to season my Blackstone griddle every single time I use it?
A: Yes, it is highly recommended to season your Blackstone griddle after every use. This consistent seasoning is what maintains the crucial non-stick surface and provides ongoing protection against rust. While forgetting to season occasionally won’t immediately ruin your griddle, making it a regular practice will significantly prolong its life and cooking performance.
Q: What materials are Blackstone griddles actually made of?
A: Blackstone griddles are primarily constructed from cold-rolled steel. This material is chosen for its excellent heat distribution properties and robust durability, which are essential for effective and long-lasting outdoor cooking.
Q: What should a properly seasoned Blackstone griddle look like?
A: A well-seasoned Blackstone griddle should exhibit a dark, almost black, semi-glossy finish. This dark patina is visual evidence of a well-developed non-stick coating. The surface should become smoother and more non-stick with continued proper use and consistent maintenance, including regular cleaning and seasoning.