Sterling silver items, from elegant flatware to cherished jewelry, add a touch of sophistication to our lives. However, the beauty of sterling silver can be marred by tarnish, a dull, dark film that develops over time. Understanding How To Clean Sterling Silver properly is essential to maintain its luster and prevent damage. This guide explores various methods, from simple DIY solutions to specialized store-bought cleaners, ensuring your sterling silver stays sparkling for years to come.
Understanding Sterling Silver and Tarnish
Sterling silver is not pure silver. Due to pure silver’s softness, it is alloyed with other metals, typically copper, to enhance its durability for everyday use in items like silverware, candlesticks, and jewelry. Tarnish is the result of a chemical reaction between silver and sulfur-containing compounds in the air, creating silver sulfide. This appears as a yellowish-gray or black layer on the surface. Unlike rust, tarnish is a surface coating and can be removed without causing permanent damage if addressed correctly. Regular cleaning is key to keeping your sterling silver in pristine condition.
Testing Different Cleaning Methods: Finding the Best Approach
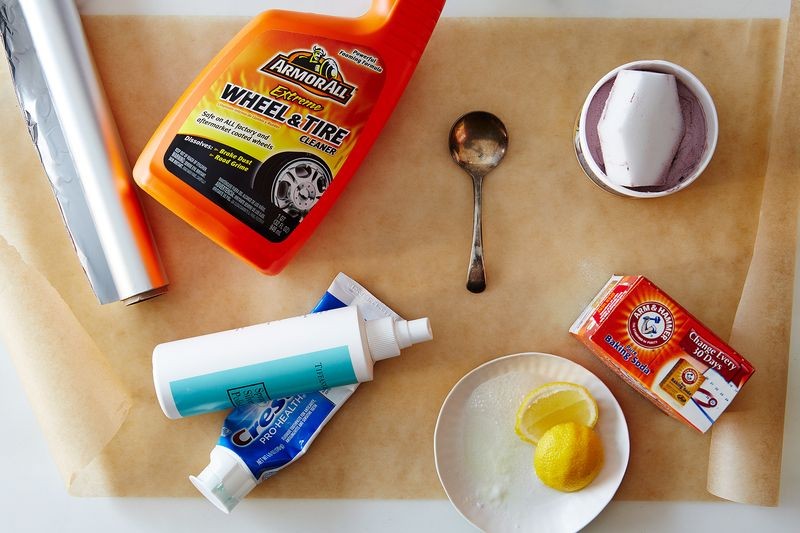
To identify the most effective and practical methods for cleaning sterling silver, we tested six different approaches, ranging from household remedies to commercial products, on a tarnished silver spoon. Here are our findings, ranked from least effective to the overall best.
Method 1: Toothpaste – A Mild Approach
Toothpaste, suggested by some readers as a gentle cleaner, proved to be the least effective in our test.
- Mild Cleaning Power: Whitening toothpaste only slightly lightened the tarnish, failing to remove it completely. This might be sufficient for very light tarnish or for a quick surface clean.
- Gentle Abrasiveness: Toothpaste is less abrasive than other cleaners, minimizing the risk of scratching, especially on silver-plated items. However, Boulangere, a commentator in the original article, rightly pointed out concerns about potential scratching, particularly on plated silver.
- Accessibility and Cost: Toothpaste is readily available and inexpensive, making it a convenient option if you need a very mild cleaning solution and already have it at home.
- User Experience: The minty smell is pleasant, and toothpaste is easy to handle and rinse off.
While toothpaste is gentle and accessible, it lacks the power needed for effectively cleaning moderately to heavily tarnished sterling silver.
Method 2: Hubcap Cleaner – An Aggressive Solution
Hubcap cleaner, recommended by a seller as a powerful cleaning agent, turned out to be the most aggressive method tested.
- Strong Cleaning Action: Hubcap cleaner effectively removed tarnish, leaving a very shiny surface. However, it also stripped away desirable patina and created an uneven, splotchy appearance.
- Harsh Chemicals: This cleaner is designed for car hubcaps, not delicate silverware. Using it on items you eat with feels unsettling and potentially unsafe.
- Availability: Hubcap cleaner may not be a common household item and might require a trip to an auto parts store or home improvement center.
- Damage Risk: The aggressive nature of hubcap cleaner makes it unsuitable for regular use on sterling silver, as it could potentially damage the surface over time and remove details.
Hubcap cleaner is too harsh for sterling silver, risking damage and stripping away the desired character of the pieces. It’s best reserved for its intended purpose – cleaning hubcaps.
Method 3: Lemon Juice and Baking Soda – A Natural Remedy
Lemon juice and baking soda, a popular DIY cleaning combination, was suggested as a natural way to remove oxidation from silver.
- Moderate Abrasiveness: This mixture is more abrasive than toothpaste, effectively removing a significant amount of tarnish, including some of the desirable patina. It left a slightly duller shine compared to more specialized cleaners.
- Natural Ingredients: Using common pantry staples like lemon juice and baking soda appeals to those seeking natural cleaning solutions.
- Easy Availability: These ingredients are readily available in most kitchens, making it a convenient option for a quick cleaning.
- Fun Fizzing Action: The chemical reaction between lemon juice and baking soda creates a fizzing effect, which can be visually interesting.
While lemon juice and baking soda are natural and readily available, their abrasive nature and potential to dull the silver’s shine make them less ideal than other methods.
Method 4: Tiffany Silver Polish Spray – A Premium Store-Bought Solution
Tiffany Silver Polish Spray, representing high-end, store-bought cleaners, was tested for its effectiveness and gentleness.
- Effective and Gentle Cleaning: This spray effectively removed tarnish, including brown tinges, without being overly abrasive or removing desirable patina, aligning with Chocolate Be’s recommendation in the original article about Tiffany polish’s gentleness.
- Ease of Use: The spray application makes it easy to coat silver pieces quickly and evenly, especially useful for cleaning multiple items at once.
- Accessibility and Cost: While easy to purchase in major cities with Tiffany stores, it may be less accessible elsewhere. It is also a more expensive option compared to other cleaners, although it was noted as the least expensive item in the Tiffany store at the time of testing.
- Brand Reputation: Tiffany is a reputable brand known for high-quality silver and jewelry care products, lending credibility to its cleaning polish.
Method 5: Wright’s Silver Cream – A Reliable Store-Bought Cream
Wright’s Silver Cream, a widely recommended and more accessible store-bought cleaner, provided a strong performance.
- Effective Cleaning Power: Comparable to Tiffany’s cleaner, Wright’s Silver Cream effectively removed tarnish and restored shine, although it required slightly more buffing to achieve a high polish.
- Convenient Application: The included sponge applicator keeps the cream off hands, which is beneficial, although it may be less practical for cleaning items with intricate details compared to a spray.
- Accessibility and Cost: Wright’s Silver Cream is readily available in drugstores and pharmacies at a reasonable price, making it a practical and cost-effective option.
- Trusted Brand: Wright’s is a well-known and trusted brand in silver care, recommended by Molly Fuller and seconded by Boulangere in the original article.
Both Tiffany Silver Polish Spray and Wright’s Silver Cream are excellent store-bought options, offering effective and relatively gentle cleaning. Tiffany’s spray excels in ease of application, while Wright’s cream is more accessible and budget-friendly.
Method 6: Aluminum Foil, Baking Soda, and Hot Water – The Best Overall DIY Solution
The combination of aluminum foil, baking soda, and hot water, a widely recommended DIY method, emerged as the best overall solution for cleaning sterling silver.
- Effective Tarnish Removal: Soaking silver in this solution effectively loosened and removed dark tarnish, leaving behind the desired lighter patina. This method was highly praised by Klrcon and Pegeen in the original article for its effectiveness on heavily tarnished silver.
- Gentle Action: Being primarily water-based, this method is gentle on silver and less messy than pastes or creams.
- Easy to Scale: This method is particularly convenient for cleaning large quantities of silverware at once, as suggested by Alexis, the creative director mentioned in the original article.
- Household Ingredients: Baking soda and aluminum foil are common household items, making this method readily accessible and inexpensive.
- Chemical Reaction: The cleaning action is based on a chemical reaction, where the aluminum foil attracts sulfur from the silver sulfide tarnish, reversing the tarnishing process. This scientifically interesting aspect adds to its appeal.
- Slight Odor: The chemical reaction produces a mild, slightly sulfurous scent, which is temporary and easily dissipated.
The aluminum foil, baking soda, and hot water method offers an unmatched combination of effectiveness, ease of use, gentleness, and accessibility, making it the top recommendation for cleaning sterling silver.
Verdict: The Best Ways to Clean Your Sterling Silver
While specialized silver polishes like Tiffany’s and Wright’s provide excellent cleaning results with controlled abrasion, the DIY method using aluminum foil, baking soda, and hot water stands out as the best overall choice. It balances ease of use, effectiveness, and gentleness perfectly. It’s a natural, chemically fascinating, and virtually foolproof method, ideal for cleaning everything from a single spoon to an entire set of silverware.
Store-bought polishes are good alternatives, especially if you already have them or prefer a product specifically formulated for silver. Toothpaste proved too weak, while lemon juice and baking soda and hubcap cleaner were too aggressive or unsuitable for silverware.
Step-by-Step Guide: How to Clean Sterling Silver with Aluminum Foil, Baking Soda, and Hot Water
For consistently excellent results, follow these simple steps to clean your sterling silver using the best overall method:
- Prepare your dish: Line a casserole dish or any shallow container with aluminum foil, ensuring the shiny side is up. You can also use an aluminum dish directly.
- Add baking soda: Sprinkle a generous amount of baking soda into the dish. The amount will depend on the size of the dish and the quantity of silver you are cleaning – about a tablespoon or two is usually sufficient.
- Arrange the silver: Place your sterling silver items in the dish, making sure each piece is in direct contact with the aluminum foil. This contact is crucial for the chemical reaction to occur.
- Pour hot water: Carefully pour hot water over the silver pieces and baking soda. Use enough water to submerge the silver. Hot water is essential to activate the chemical reaction.
- Wait and observe: Let the silver soak in the solution. You will likely observe bubbles and a slight odor as the tarnish is transferred to the aluminum foil. The soaking time depends on the level of tarnish. For light tarnish, a few minutes may suffice. For heavier tarnish, it may take up to 15-20 minutes.
- Remove and rinse: Once the tarnish is removed to your satisfaction, carefully remove the silver pieces from the solution. Rinse them thoroughly with clean water to remove any baking soda residue.
- Dry and polish: Dry the silver completely with a soft, clean cloth. For extra shine, you can gently buff the silver with a silver polishing cloth.
By following these steps, you can effectively and safely clean your sterling silver, restoring its beautiful shine and preserving its value for years to come. Regular light cleaning using this method can prevent heavy tarnish buildup, making maintenance easier in the long run.