Running out of iCloud storage can be a frustrating experience. Suddenly, you can’t back up your iPhone, your photos stop syncing, and you might even miss important emails. Apple provides a free 5GB of iCloud storage when you set up your account, which is quickly consumed by backups, photos, videos, documents, and app data. If you’re looking for ways to manage your digital life without constantly seeing “iCloud Storage Full” notifications, you’ve come to the right place.
This comprehensive guide will walk you through various methods to effectively clear iCloud storage and reclaim valuable space. We’ll cover everything from deleting old backups and unwanted photos to managing files in iCloud Drive and cleaning up your messages and mail. By following these simple steps, you can optimize your iCloud storage and ensure your Apple devices continue to function seamlessly.
If you find yourself needing more storage consistently, we’ll also touch upon upgrading to iCloud+, Apple’s premium subscription service, as a long-term solution. But first, let’s focus on practical, actionable steps you can take right now to clear up your iCloud storage and get back in control.
Easy Ways to Free Up Space in iCloud
Before diving into specific categories, it’s crucial to understand what’s eating up your iCloud space. You can easily check your iCloud storage usage on any Apple device or on iCloud.com. Knowing where your storage is going will help you prioritize which areas to clean up first.
Once you know what’s taking up space, you can start deleting content you no longer need. Apple offers several tools and features to help you manage your iCloud storage efficiently. Let’s explore these methods step-by-step.
Utilize “Recommended for You” in iCloud Settings
For users with iPhones or iPads running iOS 17 or iPadOS 17 and later, Apple provides a handy “Recommended for You” feature within iCloud settings. This tool intelligently suggests items you might want to delete, such as old backups, large files, or rarely viewed photos. It’s a great first step for quickly freeing up space without manually digging through every category.
Here’s how to access and use “Recommended for You”:
- Open the Settings app on your iPhone or iPad.
- Tap your name at the top to access your Apple ID settings.
- Tap iCloud.
- Tap Recommended for You.
- You’ll see a list of suggestions, such as “Review Large Files” or “Review Old Backups.” Tap an option to see more details and follow the on-screen instructions to delete suggested items.
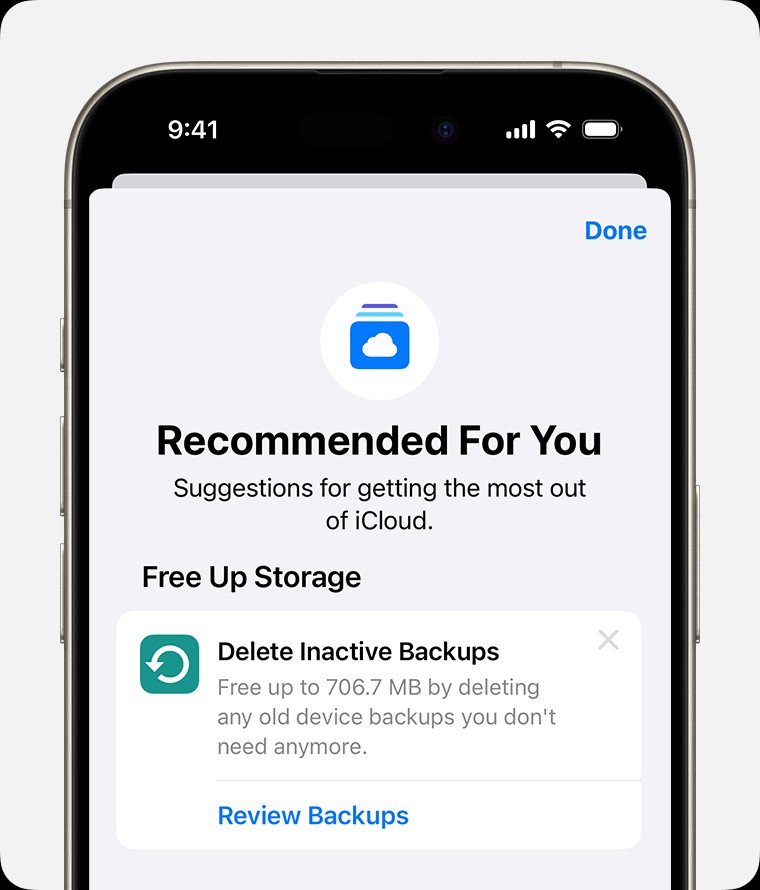 iPhone screen showing the Recommended For You suggestions within iCloud settings.
Alt text: iPhone Settings app showing the Recommended For You section within iCloud storage settings, highlighting suggestions to free up space.
If “Recommended for You” doesn’t offer enough options, or if you’re using an older iOS version, don’t worry. There are plenty of other ways to manually clear iCloud storage.
Managing Your iCloud Backups to Save Space
iCloud Backup automatically saves important data from your iPhone, iPad, and other Apple devices. While backups are essential for data recovery, they can also consume a significant portion of your iCloud storage, especially if you have multiple devices or haven’t managed your backup settings in a while.
You can reduce the size of your iCloud backups by:
- Choosing which apps to back up: Not every app needs to be backed up to iCloud. You can exclude apps that contain non-essential data or data already synced elsewhere.
- Deleting old backups: Outdated backups of devices you no longer use can be safely removed.
Let’s look at how to manage your iCloud backups on different devices.
Select Apps to Back Up on iPhone, iPad, or Apple Vision Pro
Customizing your app backup list can significantly reduce your backup size. Here’s how:
- Open the Settings app, tap your name, then tap iCloud.
- Tap Storage or Manage Account Storage, then tap Backups.
- Tap the name of the device you are currently using.
- You’ll see a list of apps. Toggle off the switch next to any apps you don’t want to back up.
- Tap Turn Off to confirm.
Remember, turning off backup for an app will remove its backed-up data from iCloud. Choose apps wisely, prioritizing essential data. Some core apps are always backed up and cannot be disabled.
Deleting Old iCloud Backups from iPhone, iPad, Apple Vision Pro
Deleting old backups, especially for devices you no longer own, can free up a substantial amount of iCloud storage.
- Open the Settings app, tap your name, then tap iCloud.
- Tap Storage or Manage Account Storage, then tap Backups.
- Tap the name of the device whose backup you want to delete.
- Scroll down and tap Turn Off & Delete from iCloud.
- Tap Turn Off & Delete to confirm.
Deleting a backup will also disable iCloud Backup for that device. You can re-enable it in iCloud settings if needed. Keep in mind that backups are available for 180 days after you disable backup, unless they are currently being used for restoring a device.
Deleting Old iCloud Backups from Mac
Managing backups on a Mac is slightly different:
- Click the Apple menu > System Settings.
- Click your name, then click iCloud.
- Click Manage, then select Backups.
- Select a device backup you want to delete and click the Remove button (–).
- Confirm by clicking Delete.
Similar to iOS, deleting a backup on Mac also turns off iCloud Backup for that device, which can be re-enabled in iCloud settings.
Deleting Old iCloud Backups from Windows PC
If you use iCloud for Windows, you can manage backups there as well:
- Open iCloud for Windows on your PC.
- Click Storage.
- Select Backup from the list.
- Select a device backup you want to delete and click Delete.
- Confirm by clicking Delete again.
Again, deleting a backup through iCloud for Windows will also disable iCloud Backup for that device.
Clearing Photos and Videos from iCloud Photos
iCloud Photos is a fantastic service for keeping your photo and video library synced across all your Apple devices. However, high-resolution photos and videos can quickly consume iCloud storage. Deleting unwanted photos and videos is a primary way to clear iCloud space.
Before deleting anything, always ensure you have backed up any photos and videos you want to keep. You can download them to your computer or an external drive. Once you delete photos or videos from iCloud Photos on one device, they are deleted across all devices signed in with the same Apple ID.
Here’s how to delete photos and videos from iCloud Photos on different platforms.
Deleting Photos and Videos on iPhone, iPad, or Apple Vision Pro
- Open the Photos app.
- Tap Albums and then All Photos (or Library and then All Photos).
- Tap Select in the top right corner.
- Select the photos and videos you want to delete.
- Tap the Delete button (trash can icon) and then Delete Photo or Delete Video.
Deleting Photos and Videos on Mac
- Open the Photos app.
- Select the photos and videos you want to delete.
- Press the Delete key on your keyboard.
- Click Delete to confirm.
Deleting Photos and Videos on iCloud.com
- Go to iCloud.com in a web browser and sign in with your Apple ID.
- Click on the Photos app.
- Select the photos or videos you want to delete.
- To select multiple items, tap Select or press and hold Command (Mac) or Control (PC) while clicking items.
- To select all, use Command-A (Mac), Control-A (Windows), or tap Select All.
- Click the Delete button (trash can icon) and then Delete.
Recovering Deleted Photos and Videos:
Photos and videos deleted from iCloud Photos are moved to the Recently Deleted album, where they remain for 30 days before permanent deletion. You can recover them from this album within 30 days. To permanently delete them sooner and free up space immediately:
- In the Photos app, go to Albums and scroll down to Recently Deleted.
- Tap Select.
- Select the items you want to permanently delete.
- Tap Delete and then Delete [Number] Photos/Videos.
If you are exceeding your iCloud storage limit, items deleted from iCloud Photos will be immediately and permanently removed, bypassing the Recently Deleted album.
Managing Files in iCloud Drive
iCloud Drive is Apple’s cloud storage service for files, documents, and folders. If you use iCloud Drive extensively, managing and deleting unnecessary files and folders is another way to clear iCloud storage.
Here’s how to delete files and folders from iCloud Drive on different devices.
Deleting Files and Folders on iPhone or iPad
- Open the Files app and tap Browse.
- Under Locations, tap iCloud Drive.
- To delete a folder: Tap the More button (three dots), tap Select, and choose the folder(s). Tap Delete.
- To delete a file within a folder: Open the folder, tap the More button, tap Select, and choose the file(s). Tap Delete.
Deleted files and folders are moved to Recently Deleted in iCloud Drive for 30 days.
Deleting Files and Folders on Mac
- Open Finder and go to the iCloud Drive folder in the sidebar.
- Drag files or folders to the Trash.
Items moved to Trash on Mac remain in Recently Deleted in iCloud Drive for 30 days.
Deleting Files and Folders on Windows PC
Using iCloud for Windows:
- Open File Explorer and navigate to iCloud Drive in the navigation pane.
- Select the files or folders you want to delete.
- Press the Delete key or right-click and choose Delete.
Deleted items go to the Recycle Bin on your PC and Recently Deleted in iCloud Drive for 30 days.
Deleting Files and Folders on iCloud.com
- Go to iCloud.com and sign in.
- Click on the iCloud Drive app.
- Select the files or folders you want to delete.
- Click the More button (three dots) and then Delete Selected.
Deleted items are moved to Recently Deleted in iCloud Drive for 30 days.
Emptying Recently Deleted in iCloud Drive:
To permanently delete items and free up space faster, you can empty the Recently Deleted folder in iCloud Drive:
- On iPhone or iPad: In the Files app, go to Browse, tap Recently Deleted, tap More, then tap Delete All or delete individual items.
- On Mac: In Finder, go to iCloud Drive in the sidebar, click Recently Deleted, then click “Delete Immediately…” at the bottom right.
- On iCloud.com: In the iCloud Drive app, click Recently Deleted in the sidebar, then click “Delete All” or select individual items and click the trash icon.
Cleaning Up Messages in iCloud
If you use Messages in iCloud, your text messages and attachments are stored in iCloud and count towards your storage limit. Deleting old conversations and large attachments can free up space.
Deleting Messages and Attachments on iPhone, iPad, or Apple Vision Pro
- Delete a message or attachment: In a conversation, touch and hold a message bubble or attachment, tap More, tap the Delete button, then Delete Message.
- Delete multiple attachments from a contact: In a conversation, tap the contact’s name at the top, tap See All in the Photos section, tap Select, choose attachments, tap Delete, and then Delete Attachment.
- Delete an entire conversation: Swipe left on a conversation in the Messages list, tap Delete, and confirm with Delete again.
Deleting Messages and Attachments on Mac
- Delete a message: Control-click a message bubble, choose Delete, and confirm with Delete.
- Delete multiple attachments: In a conversation, click the Info button, scroll to Photos, click an attachment, hold Command to select multiple, Control-click, choose Delete, and confirm with Delete Attachment.
- Delete an entire conversation: Control-click a conversation in the Messages list, choose Delete or Delete Conversation, and confirm with Delete.
Managing Your iCloud Mail
Email messages, especially those with large attachments, consume iCloud storage if you use an iCloud email account (@icloud.com, @me.com, @mac.com). Deleting old or unnecessary emails and emptying the Trash folder is essential for clearing space.
Deleting Emails on iPhone, iPad, or Apple Vision Pro
- Swipe left on a message in your inbox or any mailbox to delete it.
- Go to Mailboxes and select the Trash folder.
- To delete individual messages: Swipe left on each message.
- To delete all messages in Trash: Tap Edit, tap Select All, tap Delete, and confirm with Delete All.
Deleting Emails on Mac or Windows PC
If you use a desktop email app like Mail on Mac or Outlook on Windows with your iCloud account:
- Mail on Mac: Delete unwanted emails, then go to Mailbox > Erase Deleted Items and select your iCloud account. Click Erase to confirm.
- Outlook on Windows: Delete unwanted emails. Outlook will permanently delete them when you close and restart the app.
Deleting Emails on iCloud.com
- Go to iCloud.com and sign in.
- Click on the Mail app.
- Select the Trash folder.
- To delete individual messages: Select a message and click the Trash button.
- To delete multiple messages: Select messages and click Delete.
Removing Voice Memos from iCloud
If you use Voice Memos in iCloud, your recordings are stored in iCloud. Deleting unwanted voice memos can free up space.
Deleting Voice Memos on iPhone, iPad, or Apple Vision Pro
- Open the Voice Memos app and tap All Recordings.
- Select voice memos to delete and tap the Delete button.
- Tap Recently Deleted, tap Edit, select memos, and tap Delete.
- Tap Delete Forever to confirm permanent deletion.
Deleting Voice Memos on Mac
- Select voice memos in the Voice Memos app.
- Click the Delete button.
- Open Recently Deleted, then click Delete All or Delete for individual memos.
- Click Delete Forever to confirm.
Deleting FaceTime Data from iCloud
Deleting FaceTime data from iCloud removes call history and potentially voicemails and video/audio messages (depending on software version). This action is irreversible, so consider exporting any important FaceTime video messages before proceeding.
Deleting FaceTime Data on iPhone, iPad, or Apple Vision Pro
- Open the Settings app, tap your name, then tap iCloud.
- Tap Storage or Manage Account Storage.
- Tap FaceTime, then tap Delete Data from iCloud.
Deleting FaceTime Data on Mac
- Click the Apple menu > System Settings.
- Click your name, then click iCloud.
- Click Manage > FaceTime, then click Delete from iCloud.
Deleting Apple Invites Data from iCloud
If you use Apple Invites, event background images and guest RSVP images count towards the host’s iCloud storage. Hosts can delete events to free up space. Deleting an event removes access for participants, except for shared albums or playlists associated with the event.
Deleting Apple Invites Events on iPhone or iPad
- Open the Apple Invites app and select an event.
- Tap the More button (three dots) in the upper-right corner, then Event Settings.
- Tap Delete Event, then tap again to confirm.
For deleting events on iCloud.com, refer to Apple’s guide on deleting events.
When Clearing Isn’t Enough: Consider iCloud+
If you regularly find yourself clearing iCloud storage and still running low, upgrading to iCloud+ might be the most convenient long-term solution. iCloud+ offers:
- More storage: Options range from 50GB to 12TB, depending on your needs.
- iCloud Private Relay: Enhances online privacy by masking your IP address and browsing activity.
- Hide My Email: Creates unique, random email addresses to protect your real email address when signing up for services.
- Custom Email Domain: Personalize your iCloud Mail with a custom domain name.
- HomeKit Secure Video support: Allows you to store recordings from your home security cameras in iCloud.
Upgrading to iCloud+ provides ample storage and valuable privacy features, eliminating the constant need to manage and clear your free 5GB. You can explore iCloud+ plans and upgrade through the Settings app on your Apple devices or on iCloud.com.
Take Control of Your iCloud Storage Today
Clearing iCloud storage doesn’t have to be a daunting task. By following these straightforward steps for managing backups, photos, files, messages, and mail, you can effectively free up space and keep your digital life organized. Regularly reviewing your iCloud storage and deleting unnecessary content is a good practice. And if you need even more space and features, iCloud+ is readily available to expand your storage capacity and enhance your Apple experience.