In today’s digital age, social media platforms like Facebook have become deeply integrated into our daily lives. However, there might come a time when you consider taking a step back or even permanently disconnecting from the platform. Whether you’re concerned about privacy, want to reduce your screen time, or simply feel it’s time for a change, understanding how to close your Facebook account is essential. This guide will walk you through the process of both deactivating and deleting your Facebook account, ensuring you can make the choice that best fits your needs.
Deactivating Your Facebook Account: A Temporary Break
Deactivating your Facebook account is like hitting the pause button on your social media presence. It’s a temporary suspension that allows you to step away from Facebook without permanently losing your profile and data. When you deactivate, your profile becomes invisible to other users, and you won’t be able to use Facebook’s features. However, you retain the option to reactivate your account whenever you’re ready to return.
Here’s how to deactivate your Facebook account across different platforms:
Deactivating Facebook via Browser (Desktop)
The browser method is a straightforward way to deactivate your account from your computer.
-
Log in to Facebook: Open your web browser and navigate to Facebook.com. Enter your login credentials to access your account.
-
Access Settings & Privacy: Click on your profile picture located in the top-right corner of the page. From the dropdown menu, select Settings & Privacy.
Accessing the settings and privacy menu on Facebook to initiate account deactivation.
-
Go to Settings: Within the Settings & Privacy dropdown, click on Settings.
Navigating to the settings section within the Facebook privacy panel.
-
Navigate to Your Facebook Information: In the left-hand panel, click on Privacy, and then in the main section, click on Your Facebook information.
Locating the account deactivation options under ‘Your Facebook information’ in privacy settings.
-
Select Deactivation and deletion: Scroll down to the Deactivation and deletion option and click View.
-
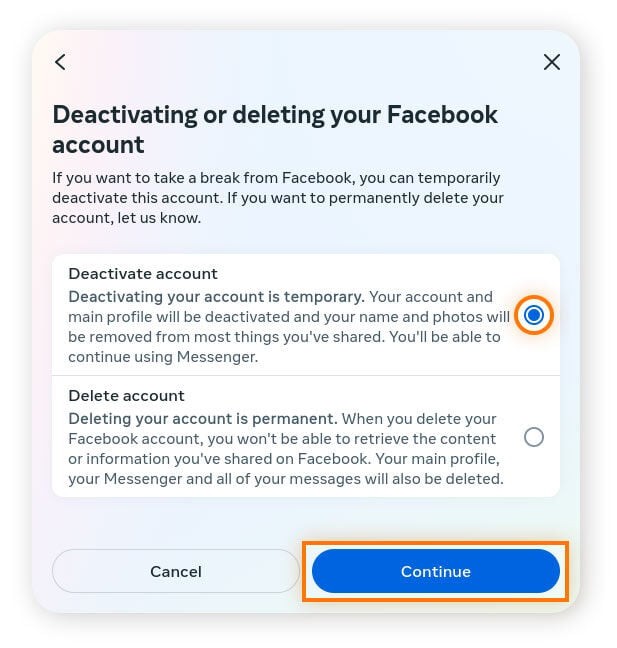
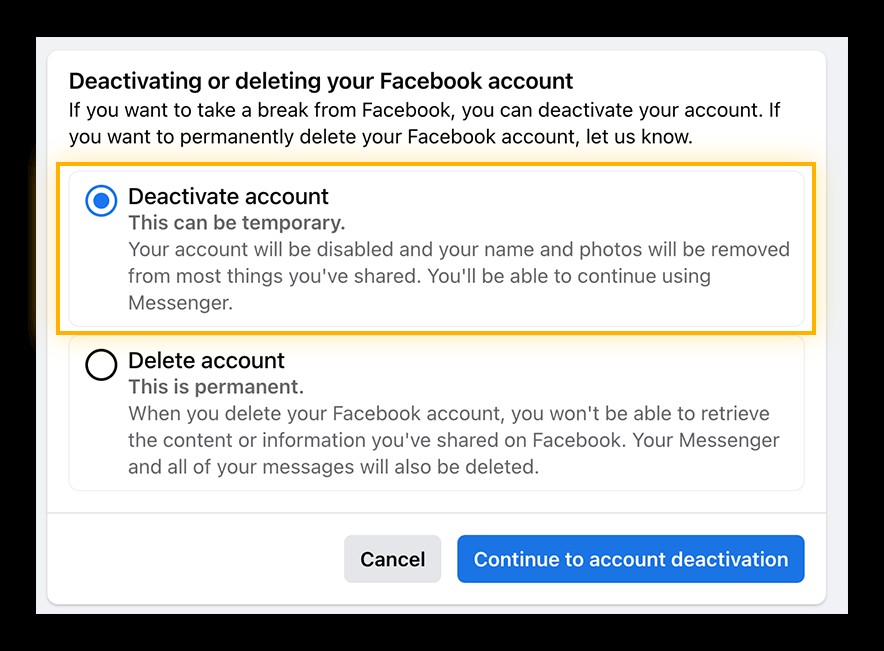
Choose Deactivate account: You’ll be presented with two options: Deactivate account and Delete account. Select Deactivate account and click Continue to account deactivation.
Confirming the decision to deactivate the Facebook account by clicking the continue button.
-
Confirm Deactivation: Facebook will ask you to provide a reason for deactivating and may offer options to stay on the platform. After making your selections, you’ll need to re-enter your Facebook password and click Continue to finalize the deactivation process.
Re-entering the password as a final confirmation to deactivate the Facebook account.
Deactivating Facebook on iPhone App
If you primarily use Facebook on your iPhone, deactivating through the app is equally simple.
-
Open the Facebook App: Locate and open the Facebook app on your iPhone or iPad.
-
Access Menu & Settings: Tap the menu icon (three horizontal lines), usually located at the bottom right of the screen. Then, scroll down and tap Settings & Privacy.
Initiating Facebook deactivation directly within the Facebook app on an iOS device.
-
Go to Access and Control: Tap on Settings, then scroll down to the Account section and tap Access and control.
Navigating through ‘Settings & Privacy’ to ‘Access and control’ for account deactivation on the Facebook iPhone app.
-
Deactivation and Deletion: Tap Deactivation and deletion, choose Deactivate account, and then Continue to Account Deactivation. You’ll be prompted to re-enter your password to confirm your decision.
Confirming the Facebook account deactivation request within the iOS app.
Deactivating Facebook on Android App
The process for deactivating Facebook on an Android device is very similar to the iPhone app.
-
Open the Facebook App: Open the Facebook app on your Android phone or tablet.
-
Access Menu & Settings: Tap your profile picture at the top right, then scroll down and select Settings & privacy.
Accessing privacy settings on the Facebook Android app to deactivate an account.
-
Go to Access and Control: Tap Settings, then under the Account section, tap Access and control.
Using the ‘Settings > Access and control’ pathway to deactivate a Facebook account via the Android app.
-
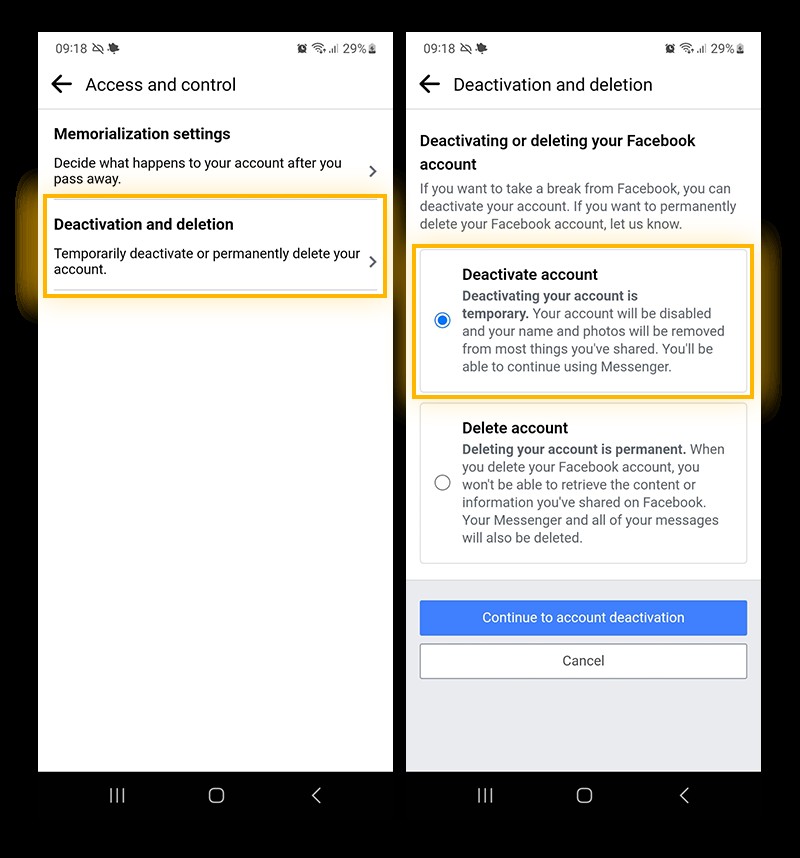
Deactivation and Deletion: Select Deactivation and deletion, choose Deactivate account, and proceed by tapping Continue to Account Deactivation. You’ll need to enter your password again to confirm.
Confirming Facebook account deactivation and re-entering password on Android.
Deleting Your Facebook Account: Permanent Removal
Deleting your Facebook account is a more decisive step. When you delete your account, it initiates a process to permanently remove your profile, photos, posts, videos, and everything else you’ve added. It’s important to note that deletion is permanent, and once the process begins, you typically cannot recover your account or the information within it after a certain grace period (usually 30 days).
Here’s how to permanently delete your Facebook account:
Deleting Facebook via Browser (Desktop)
Deleting your account through a browser is similar to deactivation, with a key difference in the final selection.
-
Log in to Facebook: Go to Facebook.com and log into your account using your username and password.
-
Access Settings & Privacy: Click your profile picture in the top-right corner and select Settings & privacy.
-
Go to Settings & Your Facebook Information: Select Settings and then Your Facebook information from the Privacy menu on the left.
-
Deactivation and deletion: Click on Deactivation and deletion.
-
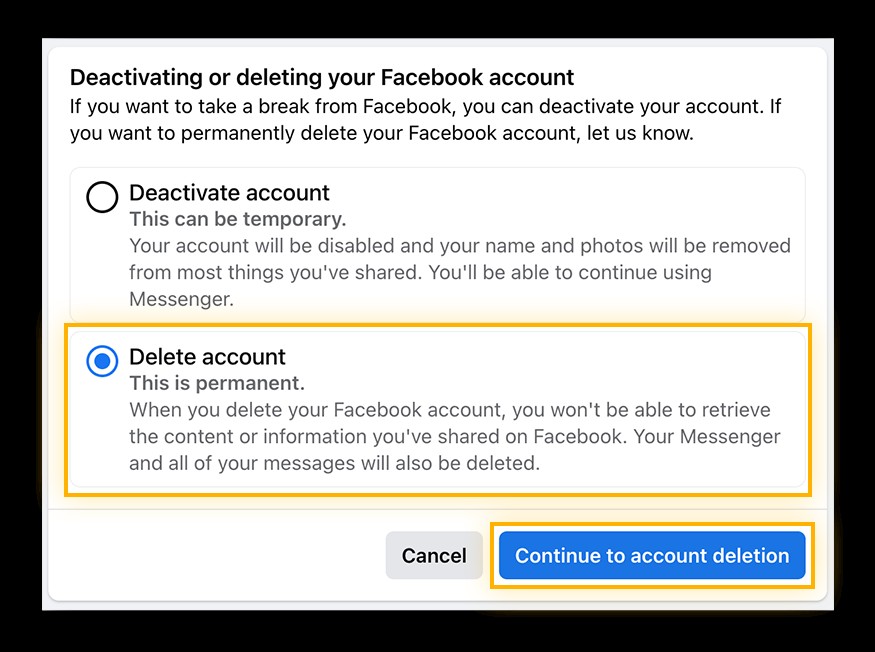
Choose Delete account: This time, select Delete account instead of ‘Deactivate account’, and click Continue to account deletion.
Clicking ‘Continue to account deletion’ to finalize the permanent deletion process on Facebook.
-
Confirm Deletion: Facebook will present you with information about deletion, including the option to download your information. After reviewing, click Delete My Account, enter your password, and complete the process.
Deleting Facebook on iPhone App
Deleting your account using the iPhone app mirrors the deactivation process, just ensure you select ‘delete’ at the crucial step.
- Open Facebook App: Open the Facebook app on your iPhone.
- Access Menu & Settings: Tap the menu icon (three lines) and go to Settings & Privacy.
- Go to Access and Control: Tap Settings and then Access and control.
- Deactivation and Deletion: Select Deactivation and deletion, and this time choose Delete account. Continue with the prompts, and re-enter your password to confirm the permanent deletion.
Deleting Facebook on Android App
Deleting your Facebook account on Android is also very similar to deactivation using the app.
- Open Facebook App: Open the Facebook app on your Android device.
- Access Menu & Settings: Tap the menu icon (three lines) and navigate to Settings & Privacy.
- Go to Access and Control: Select Settings and then Access and control.
- Deactivation and Deletion: Tap Deactivation and deletion, and select Delete account. Follow the on-screen instructions to finalize the permanent deletion, including re-entering your password.
Deactivation vs. Deletion: Key Differences
Choosing between deactivating and deleting your Facebook account depends on your long-term intentions. Here’s a breakdown of the key differences to help you decide:
| Feature | Deactivation | Deletion |
|---|---|---|
| Permanence | Temporary | Permanent |
| Profile Visibility | Hidden from other users | Permanently removed |
| Data Retention | Data is saved and can be restored | Data is scheduled for deletion (may take up to 90 days to fully remove) |
| Messenger Access | Can still use Messenger | Messenger access is lost |
| Reactivation | Account can be reactivated easily by logging in | Account cannot be reactivated; new account needed |
| Data Recovery | All data is restored upon reactivation | Data cannot be recovered after grace period |

Pros and Cons of Deactivating Facebook:
Pros:
- Temporary Break: Ideal for taking a break without losing your profile.
- Keep Messenger: Continue using Facebook Messenger to chat with friends.
- Easy Reactivation: Simply log back in to reactivate your account.
Cons:
- Data Not Deleted: Your data remains on Facebook’s servers.
- Oculus Incompatibility: May affect access to Oculus products linked to your Facebook account.
- Potential for Return: The temptation to reactivate and fall back into old habits might be strong.
Pros and Cons of Deleting Facebook:
Pros:
- Privacy Focused: Reduces your digital footprint and data held by Facebook.
- Permanent Disconnection: Offers a clean break from the platform.
- Data Deletion (Eventually): Facebook aims to delete your data, enhancing your privacy in the long run.
Cons:
- Irreversible (After Grace Period): Once deleted, your account and data are gone for good after the grace period.
- Loss of Data: You’ll lose all your photos, posts, and memories if not backed up.
- Starting Over: Rejoining Facebook means creating a new profile from scratch.
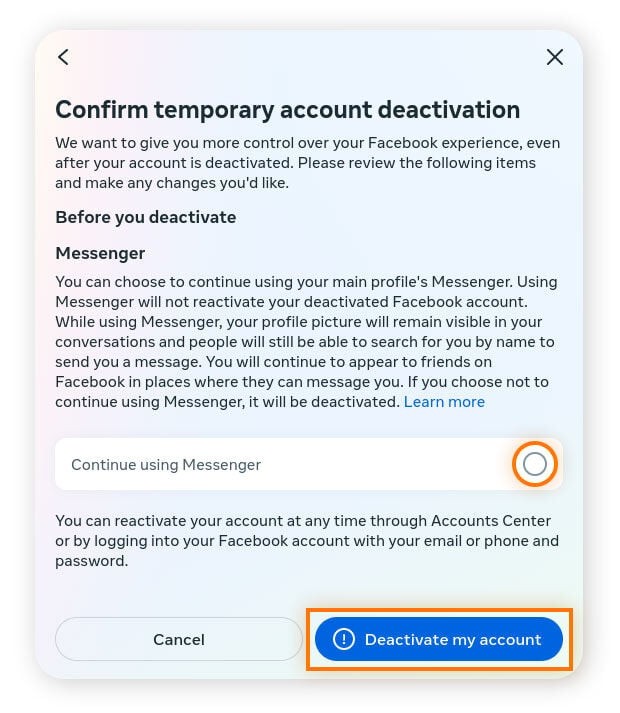
Keeping Messenger While Deactivated
Yes, you can deactivate your Facebook account and continue using Facebook Messenger. When you choose to deactivate, you’ll be given the option to keep using Messenger. This allows you to stay in touch with your Facebook contacts without having an active Facebook profile.
Confirmation prompt during Facebook deactivation, highlighting the option to keep Messenger active.
Reactivating Your Facebook Account
Reactivating a deactivated Facebook account is straightforward. Simply log back into Facebook using your email and password. Your profile, friends, photos, and all other information will be restored as they were before deactivation.
For deleted accounts, there’s a short grace period, typically 30 days, during which you can cancel the deletion and reactivate your account by logging back in. However, after this period, the deletion becomes permanent, and account recovery is no longer possible.
Conclusion:
Deciding to close your Facebook account, whether temporarily through deactivation or permanently through deletion, is a personal choice. Understanding the steps involved and the differences between these options empowers you to take control of your social media presence. Evaluate your needs, consider the pros and cons, and choose the path that aligns best with your digital well-being and privacy goals.