Chicken breast is a fantastic lean protein, incredibly versatile and a staple in many kitchens. However, it’s also notorious for drying out in the oven, leading to meals that are less than enjoyable. If you’ve struggled with dry, rubbery chicken breasts, you’re not alone. But the secret to perfectly cooked, juicy, and tender chicken breast is simpler than you might think. This guide will walk you through a foolproof method – the B.B.R.R.R. technique – to bake chicken breasts that are consistently delicious and moist every time. Get ready to transform your chicken game and say goodbye to dry chicken forever!
Why Chicken Breast is a Great Choice
Chicken breast is a popular choice for health-conscious eaters and busy cooks alike for good reason. It’s packed with lean protein, essential for muscle building and satiety, and low in fat. Chicken breast is also incredibly adaptable to a wide range of flavors and cuisines. From simple weeknight dinners to more elaborate weekend meals, knowing how to cook chicken breast perfectly opens up a world of culinary possibilities. Whether you’re grilling, pan-frying, or, as we’ll focus on here, baking, mastering chicken breast is a fundamental cooking skill. Plus, baked chicken breast is a healthy cooking method that minimizes added fats while maximizing flavor when done right.
The Secret to Perfect Chicken Breast: The B.B.R.R.R. Method
Forget everything you thought you knew about baking chicken breast. The key to unlocking its full potential lies in this simple 5-step method we call B.B.R.R.R.: Brine, Brush, Rub, Roast, Rest. Each step plays a crucial role in ensuring your chicken breasts are not only cooked through but also bursting with flavor and incredibly juicy. Let’s break down each step to understand why they are essential and how to execute them perfectly.
1. Brine: The Foundation for Juicy Chicken
Brining is an absolute game-changer when it comes to cooking chicken breast, especially in the oven. This simple step is the secret weapon against dry, tasteless chicken. But what is brining, and why does it work so well?
Brining is essentially soaking your chicken breasts in a saltwater solution. This process has two major benefits:
- Moisture Retention: The salt in the brine helps the chicken muscles relax and retain moisture during cooking. Think of it as a spa day for your chicken, plumping it up with flavorful liquid.
- Enhanced Flavor: The brine itself adds flavor throughout the chicken, not just on the surface. You can also infuse your brine with herbs, spices, or aromatics for an extra layer of taste.
How to Brine Chicken Breast:
- Prepare the Brine: In a large bowl, dissolve ¼ cup of kosher salt in 2 cups of lukewarm water. Stir until the salt is mostly dissolved.
- Cool the Brine: Add 2 cups of cold water or a handful of ice cubes to quickly cool the brine down. It’s important to start with a cool brine to maintain food safety.
- Submerge the Chicken: Place your boneless, skinless chicken breasts in the brine, ensuring they are fully submerged.
- Brine Time: Let the chicken brine for at least 15 minutes, or up to 6 hours in the refrigerator. For a quick brine, 15-30 minutes works wonders. For a deeper level of moisture, you can brine for longer, but avoid going beyond 6 hours as it can make the chicken too salty or change the texture.
- Rinse and Pat Dry: After brining, remove the chicken from the saltwater and rinse it thoroughly under cold water to remove excess salt. Pat the chicken breasts completely dry with paper towels. This is crucial for good browning in the oven.
Important Note: Always check the packaging of your chicken breasts. Some commercially sold chicken is already pre-brined in a sodium solution. If your chicken is pre-brined, skip this step to avoid overly salty chicken.
2. Brush: Moisture and Flavor Carrier
Brushing the chicken breasts with melted butter or olive oil is the next essential step in our B.B.R.R.R. method. This step serves multiple purposes:
- Moisture Infusion: Butter or olive oil adds another layer of moisture to the chicken, contributing to the overall juiciness. Butter, in particular, adds a richness and flavor that complements chicken beautifully.
- Browning and Crispness: Fat helps the chicken brown beautifully in the oven, creating a slightly crispy and appealing exterior.
- Seasoning Adhesion: The butter or oil acts as a binder, helping your chosen seasonings adhere evenly to the chicken breasts, maximizing flavor in every bite.
How to Brush Chicken Breast:
- Melt Butter (or Prepare Olive Oil): Melt butter in the microwave or on the stovetop. Alternatively, have your olive oil ready.
- Generously Brush: Using a pastry brush, liberally brush melted butter or olive oil over all sides of the chicken breasts. Ensure every surface is coated for optimal results.
- Prepare Baking Dish: Brushing also prevents the chicken from sticking to the baking dish. You can lightly grease your baking dish or roasting pan as an extra precaution, although the brushed oil/butter usually suffices.
3. Rub: Flavor Explosion
Now it’s time to infuse your chicken breasts with flavor! While you could simply use salt and pepper, a well-chosen spice rub can elevate your baked chicken breast from ordinary to extraordinary. This is where you can get creative and customize the flavor profile to your liking.
Seasoning Options for Chicken Breast Rub:
- Simple & Classic: Salt, freshly ground black pepper, and garlic powder are a fantastic base that works with almost any dish.
- Smoked Paprika Blend: As used in the original recipe, smoked paprika, garlic powder, salt, and pepper create a savory, slightly smoky flavor that’s incredibly versatile.
- Italian Herb Blend: Dried oregano, basil, thyme, rosemary, garlic powder, and a pinch of red pepper flakes bring a Mediterranean flair.
- Lemon-Herb Blend: Lemon zest, dried thyme, rosemary, garlic powder, and salt create a bright and fresh flavor profile.
- Spicy Southwestern Blend: Chili powder, cumin, coriander, smoked paprika, cayenne pepper, garlic powder, onion powder, salt, and pepper for a flavorful kick.
- Asian-Inspired Blend: Ginger powder, garlic powder, onion powder, white pepper, and a touch of five-spice powder for an exotic twist.
How to Rub Chicken Breast with Seasonings:
- Combine Seasonings: In a small bowl, mix together your chosen spices and herbs.
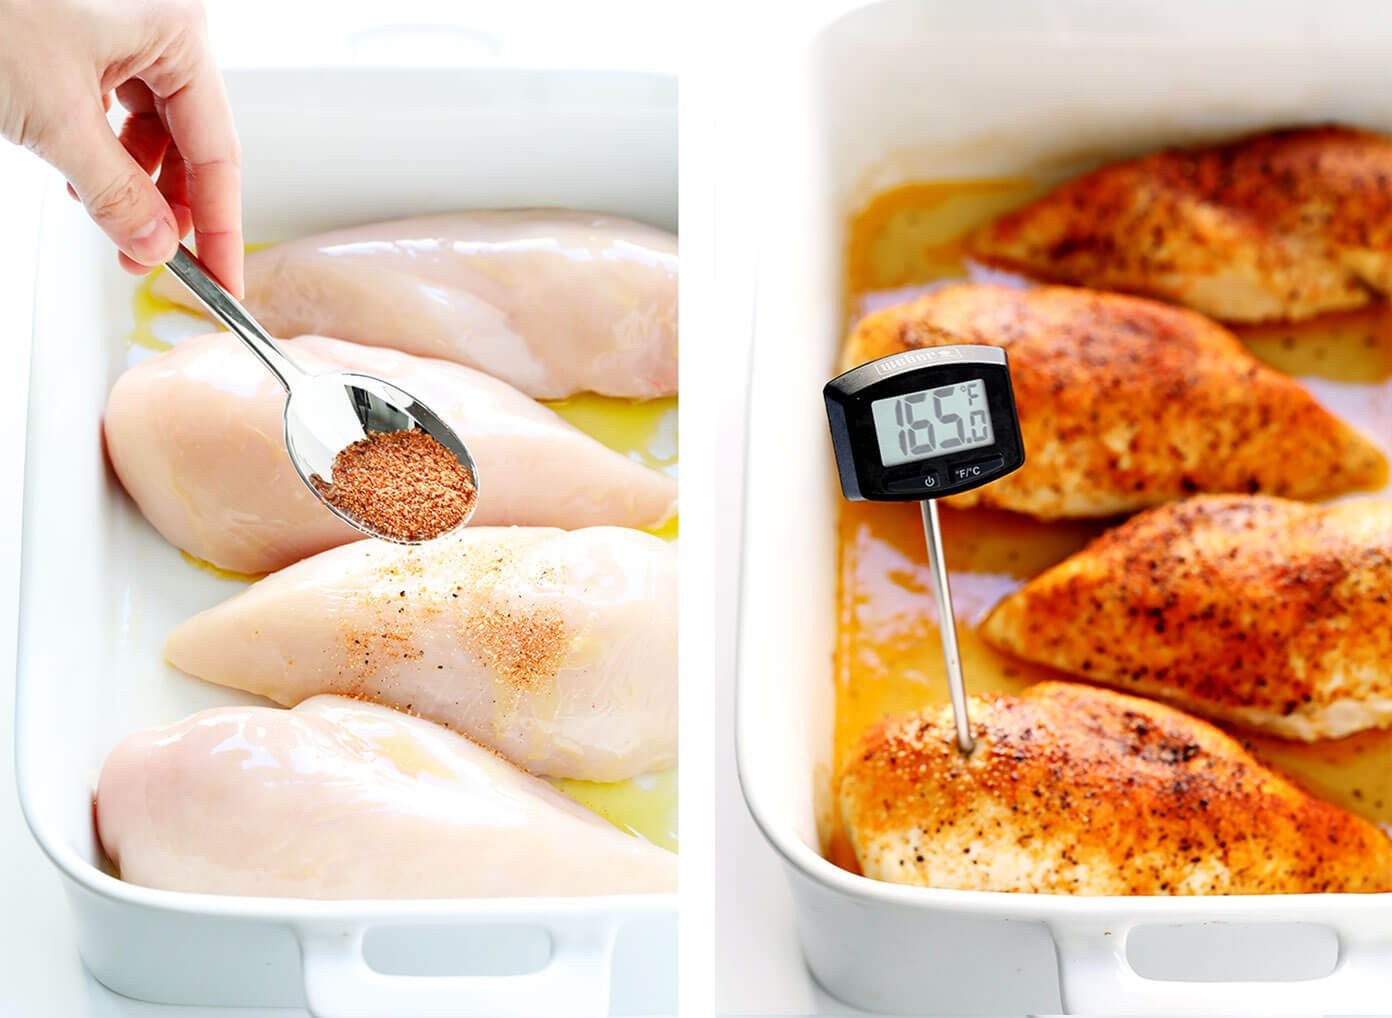
- Generously Season: Sprinkle the seasoning mixture evenly over both sides of the buttered/oiled chicken breasts. Use your hands to gently rub the seasonings into the chicken, ensuring even coverage. Don’t be shy with the seasoning; chicken breast can handle a good amount of flavor.
4. Roast: The Art of Perfect Cooking Time and Temperature
Roasting is where the magic happens, but it’s also the step where many home cooks go wrong, resulting in dry chicken. The key is understanding the right temperature and cooking time. While low and slow cooking might seem intuitive for keeping chicken moist, high-heat roasting is actually the preferred method for chicken breasts.
Why High-Heat Roasting at 450°F (232°C)?
- Quick Cooking: High heat cooks the chicken quickly, minimizing moisture loss.
- Crispy Exterior: It creates a beautiful, slightly crispy “crust” on the outside, which not only enhances texture but also helps to seal in the juices.
- Tender Interior: When done correctly, high-heat roasting results in a surprisingly tender and juicy interior, contrary to common misconceptions.
How to Roast Chicken Breast:
- Preheat Oven: Preheat your oven to a high temperature of 450°F (232°C). Make sure your oven is fully preheated for accurate cooking.
- Arrange Chicken: Place the seasoned chicken breasts in a single layer in a baking dish or roasting pan. Avoid overcrowding the pan, as this can steam the chicken instead of roasting it.
- Roast Time: Bake for 15-18 minutes, depending on the thickness of your chicken breasts. Thicker breasts will require slightly longer cooking time.
- Use a Meat Thermometer: The most foolproof way to ensure perfectly cooked chicken is to use a meat thermometer. The safe internal temperature for cooked chicken is 165°F (74°C). Insert the thermometer into the thickest part of a chicken breast to check the temperature.
- Broiling for Extra Browning (Optional): If you desire a more browned and crispier top, you can turn on the broiler for the last 3-5 minutes of cooking. Watch closely to prevent burning.
Avoiding Overcooked Chicken: Overcooking is the biggest culprit for dry chicken. Rely on a meat thermometer rather than just cooking time to prevent this. Once the chicken reaches 165°F, it’s done!
5. Rest: Locking in the Juiciness
Resting is the final, and often overlooked, step in the B.B.R.R.R. method, but it’s just as crucial as the others for achieving truly juicy chicken. Think of resting as allowing the chicken to relax and redistribute its juices after the intense heat of the oven.
Why Rest Chicken Breast?
- Juice Redistribution: During cooking, the juices in the chicken are pushed towards the center. Resting allows these juices to redistribute evenly throughout the meat, resulting in a more consistently moist and flavorful chicken breast.
- Tenderization: Resting also allows the muscle fibers to relax, making the chicken more tender.
How to Rest Chicken Breast:
- Remove from Oven and Pan: Once the chicken reaches 165°F, remove the baking dish from the oven and transfer the chicken breasts to a clean plate or cutting board.
- Tent with Foil: Loosely tent the chicken breasts with aluminum foil. This helps to keep the chicken warm while it rests without steaming it.
- Rest Time: Let the chicken rest for 5-10 minutes before slicing or serving. Resist the urge to cut into it immediately!
Seasoning Variations to Elevate Your Chicken Breast
While the classic paprika-garlic-pepper blend is delicious and versatile, don’t be afraid to experiment with different seasoning combinations to create exciting flavor profiles. Here are a few ideas to get you started:
- Mediterranean Chicken: Use a blend of dried oregano, basil, thyme, rosemary, lemon zest, and garlic powder. Serve with a Greek salad or roasted vegetables.
- Taco Chicken: Combine chili powder, cumin, coriander, smoked paprika, onion powder, garlic powder, and a pinch of cayenne pepper. Shred and use in tacos, burritos, or salads.
- Lemon Herb Chicken: Mix lemon zest, dried thyme, rosemary, parsley, garlic powder, and black pepper. Serve with roasted potatoes and green beans.
- Honey Garlic Chicken: Brush the chicken with a mixture of honey, soy sauce, minced garlic, and ginger after baking for a sweet and savory glaze.
- Blackened Chicken: Use a blackened seasoning blend with paprika, cayenne pepper, onion powder, garlic powder, thyme, oregano, and black pepper for a spicy and smoky flavor.
Serving Suggestions for Baked Chicken Breast
Baked chicken breast is incredibly versatile and can be served in countless ways. Here are a few ideas:
- Classic Main Course: Serve sliced or whole chicken breasts alongside your favorite side dishes like roasted vegetables, mashed potatoes, rice, quinoa, or salad.
- Salads: Slice or dice baked chicken breast and add it to salads for a protein boost. It’s delicious in Caesar salads, Cobb salads, or mixed green salads.
- Pasta Dishes: Shred or dice baked chicken breast and add it to pasta sauces like marinara, pesto, or Alfredo.
- Sandwiches and Wraps: Slice baked chicken breast and use it in sandwiches, wraps, or paninis with your favorite toppings and sauces.
- Meal Prep: Baked chicken breast is perfect for meal prepping. Cook a batch on the weekend and use it throughout the week in various dishes.
Storing Leftover Chicken Breast
Leftover baked chicken breast is a valuable asset for quick meals. To store it properly:
- Cool Completely: Allow the chicken to cool completely before storing.
- Airtight Container: Store in an airtight container in the refrigerator for up to 3-4 days.
- Freezing: For longer storage, you can freeze baked chicken breast for up to 2-3 months. Slice, dice, or shred the chicken before freezing for easier use later. Thaw overnight in the refrigerator before reheating.
Reheating Tips: To reheat baked chicken breast without drying it out, consider these methods:
- Microwave (with moisture): Place the chicken breast on a microwave-safe plate with a tablespoon of water or broth. Cover and microwave in short intervals until heated through.
- Oven (low and slow): Wrap the chicken breast in foil with a little broth or water and reheat in a low oven (around 325°F/160°C) until warmed through.
- Skillet (with moisture): Slice or shred the chicken and reheat it in a skillet with a little olive oil or broth over medium heat, stirring occasionally.
Conclusion
Mastering how to cook chicken breast is a fundamental cooking skill that will empower you to create countless healthy and delicious meals. By following the B.B.R.R.R. method – Brine, Brush, Rub, Roast, Rest – you can consistently bake chicken breasts that are juicy, tender, and full of flavor. Say goodbye to dry chicken and hello to perfectly cooked chicken breast every time! Try this method out and let us know in the comments how it transformed your chicken cooking experience!